 Tweet
Tweet
There recently was a thread by mack called 'For Discussion' and he asked what happens if you install your stock cam sprockets with the little arrow pointing down (180 degrees out). I volunteered to give it a test since I have the measurement equipment and happen to have my stock sprockets installed at present and thought it would be interesting to see the impact, if any. Besides, I did not have anything important to do Saturday morning anyway for a change. So what follows is my finding on the difference in lobe centers if the cam sprockets are installed with the arrow pointed down. Yep, pictures too!
I like everything I do to be a learning experience for not only myself but for others. So for those that know about dealing with camshafts then skim over but for those who might not know more than the 'I know its that bumpy thing under the valve cover', I hope you can gain something from this little exercise. The dual overhead cams on our motors provide a nice little extra tuning feature if you decide to go the route of adjustable cam sprockets. That is the reason I have the aforementioned measuring tools. Will tuning in your cams give a kick in the pants? Nope, but adjusting your cam events can pull the power and torque curves more in line with your riding style. You won’t get more power but you can feel the performance gain if done right.
First a word of caution to anyone thinking of tinkering with their cams or trying to adjust cam timing using slotted sprockets without having accurate measuring equipment. Changing out cams or sprockets on an XS11 using the stock stuff is ok to do because you have no adjustment and are basically locked in to the factory cam specs. If the dots and arrows align then you are good to go. But if you ever decide to ‘degree in’ your cams using adjustable sprockets, it is imperative that you do several things using quality equipment otherwise there will be a real possibility that piston/valve collision will happen. At the minimum, performance may drop off. On top of this, all measurements are very small and using anything other than good equipment will yield questionable results. For instance, some people say you can make a cardboard degree wheel and use a soda straw to locate Top Dead Center (TDC). I would recommend you do not use such methods when dealing with cam adjustments. Anyone serious about cam timing should have the right tools. Motion Pro makes a very nice 9” degree wheel (part number 08-0092) and there is enough space between marks to pick out a half degree. Summit Racing has a good dial indicator set in their catalogue. This is what I use in addition to a home made piston stop. One other thing, some simple math is required and I am sure there are several formulas that will give the same result so the way I deal with finding the lobe center may be different from some other people but the formulas are simple and my method will work on any motorcycle motor (or car motor or lawnmower motor).
The first thing I did was look at a stock sprocket.
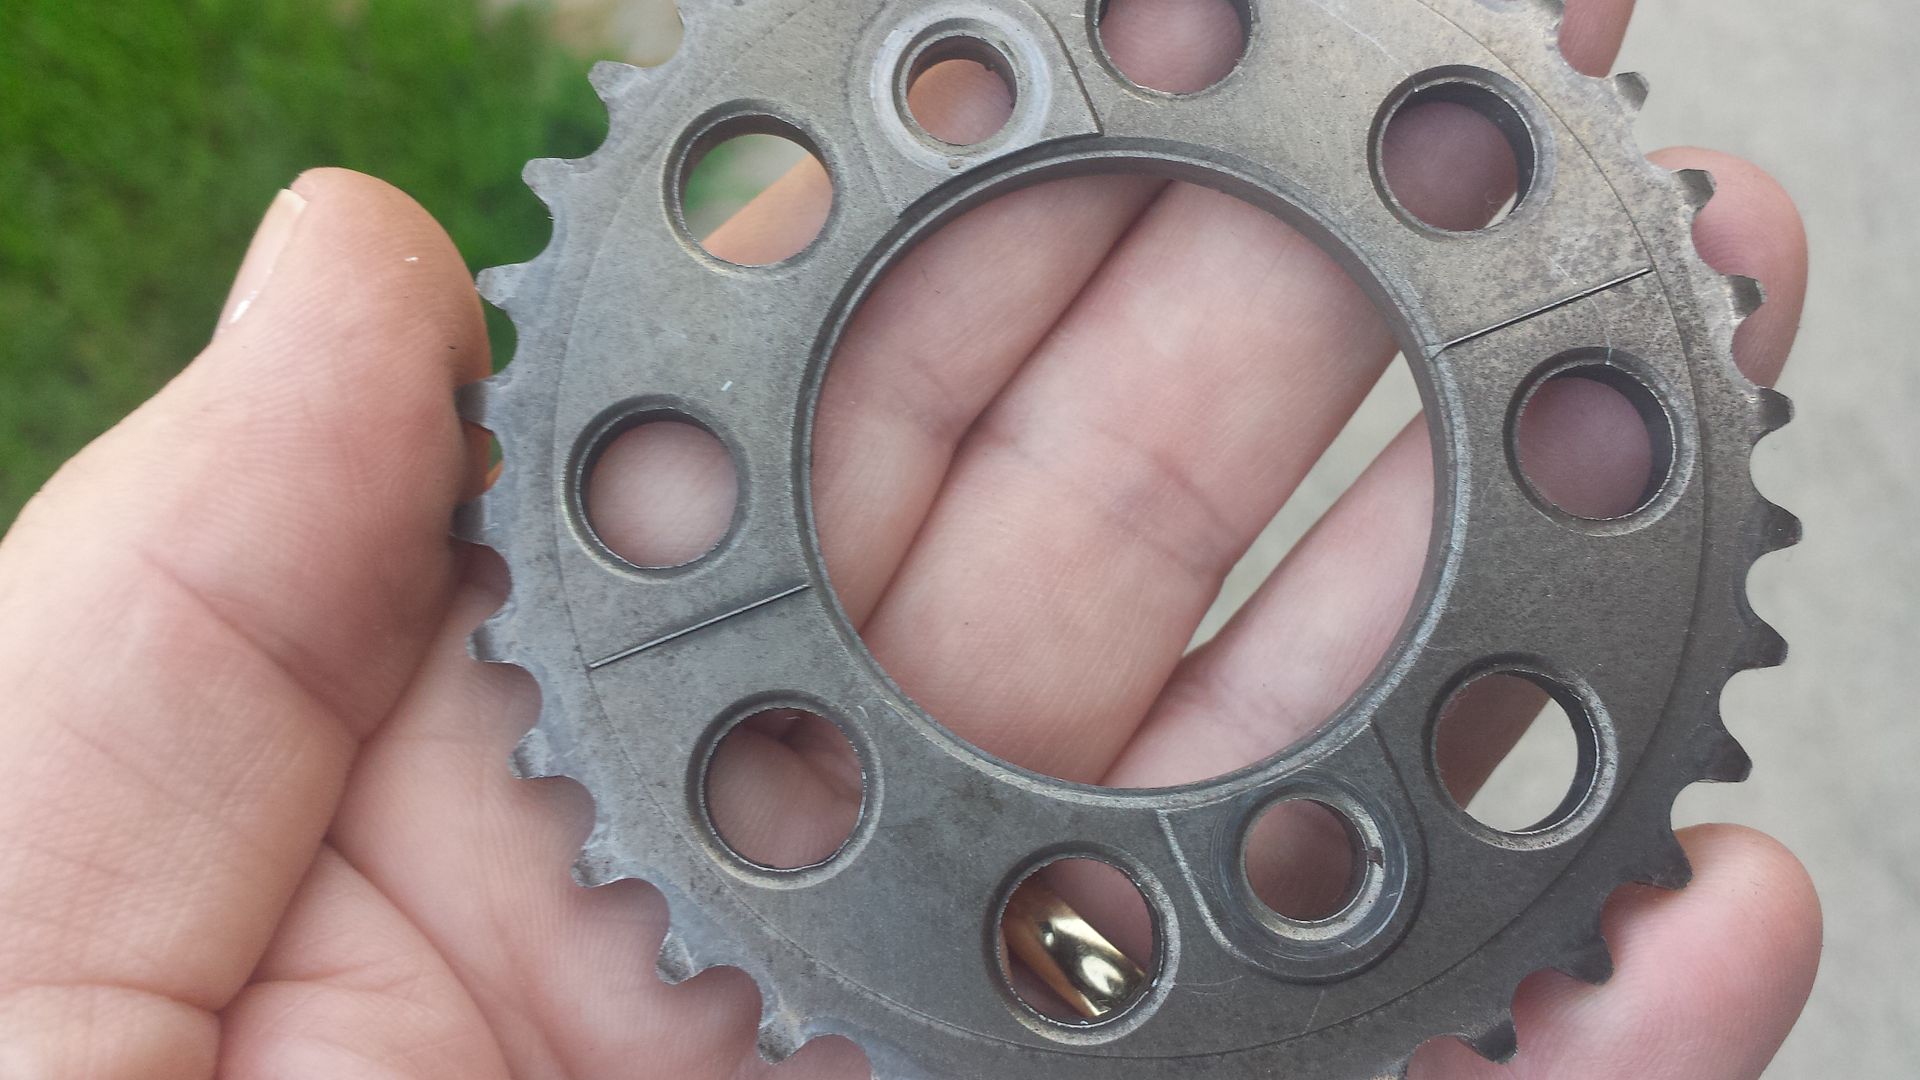
I noticed the forging line across the sprocket ends in the valley between teeth directly across from each other. I was almost ready to call it a wash right there but then I thought there might be a degree or two in there that you just cannot see. Also, the forging line is not intended to be an index or anything so, I decided to spend my morning tinkering. OK, here we go!
First, set up the degree wheel and find true TDC. I say true TDC because at the point where the crank throws over the top at TDC can be several degrees of crank rotation where the top of the piston is not really moving in the cylinder. So to find true TDC you must be in the center of this range. It is imperative that true TDC is found because if not then the real relationship of the cam to the crank will not be known. There are several methods but in my opinion a piston stop and a degree wheel is the best method for finding the true TDC.


Remove all spark plugs, gas tank, left side timing cover valve cover and any other stuff that might get in the way. Using the stock timing plate rotate the motor to the T mark to place the motor at approximate TDC and then mount your degree wheel using a long hex bolt in place of the stock bolt through the timing plate. Place the degree wheel close to what you feel is TDC and tighten the hex bolt. It does not need to be accurate at present. Install a pointer to the side of the motor and adjust it to zero on your degree wheel. Now let’s find true TDC. Rotate the motor backwards (counter clockwise on the XS11) about 20 degrees and screw in a piston stop in the #1 spark plug hole until it touches the top of the piston. Now continue to rotate the crank all the way around backwards until it touches the stop and record the reading on your degree wheel. Now we rotate the crank forward (clockwise) until it again touches the stop and record that reading. Add the readings together, divide by two and subtract the smaller reading. For example, 25 deg on one side at the stop and 22 degrees on the other stop means 25+22 / 2 -22 = 1.5 degrees on the side of zero that has the higher number is true TDC. Remove the piston stop and rotate the motor until the pointer is on 1.5 degrees past the TDC mark on the degree wheel on the side of the high number reading. This is the true TDC. Now adjust the pointer until it is exactly on zero (the TDC mark) or you can carefully rotate the degree wheel without moving the crankshaft at all whatsoever until the pointer is on the TDC mark. Again, make sure you do not move the crankshaft whatsoever if you do it this way.
You are now on true TDC and this should be confirmed by installing the piston stop again and this time the readings should match on both sides of TDC. If they do not then re-do the procedure. Throughout all the rest of the measurements take care not to touch or move the pointer otherwise you must start over at the beginning if it moves.
Second, find the lobe center. There are several parts of the typical cam lobe; nose, flank, opening and closing ramps, base circle, etc. We will be dealing with finding the exact center of the nose. There are a couple of ways to measure the cam lobe. Many people use the method of where the whole lobe is measured off of the base circle using a checking height, usually .040” or .050” eliminating the transition from the base circle to the opening and closing ramps from consideration. But if just checking for the lobe centers I rather use a method that works directly around the top of the lobe and disregards virtually everything on the opening and closing ramps of the cam lobe. Rotate the crank shaft forward until the cam lobe on #1 intake is at maximum lift. This is the position of the lobe center location but due to cam grinding tolerance, wear, symmetry of the lobe profile and other considerations, we must find the true lobe center using a procedure similar to what you used to find true TDC using a point between two known points.
Install the dial indicator so the pin rides on the top of the #1 intake shim.
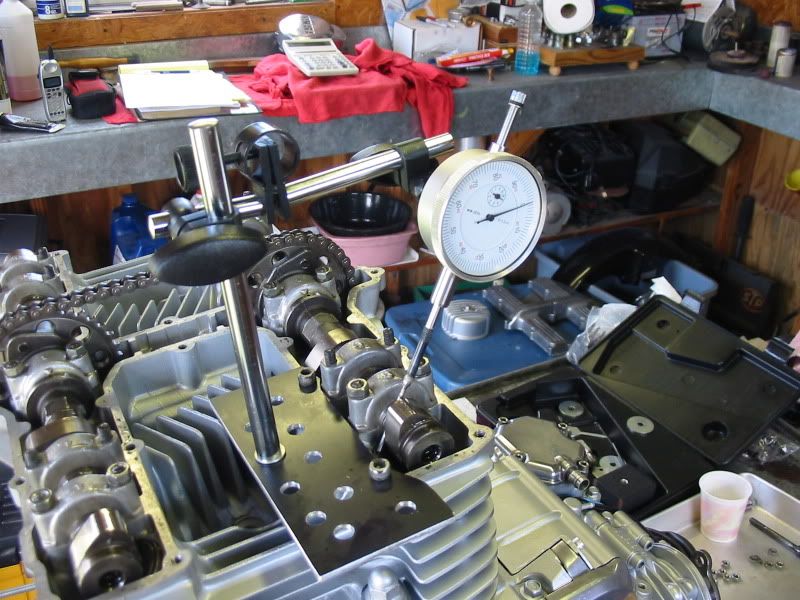
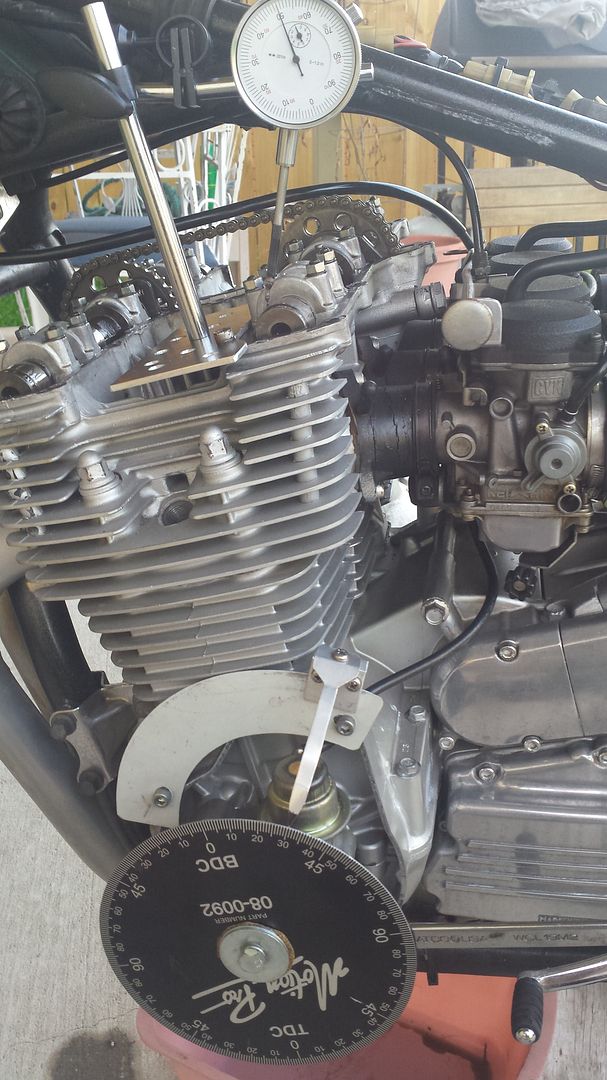
The picture above is an older pic I had but it is the same motor and tools. The dial I use has a 1” travel and the pin at the bottom must be thin enough to ride the exposed top of the shim without binding on the camshaft or the edge of the valve bucket bore. You may need to modify the end of your pin to clear everything as it is close quarters. Mount the dial indicator to the motor and not to the frame. Mounting the dial to the frame will give erroneous readings due to the give in the motor mounts. Turn the crankshaft forward until the #1 lobe is at full lift and then zero out your dial indicator like in the picture below. This can be determined when the dial indicator needle stops and begins to move the other direction as the nose of the intake lobe reaches maximum lift. Try to be as accurate as you can. Notice on the degree wheel the pointer is nowhere near the factory 101 degrees so we have to do more work to find the true lobe center. Oh, and no comments about the oil dripping into the pan from my filter bolt.
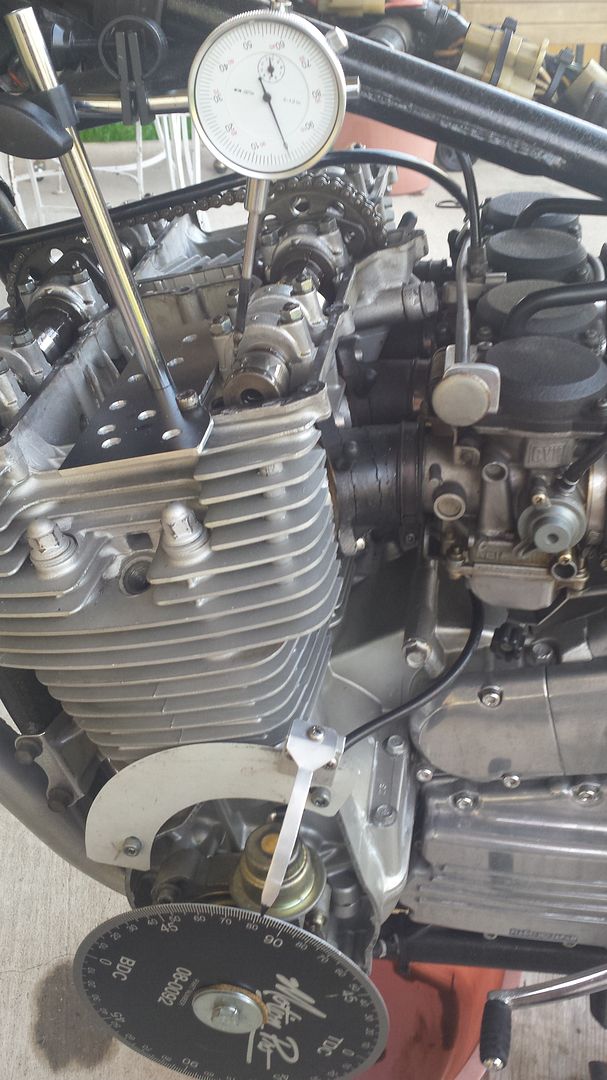
I use a .050” checking height on each side of the nose so now rotate the motor backwards about ¼ turn and then forward until the dial indicator stops exactly at .050” on the opening side of the lobe. This takes all the slack out of the valve train. Record the degree reading on the wheel. In the pic below you will see it is on 54 degrees ATDC.
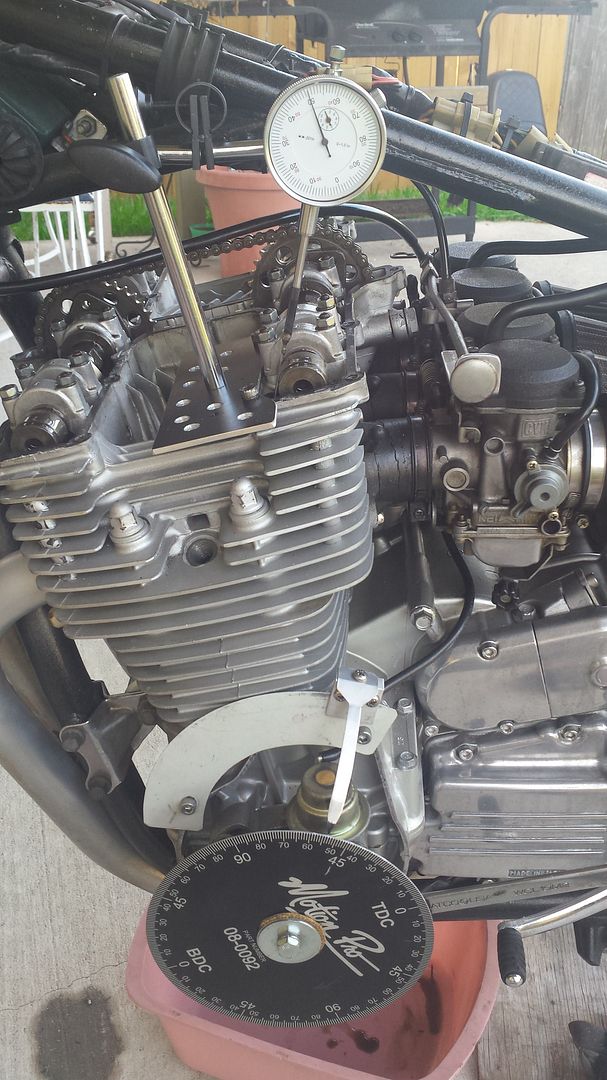
Now continue to rotate forward until the needle goes to zero and back to exactly .050” on the closing side of the lobe and take another reading on the degree wheel. It is now on 150 degrees ATDC.
Add the two readings together and divide by 2 and this is the true lobe center for the cam lobe irrespective of the symmetry of the cam lobe or of any slack in the valve train.
The factory figures on the XS11 stock cam lobe centers for both intake and exhaust is 101 degrees. I checked mine using the above method to confirm this and to set a base line for the exercise. Here are my results. Opening ramp was 54 degrees ATDC and the closing ramp was 150 degrees ATDC. And so 54+150 / 2 = 102 degrees ATDC so my intake cam is one crankshaft degree retarded from the factory figures. This may be because of several things but most probably cam chain stretch. To verify I disrupted the mount of the dial indicator and re-mounted it and then took the readings again. The numbers were exactly the same so 102 degrees ATDC on the intake cam is my baseline today.
Using this method instead of measuring off of the base circle of the cam will not give the data needed to calculate things like total duration, valve overlap events, maximum lift, etc. but if establishing the lobe center is the goal (like if you are degreeing in your cams) then this method surpasses the others as it disregards everything else on the cam profile other than the lobe center.
Now, let’s see what happens if we spin the stock cam sprocket 180 degrees on the camshaft like if it is installed upside down like this.
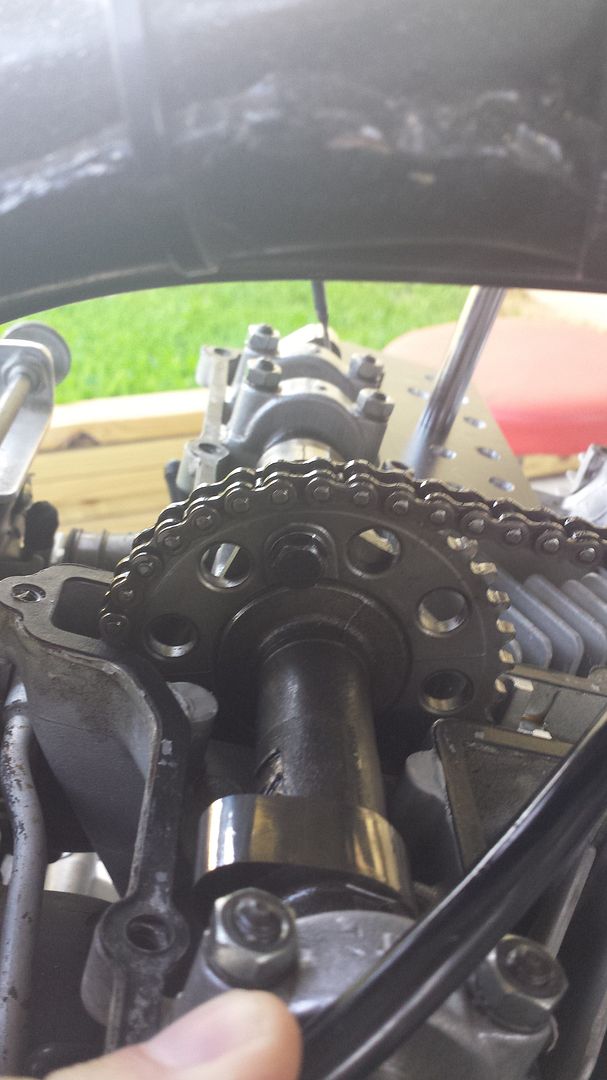
I rotated the motor until the camshaft bolt at the bottom was exposed and removed the bolt. I rotated the cam back up top and slacked the cam chain tensioner and removed the bridge between the sprockets. I removed the upper bolt, disengaged the sprocket from the chain and rotated it 180 degrees and then re-installed the bolt through the factory hole. I snugged up the cam chain tensioner and checked the lobe center again using the same procedure as above. The results for two more successive tries disrupting the dial indicator between each try were exactly the same, 102 degrees ATDC. So from this I conclude that installing your XS11 cam sprockets upside down has no effect whatsoever on cam timing.
What about adjustable cam sprockets that will allow you to degree your cams? Well as I stated above there are certainly some advantages to this added tuning option. It allows one to dial in when the power comes on or move the torque curve down in the RPM range or set them to let her breath at very high RPM. It is an excellent tuning tool when you have mods like a 4-1 header or some head porting and/or pod filters. But installing slotted sprockets does have a one-time cost and a continuing maintenance requirement. The measurement tools (as used here) will run about $100.00 and then several times of popping the valve cover off to make an adjustment until you find your particular sweet spot (which then becomes your tuning baseline). By the way, I find that the exhaust cam has virtually no effect on performance, it is all in the intake cam. But you have to do both. Then, every year I recommend it all be mounted up and the cam timing checked though, I never have found any real movement from year to year. Will you get that big kick in the pants performance gain? Again, nope. But you can definitely make the power come on when you want it, flatten the power curve or make it peak at high RPMs, depending on the kind of riding you do. But then, this is fodder for a subject that is best left for another time.
Oh one more thing. While the degree wheel installed, do take advantage and set/check the ignition timing and ignition advance curves with an great degree of accuracy over the marks on the stock timing plate. Once you see how accurate you can set your ignition timing you will be tempted to install a degree wheel and find TDC just to time your ignition.
Thanks for reading
Mike
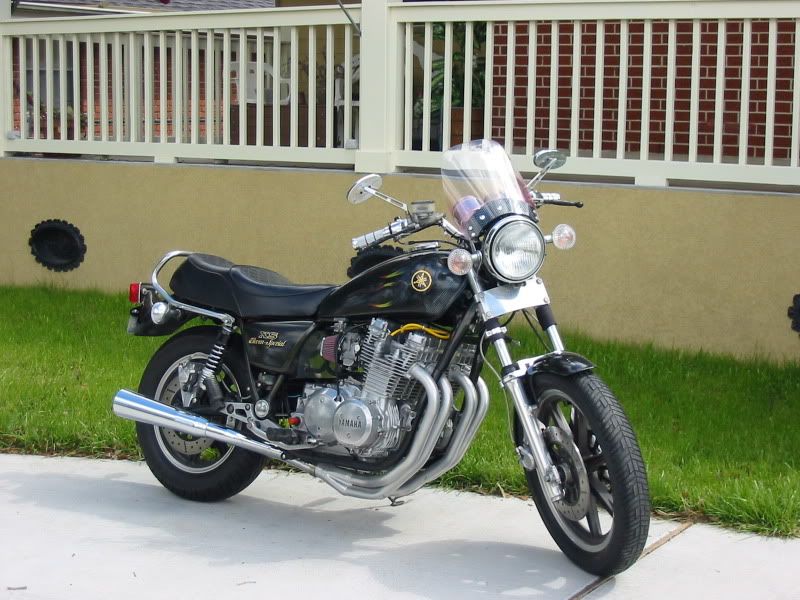
My bike this was done on and my smiling face

I like everything I do to be a learning experience for not only myself but for others. So for those that know about dealing with camshafts then skim over but for those who might not know more than the 'I know its that bumpy thing under the valve cover', I hope you can gain something from this little exercise. The dual overhead cams on our motors provide a nice little extra tuning feature if you decide to go the route of adjustable cam sprockets. That is the reason I have the aforementioned measuring tools. Will tuning in your cams give a kick in the pants? Nope, but adjusting your cam events can pull the power and torque curves more in line with your riding style. You won’t get more power but you can feel the performance gain if done right.
First a word of caution to anyone thinking of tinkering with their cams or trying to adjust cam timing using slotted sprockets without having accurate measuring equipment. Changing out cams or sprockets on an XS11 using the stock stuff is ok to do because you have no adjustment and are basically locked in to the factory cam specs. If the dots and arrows align then you are good to go. But if you ever decide to ‘degree in’ your cams using adjustable sprockets, it is imperative that you do several things using quality equipment otherwise there will be a real possibility that piston/valve collision will happen. At the minimum, performance may drop off. On top of this, all measurements are very small and using anything other than good equipment will yield questionable results. For instance, some people say you can make a cardboard degree wheel and use a soda straw to locate Top Dead Center (TDC). I would recommend you do not use such methods when dealing with cam adjustments. Anyone serious about cam timing should have the right tools. Motion Pro makes a very nice 9” degree wheel (part number 08-0092) and there is enough space between marks to pick out a half degree. Summit Racing has a good dial indicator set in their catalogue. This is what I use in addition to a home made piston stop. One other thing, some simple math is required and I am sure there are several formulas that will give the same result so the way I deal with finding the lobe center may be different from some other people but the formulas are simple and my method will work on any motorcycle motor (or car motor or lawnmower motor).
The first thing I did was look at a stock sprocket.

I noticed the forging line across the sprocket ends in the valley between teeth directly across from each other. I was almost ready to call it a wash right there but then I thought there might be a degree or two in there that you just cannot see. Also, the forging line is not intended to be an index or anything so, I decided to spend my morning tinkering. OK, here we go!
First, set up the degree wheel and find true TDC. I say true TDC because at the point where the crank throws over the top at TDC can be several degrees of crank rotation where the top of the piston is not really moving in the cylinder. So to find true TDC you must be in the center of this range. It is imperative that true TDC is found because if not then the real relationship of the cam to the crank will not be known. There are several methods but in my opinion a piston stop and a degree wheel is the best method for finding the true TDC.


Remove all spark plugs, gas tank, left side timing cover valve cover and any other stuff that might get in the way. Using the stock timing plate rotate the motor to the T mark to place the motor at approximate TDC and then mount your degree wheel using a long hex bolt in place of the stock bolt through the timing plate. Place the degree wheel close to what you feel is TDC and tighten the hex bolt. It does not need to be accurate at present. Install a pointer to the side of the motor and adjust it to zero on your degree wheel. Now let’s find true TDC. Rotate the motor backwards (counter clockwise on the XS11) about 20 degrees and screw in a piston stop in the #1 spark plug hole until it touches the top of the piston. Now continue to rotate the crank all the way around backwards until it touches the stop and record the reading on your degree wheel. Now we rotate the crank forward (clockwise) until it again touches the stop and record that reading. Add the readings together, divide by two and subtract the smaller reading. For example, 25 deg on one side at the stop and 22 degrees on the other stop means 25+22 / 2 -22 = 1.5 degrees on the side of zero that has the higher number is true TDC. Remove the piston stop and rotate the motor until the pointer is on 1.5 degrees past the TDC mark on the degree wheel on the side of the high number reading. This is the true TDC. Now adjust the pointer until it is exactly on zero (the TDC mark) or you can carefully rotate the degree wheel without moving the crankshaft at all whatsoever until the pointer is on the TDC mark. Again, make sure you do not move the crankshaft whatsoever if you do it this way.
You are now on true TDC and this should be confirmed by installing the piston stop again and this time the readings should match on both sides of TDC. If they do not then re-do the procedure. Throughout all the rest of the measurements take care not to touch or move the pointer otherwise you must start over at the beginning if it moves.
Second, find the lobe center. There are several parts of the typical cam lobe; nose, flank, opening and closing ramps, base circle, etc. We will be dealing with finding the exact center of the nose. There are a couple of ways to measure the cam lobe. Many people use the method of where the whole lobe is measured off of the base circle using a checking height, usually .040” or .050” eliminating the transition from the base circle to the opening and closing ramps from consideration. But if just checking for the lobe centers I rather use a method that works directly around the top of the lobe and disregards virtually everything on the opening and closing ramps of the cam lobe. Rotate the crank shaft forward until the cam lobe on #1 intake is at maximum lift. This is the position of the lobe center location but due to cam grinding tolerance, wear, symmetry of the lobe profile and other considerations, we must find the true lobe center using a procedure similar to what you used to find true TDC using a point between two known points.
Install the dial indicator so the pin rides on the top of the #1 intake shim.

The picture above is an older pic I had but it is the same motor and tools. The dial I use has a 1” travel and the pin at the bottom must be thin enough to ride the exposed top of the shim without binding on the camshaft or the edge of the valve bucket bore. You may need to modify the end of your pin to clear everything as it is close quarters. Mount the dial indicator to the motor and not to the frame. Mounting the dial to the frame will give erroneous readings due to the give in the motor mounts. Turn the crankshaft forward until the #1 lobe is at full lift and then zero out your dial indicator like in the picture below. This can be determined when the dial indicator needle stops and begins to move the other direction as the nose of the intake lobe reaches maximum lift. Try to be as accurate as you can. Notice on the degree wheel the pointer is nowhere near the factory 101 degrees so we have to do more work to find the true lobe center. Oh, and no comments about the oil dripping into the pan from my filter bolt.

I use a .050” checking height on each side of the nose so now rotate the motor backwards about ¼ turn and then forward until the dial indicator stops exactly at .050” on the opening side of the lobe. This takes all the slack out of the valve train. Record the degree reading on the wheel. In the pic below you will see it is on 54 degrees ATDC.

Now continue to rotate forward until the needle goes to zero and back to exactly .050” on the closing side of the lobe and take another reading on the degree wheel. It is now on 150 degrees ATDC.

Add the two readings together and divide by 2 and this is the true lobe center for the cam lobe irrespective of the symmetry of the cam lobe or of any slack in the valve train.
The factory figures on the XS11 stock cam lobe centers for both intake and exhaust is 101 degrees. I checked mine using the above method to confirm this and to set a base line for the exercise. Here are my results. Opening ramp was 54 degrees ATDC and the closing ramp was 150 degrees ATDC. And so 54+150 / 2 = 102 degrees ATDC so my intake cam is one crankshaft degree retarded from the factory figures. This may be because of several things but most probably cam chain stretch. To verify I disrupted the mount of the dial indicator and re-mounted it and then took the readings again. The numbers were exactly the same so 102 degrees ATDC on the intake cam is my baseline today.
Using this method instead of measuring off of the base circle of the cam will not give the data needed to calculate things like total duration, valve overlap events, maximum lift, etc. but if establishing the lobe center is the goal (like if you are degreeing in your cams) then this method surpasses the others as it disregards everything else on the cam profile other than the lobe center.
Now, let’s see what happens if we spin the stock cam sprocket 180 degrees on the camshaft like if it is installed upside down like this.

I rotated the motor until the camshaft bolt at the bottom was exposed and removed the bolt. I rotated the cam back up top and slacked the cam chain tensioner and removed the bridge between the sprockets. I removed the upper bolt, disengaged the sprocket from the chain and rotated it 180 degrees and then re-installed the bolt through the factory hole. I snugged up the cam chain tensioner and checked the lobe center again using the same procedure as above. The results for two more successive tries disrupting the dial indicator between each try were exactly the same, 102 degrees ATDC. So from this I conclude that installing your XS11 cam sprockets upside down has no effect whatsoever on cam timing.
What about adjustable cam sprockets that will allow you to degree your cams? Well as I stated above there are certainly some advantages to this added tuning option. It allows one to dial in when the power comes on or move the torque curve down in the RPM range or set them to let her breath at very high RPM. It is an excellent tuning tool when you have mods like a 4-1 header or some head porting and/or pod filters. But installing slotted sprockets does have a one-time cost and a continuing maintenance requirement. The measurement tools (as used here) will run about $100.00 and then several times of popping the valve cover off to make an adjustment until you find your particular sweet spot (which then becomes your tuning baseline). By the way, I find that the exhaust cam has virtually no effect on performance, it is all in the intake cam. But you have to do both. Then, every year I recommend it all be mounted up and the cam timing checked though, I never have found any real movement from year to year. Will you get that big kick in the pants performance gain? Again, nope. But you can definitely make the power come on when you want it, flatten the power curve or make it peak at high RPMs, depending on the kind of riding you do. But then, this is fodder for a subject that is best left for another time.
Oh one more thing. While the degree wheel installed, do take advantage and set/check the ignition timing and ignition advance curves with an great degree of accuracy over the marks on the stock timing plate. Once you see how accurate you can set your ignition timing you will be tempted to install a degree wheel and find TDC just to time your ignition.
Thanks for reading
Mike
My bike this was done on and my smiling face


 .
.
 Still begs the question as to why Yamaha put those 'tits' above the bolt holes...

")

Comment