Announcement

Collapse
No announcement yet.

30 dollar find. 79 xs1100

Collapse
X
 
  • Filter
  • Time
  • Show
Clear All
new posts

  • 30 dollar find. 79 xs1100

    Hello everyone.
    I'm new here and this is my first post.
    I'm from Vancouver island. British Columbia Canada

    This is my first street bike. And unfortunately might be a slow project
    I do ride dirt bikes regularly with my family
    I have a 2001 ttr 225
    Wife has a 2002 xr100r
    And my 3yo has a 81 pw50

    Pics of these one day

    Anyways. Back on topic

    I was scrolling through my Facebook when I saw this.
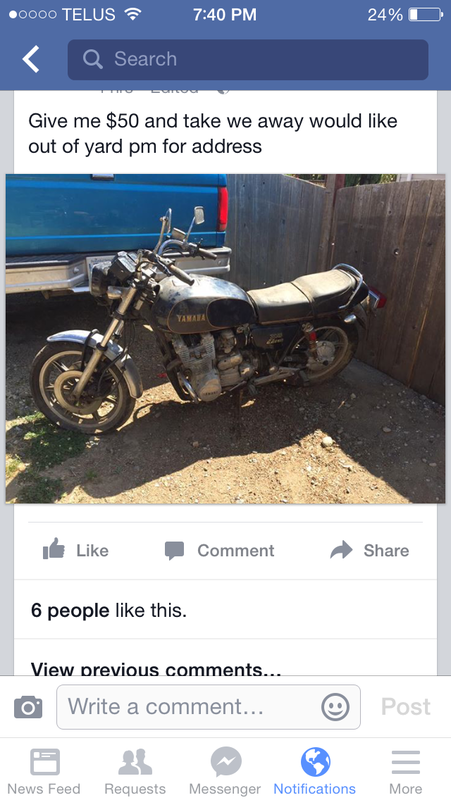


    It was about an hour out of my way so I kinda just let it slide. About 4 hours after it was posted I asked if I can now would he take 30 and he said yes.

    So here it is in my carport.
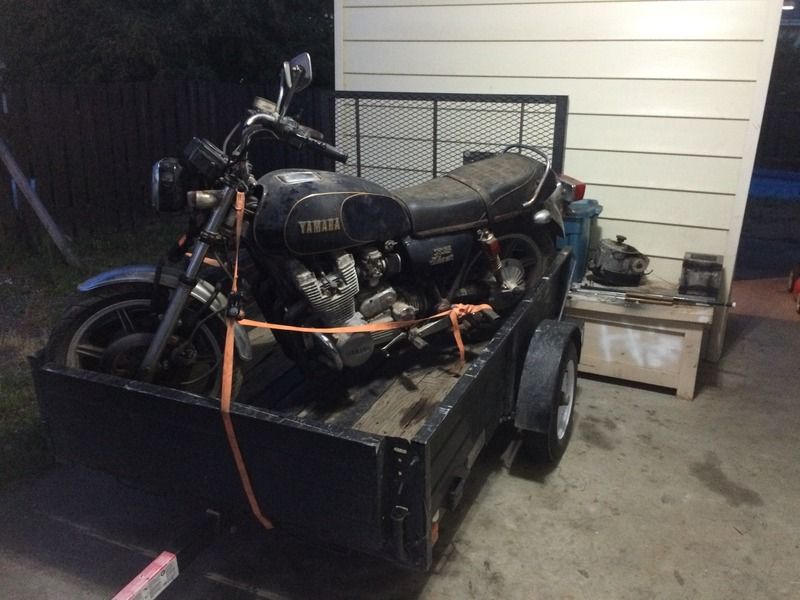


    Now. Before I bought the bike I knew zero about it. When I hot home I started researching it. And I must say I got a little excited. Seems like such a unique bike in its own way. I love it.

    Here it is unloaded.
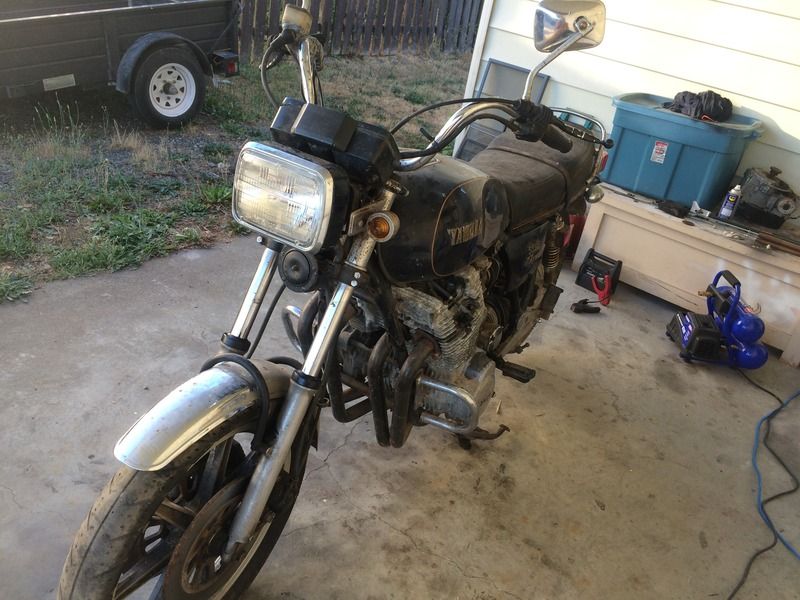


    It looks almost complete. Missing right side cover. But I might message the seller and see if he still has it.

    Like I mentioned. I'm no expert. But I think this is after market exhaust.
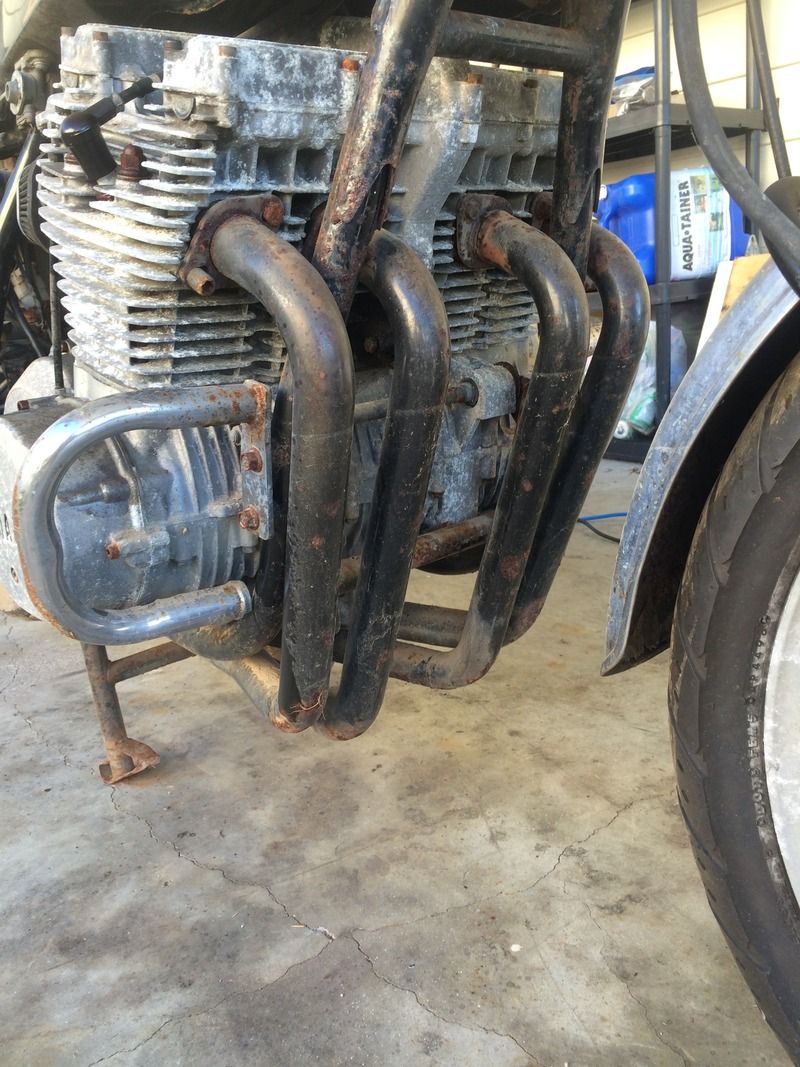


    It's 4 - 1 haven't seen any markings on it yet.

    The cluster. I wonder if the odomeder is correct. Or if it's rolled over....
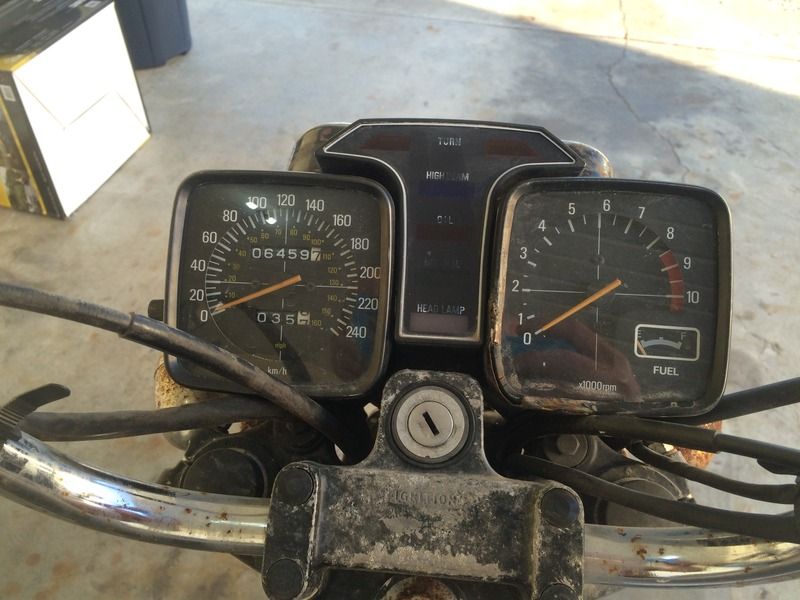


    I jumped the solenoid and it does turn over. Looks like it has spark too.
    Carbs defiantly need a good cleaning.

    And I need to get the gas cap open I gave no key :s tried ttr key. Lol

    Would love feedback and ides on cheep things to try. And small things go fix here and there

    Thanks

    Dave
    79 XS11

  • #2
    I can't find the edit post button ? Maybe I'm blind

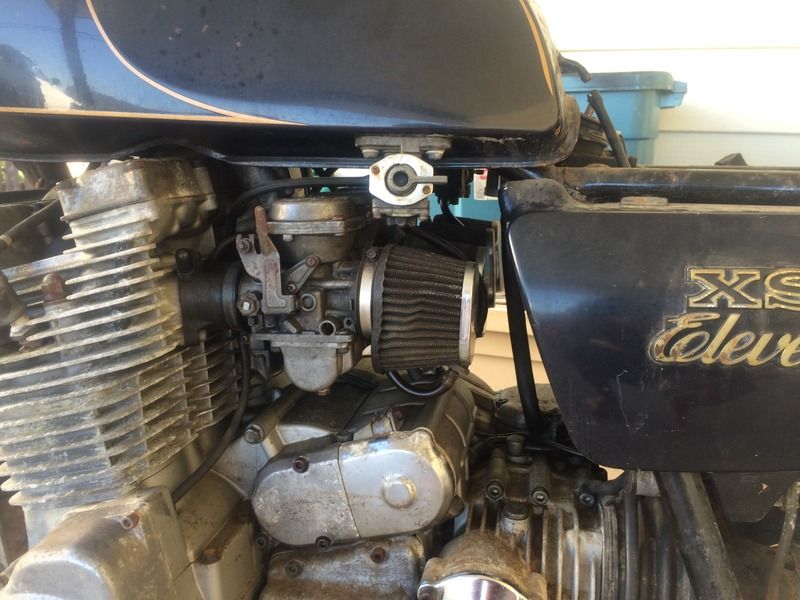
    It looks like stock air box was removed. And it now has 4 k&n pod filters. Thought I'd add that before I forgot.

    I think that's everything I've spotted so far

    Dave
    79 XS11

    Comment


    • #3
      Congrats on a sweet find! I have the same year and model and love it! I would start with a fresh battery, new spark plugs, and completely take apart the carbs and clean them. And a compression test isn't a bad idea to make sure everything is sealing up in there. A can of graphene goes a long way on this bike. Depending on how long it has sat I would suggest cleaning the clutch cable and lubing it up. Also make sure to replace the brake fluid as it appears to have sat for a while. And oil change is a no brainer I also found that because it had been a while since the petcocks had been used the rubber in them were a little worn out. You can pick up new rubber rings for $2 at home depot. I also noticed the tach was jumpy until I sprayed some graphene into the ends.

      There are a LOT of good resources on this site for where to start with an unknown project bike. Keep us up to date on your project as you move through it. Everyone here is extremely helpfully and I know I couldn't have gotten through my issues on the bike without them!
      79F with two parts bikes (78E and a 79F). Ran it for the first season all the way through the summer. more work to do this Spring!

      Comment


      • #4
        nice find...damn cheap...you should know that the left side cover has a lock. the ignition key is used...the keyhole is below the side cover and it has its own cover to keep the dirt out of it...that cover will swivel up out of the way...otherwise removal of said cover will break the plastic locking tab. From what I see the handlebars and the turnsignals front and back are not original... it looks like its been outside neglected for a lonnnng time...good luck and enjoy the process and Welcome to CH.11
        1980 XS650G Special-Two
        1993 Honda ST1100

        Comment


        • #5
          Great price. You have a lot work but you will love it when it is completed.

          Good luck.
          Bill
          1980 XS1100 SG
          Jardine Spaghetti with Harley Mufflers

          Comment


          • #6
            Edit post is time limited the button disappears after I think 10 minutes.

            Nice low buck find - I assume you got registration paperwork so you can get plates and insurance after doing all the work?

            I would not be surprised to find out either way that the ODO turned over or it has 6500km original mileage and is just weathered. Or the ODO was replaced at some point is another option.

            There should be 4 digit number on the gas cap lock - you can get a locksmith to cut a key using it to open the cap and hopefully it matches the ignition too. THe left side cover lock should open with just about any yamaha key - those do not seem to have much in the way of tumblers. Spray liberally inside the lock with WD40 or penetrating oil first so you do not bend your key.

            Before a complete teardown I would remove the sparkplugs and inspect inside best you can for rust, then with plugs out and on center stand try to put it in 5th gear and turn the back wheel to see if the engine is free. THe rear brake caliper may be frozen and need to be removed to perform this test.

            In other words, lets see if you can change the oil and gas and hook up a good battery once you get a key and see if she will try to start before you sink a bunch of time and $$ in and get frustrated.

            You can learn anything you need to know here. Just ask.

            Good luck
            John
            John is in an anonymous city with an Alamo (N29.519227,W-98.678980)

            Go ahead, click on the bikes - you know you want to...the electrons are ready.
            '81 XS1100H - "Enterprise"
            Bob Jones Custom Navy bike: Tkat brace, EBC floating rotors & SS lines, ROX pivot risers, Geezer rectifier, new 3H3 engine

            "Not all treasure is silver and gold"

            Comment


            • #7
              Thanks for the responses everyone.

              Originally posted by madmax-im View Post
              nice find...damn cheap...you should know that the left side cover has a lock. the ignition key is used...the keyhole is below the side cover and it has its own cover to keep the dirt out of it...that cover will swivel up out of the way...otherwise removal of said cover will break the plastic locking tab. From what I see the handlebars and the turnsignals front and back are not original... it looks like its been outside neglected for a lonnnng time...good luck and enjoy the process and Welcome to CH.11
              I was told it was in a barn for 10~ years. Then it was outside at persons house I got it from. Not sure how long though. I will try ttr key in side cover


              Originally posted by jwhughes3 View Post
              Edit post is time limited the button disappears after I think 10 minutes.

              Nice low buck find - I assume you got registration paperwork so you can get plates and insurance after doing all the work?

              I would not be surprised to find out either way that the ODO turned over or it has 6500km original mileage and is just weathered. Or the ODO was replaced at some point is another option.

              There should be 4 digit number on the gas cap lock - you can get a locksmith to cut a key using it to open the cap and hopefully it matches the ignition too. THe left side cover lock should open with just about any yamaha key - those do not seem to have much in the way of tumblers. Spray liberally inside the lock with WD40 or penetrating oil first so you do not bend your key.

              Before a complete teardown I would remove the sparkplugs and inspect inside best you can for rust, then with plugs out and on center stand try to put it in 5th gear and turn the back wheel to see if the engine is free. THe rear brake caliper may be frozen and need to be removed to perform this test.

              In other words, lets see if you can change the oil and gas and hook up a good battery once you get a key and see if she will try to start before you sink a bunch of time and $$ in and get frustrated.

              You can learn anything you need to know here. Just ask.

              Good luck
              John
              I will be doing an ICBC vin search I'm 99% sure I'll get the registration since the PO passed away. I did check engine was free. Using the method you said actual lol. I pulled plugs and oiled each cylinder just because. And hooked up a booster box it turns over. I poped a plug on and it looked like it had spark ?
              I'm going to pull carbs and start cleaning them out. And I'll look at bypassing ignition for now

              Dave
              79 XS11

              Comment


              • #8
                Hi Dave Welcome to the wonderful world of XS11.
                I think this is the blank you need.
                http://www.keys4urride.com/yh46p-yam...q51josfs8s6bv5
                and they will cut it for you as well.
                Check the gas cap for the 4 digit code and also the bottom of the ignition switch.( you will have to remove it but just a couple of screws) Hopefully the same numbers. Order three keys so you will have spare. May as well give the switch a good clean while apart. Carefully over a basin or towel to catch all the little bits check the solder joints are still good.
                Phil
                1981 XS1100 H Venturer ( Addie)
                1983 XJ 650 Maxim
                2004 Kawasaki Concours. ( Black Bear)

                Comment


                • #9
                  Originally posted by MaximPhil View Post
                  Hi Dave Welcome to the wonderful world of XS11.
                  I think this is the blank you need.
                  http://www.keys4urride.com/yh46p-yam...q51josfs8s6bv5
                  and they will cut it for you as well.
                  Check the gas cap for the 4 digit code and also the bottom of the ignition switch.( you will have to remove it but just a couple of screws) Hopefully the same numbers. Order three keys so you will have spare. May as well give the switch a good clean while apart. Carefully over a basin or towel to catch all the little bits check the solder joints are still good.
                  Phil
                  This is excellent news. I was gunna dill out the lock on the tank and bypass the ignition.


                  The left side cover I located the lock for it. But someone had already pryed it off and the tab was broken.

                  Few more pics info progress from today.
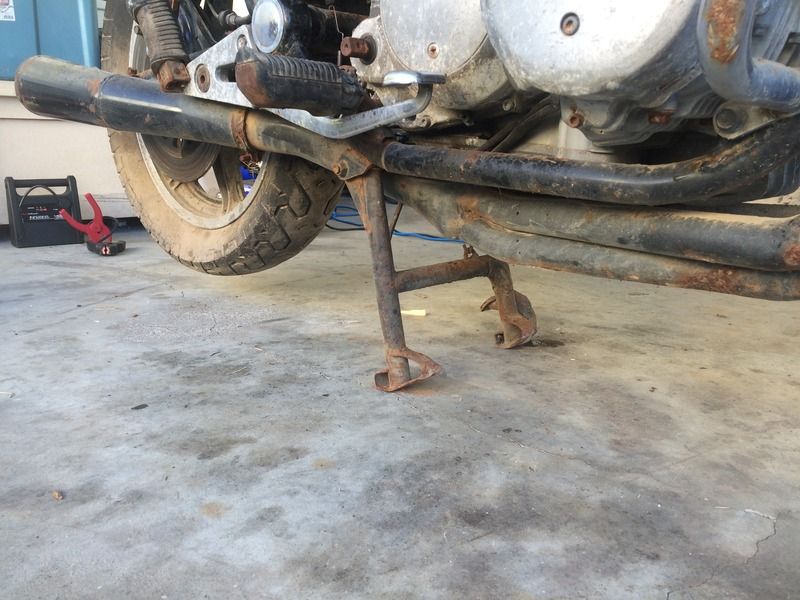
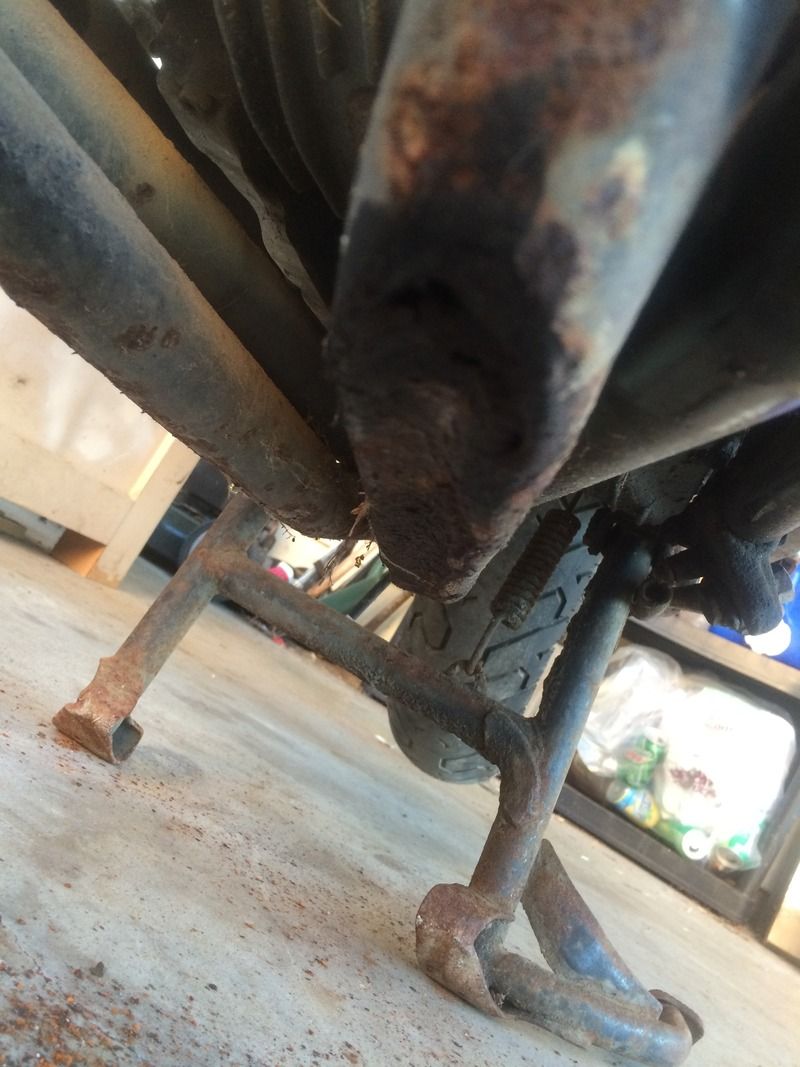
                  The exhaust is going to need some repair


                  It has a hole at the bend. And it's caved in most of the length on one of the tubes.

                  A closer picture of carb/filters


                  The carbs are now removed. Disassembled. And parts are soaking in fresh gas

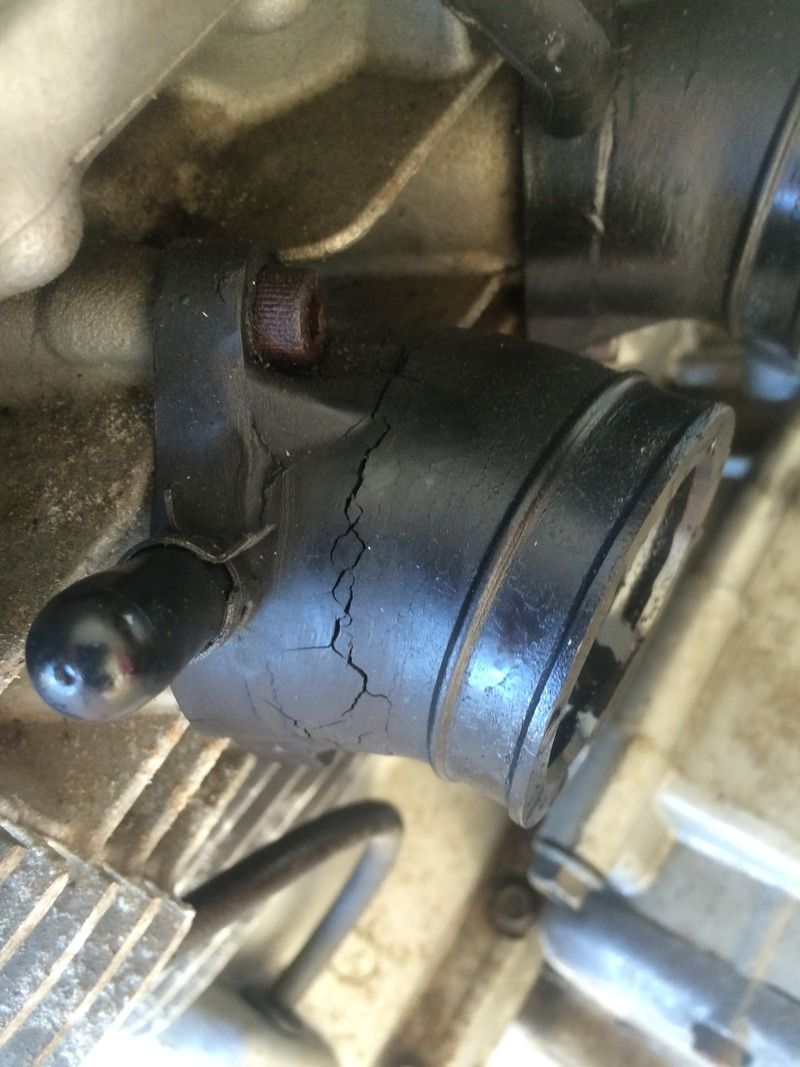
                  I should of looked closer at the other 3 carb boots. The 2 centre ones look good right side one I can't remember. But this left side one is defiantly the worse


                  With the carbs removed. I tried to see if it would fire


                  I've never had luck posting videos. Click this thumb anyways. It'll work


                  That's all for now. I should of took pics of the carbs. I hope they come out ok

                  Thanks

                  Dave
                  79 XS11

                  Comment


                  • #10
                    That carb inlet is Ok, where those cracks in the rubber are is where there is cast aluminium underneath, if they leak from cracks its around the area where the clips sit, the cast ali stops just before there and its all just rubber.

                    As another check for leaks..... fit the carbs (once you've cleaned them 3 times ) and spray WD40 over all the inlets, if the tickover revs pick up WD40 is being sucked in and burnt.

                    For the exhaust, ask Rasputin, I think its him that has a cool fix.
                    Tom
                    1982 5K7 Sport, restored to original from a wreck
                    1978 2H9 (E), my original XS11, mostly original
                    1980 2H9 monoshocked (avatar pic)http://i145.photobucket.com/albums/r...psf30aa1c8.jpg
                    1982 XJ1100, waiting resto to original

                    Comment


                    • #11
                      If you pull the tab out of the lock many times it can be repaired using super glue and baking soda trick.

                      Superglue the tab in position and once dry coat the outside of the repair with glue followed by a sprinkling of baking soda (Arm & Hammer kind). It reacts to for a very strong matrix. Repeat as necessary until built up enough then file/sand smooth and paint.

                      Whole tabs can be made with this method and filed into shape. You can search threads here for how its been done.

                      John
                      John is in an anonymous city with an Alamo (N29.519227,W-98.678980)

                      Go ahead, click on the bikes - you know you want to...the electrons are ready.
                      '81 XS1100H - "Enterprise"
                      Bob Jones Custom Navy bike: Tkat brace, EBC floating rotors & SS lines, ROX pivot risers, Geezer rectifier, new 3H3 engine

                      "Not all treasure is silver and gold"

                      Comment


                      • #12
                        Hey Dave,

                        If those air filter pods are true K&N, then someone recently stated that K&N will honor their lifetime warranty. However, if they say XS on the chrome end, then they are aftermarket units gotten from either www.mikesxs.net or www.partsnmore.com . Check out the tech tips/mods for the Velocity Stack mod for Pod filters...can help provide a better airflow with Pods to make tuning a bit easier since the stacks closer mimic the OEM airbox and internal V-stacks of the airbox.

                        Remember the ignition coils are dual tower, and fire simultaneously, but the spark has to travel down 1 wire, thru plug, engine, plug and back up the other wire....so you have to have BOTH in contact to complete a proper circuit when checking for spark, other wise you can get a false bad reading due to an incomplete spark circuit.

                        Yeah, Mack came up with a nice trick to weld ball bearings in between links of chain that can be put into the exhaust, then pulling thru the steel ball when properly sized to fit into the pipes will help expand the exhaust pipe section.

                        Let's hope its' just the metal/brass parts that are soaking in fuel/gas? Check out the vacuum diaphragms for pinholes. If found, you can replace the diaphragms with aftermarket ones at a much more reasonable price than trying to replace the entire slide assembly.

                        Forgot to mention, the intake boot synch caps can get hard and although fit over the nipples, can actually be loose and leaking! Check and replace them as part of the rebuild to prevent a nagging vac. leak potential! Also, remove the boots from the head, clean/remove the old hardened crumbling burnt rubber from the face of the boot, then use a gasket and some good non-hardening sealant....not just RTV/Silicone to also ensure a good airtight seal!

                        T.C.
                        T. C. Gresham
                        81SH "Godzilla" . . .1179cc super-rat.
                        79SF "The Teacher" . . .basket case!
                        History shows again and again,
                        How nature points out the folly of men!

                        Comment


                        • #13
                          Originally posted by Rasputin View Post
                          If you wanted to minimize those dents in the headers, you can do it relatively easily. I have three different sized steel balls welded to pieces of chain, one chain on each side of the ball. I first use the smallest one and basically feed the chain thru the headers. Then using the steel ball like a slide hammer, I pull on alternating ends of the chains to hammer my way thru the dent. Then I use a size up and then another size up etc until I am happy with it.
                          It would take someone better than me to get it perfect but it certainly will bring it round again, and look better.
                          I get the steel balls from a down-hole pump company locally. They are used and do not cost me anything. A tapered slug could be home made and work too, just depends on what you want to achieve.
                          Not sure if Mack posted it too or not. Of course the hole will need to be welded shut after.
                          Last edited by Rasputin; 07-04-2015, 06:02 PM.
                          2-79 XS1100 SF
                          2-78 XS1100 E Best bike Ever
                          80 XS 1100 SG Big bore kit but not fully running yet.
                          Couple of more parts bikes of which 2 more will live!

                          Comment


                          • #14
                            Small update. Somewhat slow going
                            But I took ignition apart. Anything that fits in the hole works as a key now. Will probably replace once I get it closer to complete.
                            Same for the gas tank flat head with a crescent wrench opened it up. Again anything that fits will work now.
                            So in the end it still looks decent but functions for now

                            The carbs are a slow going process too lol. They are completely disassembled now and soaking in kerosene (will have to do 2 at at time so will be a couple days)
                            I noticed some of the floats need repair.

                            I'm not really interested in trying to solder them incase I make them worse.
                            Googled said seal all ?

                            Anyone here use it with good results. A lot I've come across have all been successful

                            I'll get more pics and hopefully update again soon

                            Thanks
                            Dave
                            79 XS11

                            Comment


                            • #15
                              It's a bit rough, but worse has been brought back.. LOL These bikes are pretty tough. And I wouldn't be surprised if that's actual mileage....

                              Replace bad carb floats, don't try to repair unless you're sure of your skill. New ones are available from several sources. Don't throw anything away, some bits are hard to find. Yours is fairly complete, just the 'usual' stuff missing. Nice score! And welcome!
                              Fast, Cheap, Reliable... Pick any two

                              '78E original owner - resto project
                              '78E ???? owner - Modder project FJ forks, 4-piston calipers F/R, 160/80-16 rear tire
                              '82 XJ rebuild project
                              '80SG restified, red SOLD
                              '79F parts...
                              '81H more parts...

                              Other current bikes:
                              '93 XL1200 Anniversary Sportster 85RWHP
                              '86 XL883/1200 Chopper
                              '82 XL1000 w/1450cc Buell, Baker 6-speed, in-progress project
                              Cage: '13 Mustang GT/CS with a few 'custom' touches
                              Yep, can't leave nuthin' alone...

                              Comment

                              Working...
                              X