Announcement

Collapse
No announcement yet.

Rebuilding Petcocks & Carbs

Collapse
X
 
  • Filter
  • Time
  • Show
Clear All
new posts

  • Rebuilding Petcocks & Carbs

    ==========
    As these are about the same cost as a kit to rebuild my petcocks, will these work on 79 XS1100 Special?
    http://www.ebay.com/itm/361215881971...%3AMEBIDX%3AIT
    Or does anyone know of some which will fit? I'm leaning away from the vacuum valve/fuel equation anyway . . . have no interest in maintaining that problematic setup.
    ==========
    My mechanics comment on taking the carbs apart:
    "Man, breaking down those carbs is a nightmare. The bolts in mounting rack are virtually impossible to remove, as are the bolts securing the carb caps. I'm going to work on them more this week to see if I can get them all torn down." Any tips/tricks I can share with him?
    ==========
    79 SF

  • #2
    Won't fit. The special has a different bolt spread. Easy way is rebuild the two petcocks, plug the front tube on each one, and re-install without the vacuum part, and all the fuel lines.
    On my MNS, I still use the Octy, as it's working well. I have rebuilt other octy's and it's not that hard. The big problem is finding good, thin wall fuel line.
    Ray Matteis
    KE6NHG
    XS1100 E '78 (winter project)
    XS1100 SF Bob Jones worked on it!

    Comment


    • #3
      If the screw heads are already buggered, a pair of vice grips will work wonders. Just grip up the head of the bolt the best you can, perpendicular to the bolt. You will be surprised at how easy they come out (considering no bit in your arsenal could budge them).
      They are probably Japanese Industrial Standard screws. Standard Philip head screwdrivers usually wreck these screws.
      81 xs1100 SH
      81 xs1100 SH (parts)
      80 suzuki gs550et
      07 suzuki S40

      Comment


      • #4
        Tried and true method is to dremel (with a cut-off wheel), a long, fat slot in the heads of the screws, then use an impact driver and hammer to loosen them. I've done dozens of Mikuni carbs this way.
        1979 XS1100F
        2H9 Mod, Truck-Lite LED Headlight, TECHNA-FIT S/S Brake Lines, Rear Air Shocks, TKAT Fork Brace, Dyna DC-I Coils, TC Fuse Block, Barnett HD Clutch Springs, Superbike Handlebars, V-Star 650 ACCT, NGK Irridium Plugs, OEM Exhaust. CNC-Cut 2nd Gear Dogs; Ported/Milled Head; Modded Airbox: 8x8 Wix Panel Filter; #137.5 Main Jet, Viper Yellow Paint, Michelin Pilot Activ F/R, Interstate AGM Battery, 14MM MC, Maier Fairing, Cree LED Fog Lights.

        Comment


        • #5
          Thanks!

          ==========
          Thanks everyone for your experienced comments. I've forwarded all of them to my mechanic. I have a full spare set of used carbs which I bought on this forum so I'm hoping we can end up with four good carbs which do the trick. Am I clear in understanding the funky O-ring under the jet thing is newer XS carbs and *not* the 78/79 carbs?
          Thanks again for all your help!
          JIM ~ BOISE, ID
          ==========
          79 SF

          Comment


          • #6
            Hey Jim,

            Not sure what you mean by funky O-ring under the Jet thing phrase???

            The pilot jet SCREW on the top front of the carb body inside the recessed tube has an O-ring as well as a washer on the end along with the spring for the later carbs...80-81's. The 78-79's had the pilot screw EXTERNALLY mounted on the top front of the carb body.

            The Float valve needle seat also uses an O-ring to seal the PRESS IN Seat that is secured with a U clamp and screw on the latter carbs. The early carbs use a fiber washer under the SCREW IN valve seat assembly.

            HTH.
            T.C.
            T. C. Gresham
            81SH "Godzilla" . . .1179cc super-rat.
            79SF "The Teacher" . . .basket case!
            History shows again and again,
            How nature points out the folly of men!

            Comment


            • #7
              Well I musta' . . .

              ==========
              . . . been thinking about the latter. Someone posted about checking the rack of carbs (hooked up to a fuel tank) in an upright position to check for leaks (float needle/seat, etc.) and then (if none found) flipping them over to observe fuel leaking from the O-ring seal. Not sure I've wrapped my mind around *that* sequence just yet but I do remember them making a distinction that the O-ring issue was only the later carbs (80/81) and not 78/79 which was a whew(!) for me.
              ==========
              Last edited by sail4free; 03-24-2015, 08:22 PM.
              79 SF

              Comment


              • #8
                Gettin' Down to the Skinny

                ==========
                Two confirmations and three questions?
                ==========
                Just wanting to make sure the vacuum line exiting left engine case goes to #2 carb body and *not* the carb boot/holder . . . this is what provides vacuum for ignition advance, right?
                ==========
                We're moving away from the octy gizmo . . . petcocks will be freshly rebuilt with regular kit . . . with no vacuum to let the fuel flow in the ON position, will we only get flow (without vacuum) when the selector is in the prime (PRI) position? No flow without vacuum from the RES position either? I've read that prime pulls from the same level as reserve, so if we run out of gas in the prime position = time to start walking?
                ==========
                FWIW, I will return both petcocks to OFF position when the engine isn't running . . . or I will suffer my *earned* consequence(s).
                JIM P. ~ BOISE, ID
                ==========
                79 SF

                Comment


                • #9
                  Correct on the vacuum line, goes to the #2 carb body from the vac advance behind the left side engine cover.

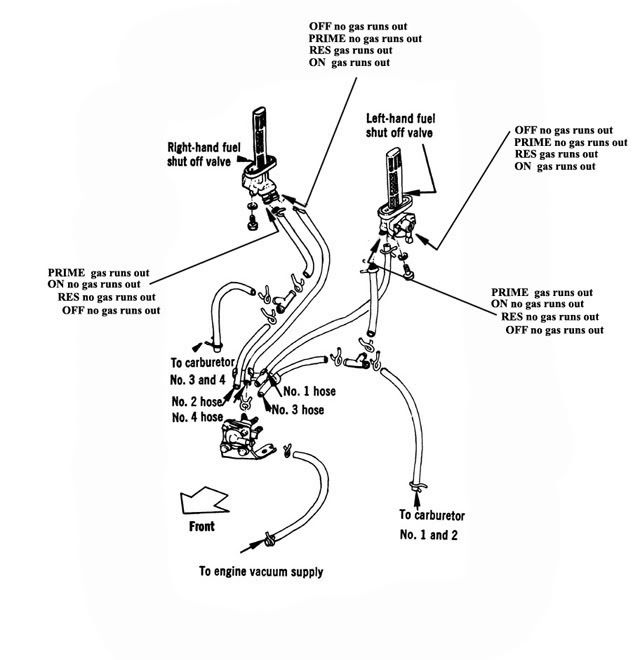
                  This schematic may answer your other two ?s :


                  HTH

                  P.S.- Yes you would be safe in turning the petcocks off while engine is not running at all times regardless of which set-up you choose.
                  Last edited by Schming; 03-31-2015, 03:20 AM.
                  1980 XS1100G "Dolly G" Full Dresser (with a coat of many colors )
                  1979 XS1100SF (stock-euro mods planned)
                  1984 XV700L Virago (to be hot-modded)
                  1983 XJ750MK Midnight Maxim (semi-restored DD)
                  1977 XS650D ( patiently awaiting resto)

                  Sometimes it takes a whole tank of gas before you can think straight.

                  Comment


                  • #10
                    Originally posted by sail4free View Post
                    Just wanting to make sure the vacuum line exiting left engine case goes to #2 carb body and *not* the carb boot/holder . . . this is what provides vacuum for ignition advance, right?
                    ==========
                    We're moving away from the octy gizmo . . . petcocks will be freshly rebuilt with regular kit . . . with no vacuum to let the fuel flow in the ON position, will we only get flow (without vacuum) when the selector is in the prime (PRI) position? No flow without vacuum from the RES position either? I've read that prime pulls from the same level as reserve, so if we run out of gas in the prime position = time to start walking?
                    Hey, Jim -

                    1) Yes, that vacuum line exiting the left engine case does indeed go to the #2 carb body.

                    And as long as you're thinking about that line, make sure there are no cracks/splits in it. This could cause stumbling/stuttering under acceleration.

                    2) If you're deleting the Octy, there are a couple of things you need to do. First, you'll need to cap off the nipple on the #2 carb boot.

                    (This is the nipple that the vacuum line from the Octy is connected to).

                    Second, you'll need to cap off/plug the Prime port on your petcocks. There are a couple of ways to do this.

                    You could run a fuel hose connecting the 2 petcock Prime ports, or you could plug each Prime port using a short piece of fuel hose with a screw in the end of it.

                    OR ... for a more novel solution, you could perform crazy steve's petcock mod:

                    Special Petcock Mod

                    Then you can run one line from each petcock to each pair of carbs. Your petcocks will be fully manual, and you will never use the Prime position.

                    (And you will have fuel available in both the ON and RES positions).

                    FWIW, I have always turned my petcocks to the off position after every ride (on every bike I've ever owned). Just a habit I developed years ago as cheap insurance.
                    Last edited by Prisoner6; 03-31-2015, 03:29 AM.
                    Marco

                    Current bikes:
                    1979 Yamaha XS Eleven Special (SF)
                    1979 Honda CBX
                    2002 Kawasaki ZRX1200R

                    Rest in Peace, Don Glardon (DGXSER) 1966-2014
                    WE MISS YOU, DON

                    Comment


                    • #11
                      Thanks! More questions please?

                      ==========
                      Thanks for that illustration, the link, and all the great feedback.
                      ==========
                      From my mechanic:
                      "What do you know about the jetting of the bike? I have 3 pilot jets that are 42.5 and 3 that are 45. I couldn't get 2 out of your old carbs, so either way we need 1 more. Just not sure if you want to go 42.5 or 45. I think yours may have been jetted up which makes sense with the after market air filters. So the 45 may be the way to go. But since 2 are stuck, that wouldn't make sense as to why I have three 45's and three 42.5's. I wonder if the other set was mix and matched?"
                      [JIM: To clarify, I had four original carbs on the bike and a replacement set of four = eight carbs total. Running the filter pods, should we lean towards the 45 jets? Original Mikuni jets for the small price difference, right?]
                      ==========
                      Also ask them where they get the jet and what model it is. There are 3 options that all look the same on jetsrus.
                      http://jetsrus.com/a_jets_by_carbure...0-96_pilot.htm
                      http://jetsrus.com/a_jets_by_carbure....067_pilot.htm
                      http://jetsrus.com/a_jets_by_carbure...-210_pilot.htm
                      ===========
                      And what do we think of this?
                      "BTW I've been looking up MK2 parts on eBay, and you should be able to part out your remaining carbs for quite a few bucks. The diaphragms and slides alone can go for upwards of $50 EACH. Caps and float bowls are all worth something."
                      [JIM: I'm thinking the Mikuni II parts must bring more than the older Mikuni stuff? I bought the whole set of used carbs for $70 -- maybe my seller just gave me a good deal?]
                      JIM ~ BOISE, ID
                      ===========
                      79 SF

                      Comment


                      • #12
                        For just pods, you should NOT need to go up on Pilot jets. Mains, maybe 1 size up. You should just tune the idle with the mixture screws, between syncing the carbs.
                        To be clear as mud, Pilot jets 42.5 all around, Mains 140 small head for the early carbs.
                        Ray Matteis
                        KE6NHG
                        XS1100 E '78 (winter project)
                        XS1100 SF Bob Jones worked on it!

                        Comment


                        • #13
                          Originally posted by DiverRay View Post
                          . . . Mains 140 small head for the early carbs.
                          Ray- Did you mean Large Round?
                          1979 XS1100F
                          2H9 Mod, Truck-Lite LED Headlight, TECHNA-FIT S/S Brake Lines, Rear Air Shocks, TKAT Fork Brace, Dyna DC-I Coils, TC Fuse Block, Barnett HD Clutch Springs, Superbike Handlebars, V-Star 650 ACCT, NGK Irridium Plugs, OEM Exhaust. CNC-Cut 2nd Gear Dogs; Ported/Milled Head; Modded Airbox: 8x8 Wix Panel Filter; #137.5 Main Jet, Viper Yellow Paint, Michelin Pilot Activ F/R, Interstate AGM Battery, 14MM MC, Maier Fairing, Cree LED Fog Lights.

                          Comment


                          • #14
                            Thanks Again For all the Great Intel!

                            ==========
                            Thanks DiverRay for the intel on the pilot jets . . . is this the one that the needle (?metering rod?) interacts with? And thanks to Schming for that illustration! I think what was confusing me was thinking vacuum is needed to let fuel flow through the petcocks. I can see now that no vacuum lines run direct to the petcocks (as they do on some newer bikes). The only engine vacuum line was to the octy diaphragm. (So even though my petcock rebuild kits come with a diaphragm looking thing, it isn't used on my '79 XS petcocks. So as long as the front prime barbs are capped (or connected to each other), the remaining positions (OFF/RES/ON) will work as they did before. I only lose the PRIME position to over-ride the octy when first filling the lines and carb bowls before attempting to start the engine which will no longer be an issue for me.
                            ==========
                            Thanks Prisoner6 for those clarifying details. I like CrazySteve's petcock mod but I think at this point we'll just run one new fuel line between those front petcock barbs and call it good. I like the one diagram where the left petcock feeds a vertical inline filter (in at the bottom; out at the top) between 3 and 4 which feeds a line to a Tee delivering fuel to 1 and 2 -- no sharp bends; no air bubbles trapped in the filter. (Of course, the right petcock feeds 3 and 4 in similar fashion.)
                            JIM ~ BOISE, ID
                            ==========
                            79 SF

                            Comment


                            • #15
                              Originally posted by sail4free View Post
                              I think what was confusing me was thinking vacuum is needed to let fuel flow through the petcocks. I can see now that no vacuum lines run direct to the petcocks (as they do on some newer bikes). The only engine vacuum line was to the octy diaphragm. (So even though my petcock rebuild kits come with a diaphragm looking thing, it isn't used on my '79 XS petcocks. So as long as the front prime barbs are capped (or connected to each other), the remaining positions (OFF/RES/ON) will work as they did before ...
                              ==========
                              ... I like CrazySteve's petcock mod but I think at this point we'll just run one new fuel line between those front petcock barbs and call it good ...
                              Hey, Jim -

                              Yep, the Special petcocks are simple gravity-feed ... so without the Octy, fuel will run from the petcocks directly to the carbs.

                              Just remember to always turn the petcocks to the OFF position after each ride.

                              The great thing about Steve's mod is this: it effectively converts the PRIME position to another OFF position on your petcock, in case you accidentally turn the petcock to PRIME.

                              Oh, and running inline fuel filters on these bikes is a really good idea ... the petcock tower filters just aren't enough, IMO.
                              Marco

                              Current bikes:
                              1979 Yamaha XS Eleven Special (SF)
                              1979 Honda CBX
                              2002 Kawasaki ZRX1200R

                              Rest in Peace, Don Glardon (DGXSER) 1966-2014
                              WE MISS YOU, DON

                              Comment

                              Working...
                              X