
Update
my wife finally passed me her flu so I haven't been over in the shop for awhile. I did marry the cases together and the mating surfaces are outstanding. I ran into a old friend in the mall who builds and races drag stuff, flat bottom boats, old trucks and yes motorcycles. I was telling him of my issues with the plastiguage and he laughed.
Basically he confirmed everything that was said in this thread. Using plasti guage on new bearing shells is a waste of time and plastiguage. The shells are designed to stick up a bit and crush into place to: fill in any iregularity in the saddles and to stop the shells from spinning with the shaft. Plastiguage is for testing existing shells to see if it's time to jump colours.
So long story short. I WAS chasing my tail. I'm back in the game as soon as I can stand up without sweating, and feel confident that more than five feet from a toilet is achievable in both time and distance.
Thanx for all the help. Merry Xmas one and all.
-
-
Big
the 5 th and 2cd have been back cut and the washer has been swapped. I'm going with a vmax CCT as from what I understand the holes match up perfectly. Brand new cam chain as well.Leave a comment:
-
Those bearings together will make a perfect circle. Throw it together with some sort of assembly lube on the bearings and ride the he** out of her. And make sure there's no lube or oil on the BACK side of the bearings before installation.
Umm.. You are getting an auto tensioner and swapping the washer on 2nd gear, right? Last edited by trbig; 12-21-2014, 07:26 PM.
Leave a comment:
-
I'll agree with Tom's idea of dry-fitting the cases to see if everything still fits. I'd even install the crank (minus the rods) and see how easily it spins. Generally, too loose is better than too tight, and you may be able to compensate for this with oil weight; although what effect this may have on the clutch is hard to say. Being 'over spec' by only .0003" shouldn't be a deal breaker. The motor may not last as long as a factory new assembly, but will likely last longer than however many miles you may put on it.
As to the possible warp, most heating done for coating purposes wouldn't cause that much movement. But you don't know just how hot yours got; at what point does that paint break down? 400F? 500F? And how was it cooled? If in the course of putting out the fire this was sprayed with water, you may be suffering from uneven cooling.
If a 'dry fit' doesn't show any obvious issues, I'd be tempted to put it together and run it. The only place I'd be real concerned about the case halves not pulling 'tight' would be if it's at the main bearing saddles; if it's there, you will have issues with the bearings. I know you're trying to keep it 'numbers matching', so you really don't have that much to lose.Leave a comment:
-
What Steve says about the shells is repeated here
I would have a go at assembling up the cases with the shells in slowly winding the bolts down to see if they sit in better until the case gap is closed, if you wreck the shells then they were no use anyway, better to find out this way than build it up and find out they're no good when you hit the starter button.
The reason I said how are the top case shells was I was hoping they were going to be under flush, that way when the whole lot is closed you will have a perfect circle in the bearing.
Steve's point about the cases being heat damaged can be checked by pulling the cases up empty using all the bolts, if they close up they are OK to use. And folk regularly get cases powder coated at 350F, if it warps them a little (read this as annealing them allowing them to relax a little) no one seems to have trouble rebuilding the motors.
If you have any doubts about the cases being warped dry build the gearbox into them and see if this spins up Ok.Leave a comment:
-
So
here I am, whats the concensus. Put it back together with the blues and hope for the best? If the motor is toast whats the difference. Blow now or blow later. Maybe It won't blow at all or maybe it will take 50K.
What would you do?Leave a comment:
-
Mack, you may be chasing your tail on this one. First, there's only a few ten thousandths difference in size between those various 'color' bearings; Yamaha used these to 'select fit' bearings to get as close as possible to optimum clearance. I'd be surprised if the 'range' of these from smallest to largest is more than .001". The issue for you is you don't have measuring tools that read that down that fine. Keep in mind that the difference between .044 mm and .051 mm is only .0003", beyond the accuracy of plastigage. This is why Yamaha had that elaborate numbering system for the crank/cases/bearings; few (if any) shops would have the tools needed to actually measure these differences. Note that Yamaha also doesn't give either bearing bore or crankshaft journal diameters; they assume that if you can't reach proper specs, the crank is worn and must be replaced.
Second, that fact that the new bearings stick up is probably 'normal'. All the bearings I've ever worked with have this, and the reason is 'bearing crush'. The idea being is that once everything is torqued down, this forces the bearing into full contact with it's saddle, giving the bearing a fully solid surface to work against as well as helping with heat transfer (very important). The 'old' bearings have been 'set' into the bores from use and won't display this as much, maybe not at all.
Lastly, you mention that these cases have been in a fire, but it wasn't hot enough to damage the paint. Well, the bummer is that aluminum is much less stable compared to cast iron, and exposure to temps above about 350F for long periods can cause dimensional changes. You may have bad cases, and attempting to remachine them will be an extremely difficult task. Not very encouraging..... sorry....Leave a comment:
-
Again its not something I would do, the shells should fit and be the right size.
For something that needs a full strip if you're wrong I'd be looking for good fitting shells.Leave a comment:
-
cases
Tom, very intuitive. They aren't as bad but still above. I just measured with a feeler guage and the lowers are just under .05 mm and the uppers are closer to .04 mm, the only one that seats flush is the side thrust bearing but it's counter part is 0.05 with a feeler guage.
Is it possible to to use a sheet of emery paper and rub the overhang off? I can't use the originals as several are down to the copper and a couple have deep gouges in them! When I first took it apart I found a lot metal fragments in it. Now I know from where they came.Leave a comment:
-
What are the shells like in the upper half of the cases, the same?? or are they under the mating face level?Leave a comment:
-
Big
My SF certainly had no problem with red lining and I'll admit that a few times I buried the needle by mistake. It gets real busy real fast when your racing out of the hole. But, my oil was always pretty fresh and my cam chain was always adjusted before I raced anyone.
I'm not putting the original head back in this one, I have a couple spare 2h7's here that don't need all the work of rust removal that the rest of this motor did so I'm putting the original aside for now and will get to it in the future when I'm not under the gun. Same goes for the carbs. They may be goners, pretty rough shape but I'll have a go at them and see how the turn out next winter.Leave a comment:
-
Well here goes
I checked and the upper and lower case have the same number 1A56 stamped into them at the rear of the tranny housing. I put a machinists flat edge on the mating surfaces laterally and longitudinaly and the surfaces look good. However when I installed the shells and ran a straight edge across the tops of the shells this is what I found on all them.
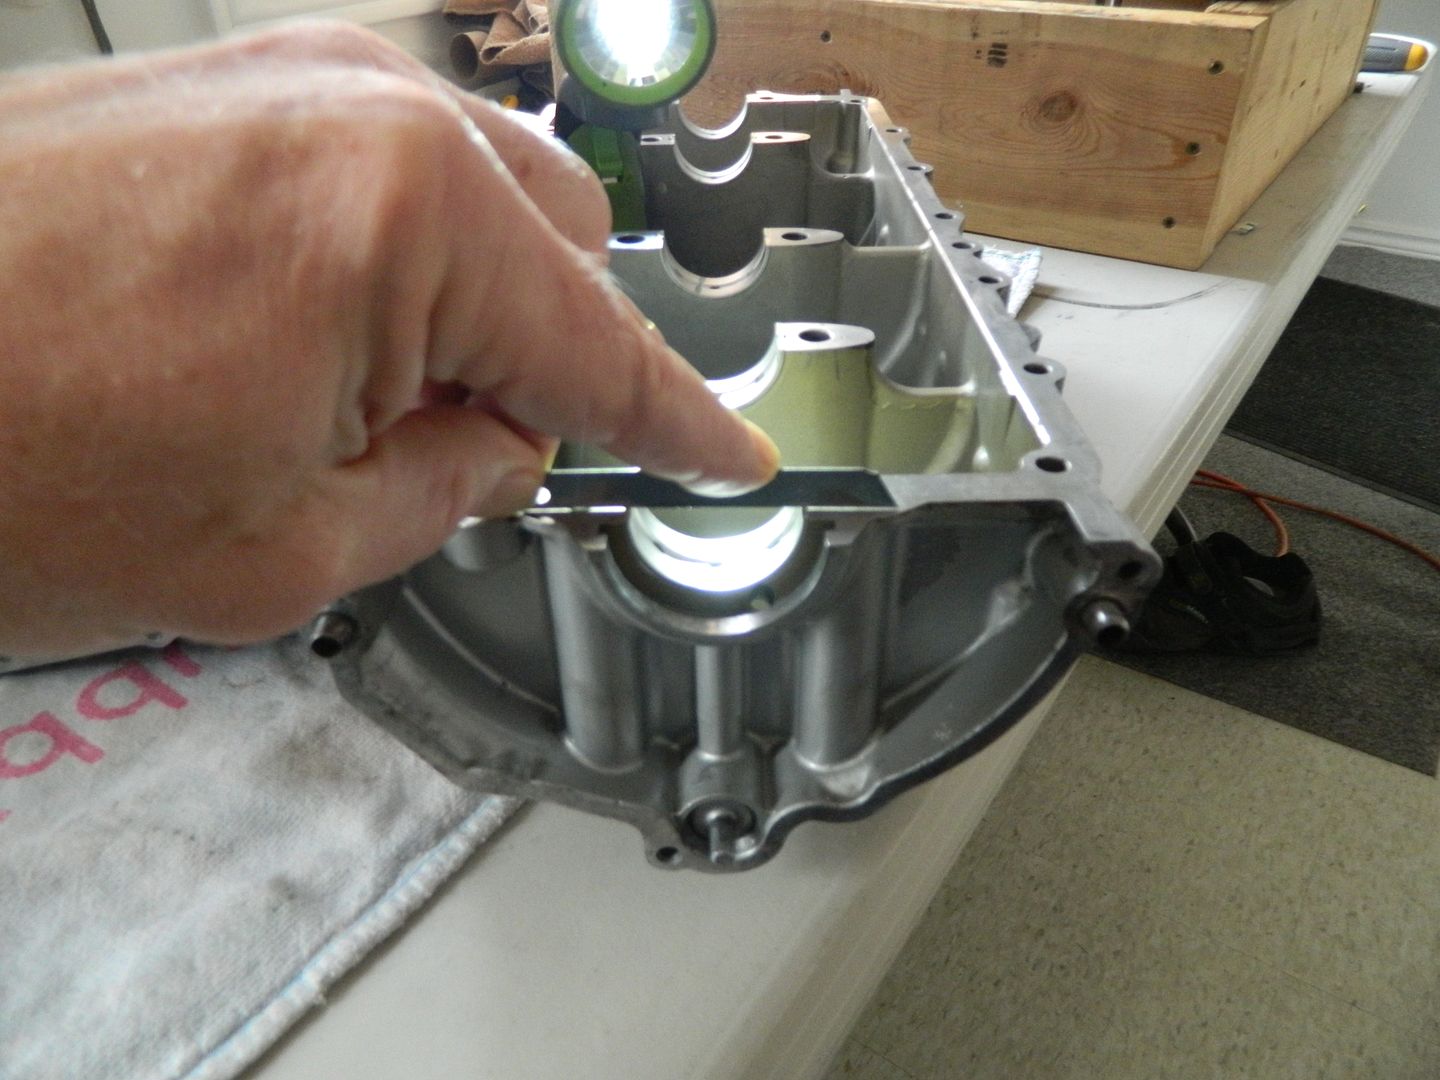
You can clearly see that the shells stick up above the mating surface on both halfs. I chercked the originals the same way and they were good. The original had numbers stamped into them of D7L on both the brown and blacks, while the new kit has D9A for brown and D9D for black with the blues being D4C. I have no idea what to do here. It's probable the shells aren't fitting properly not allowing the crank to settle down into the cradle making the readings high.
Any thoughts?Leave a comment:
-
I can't seem to find a parts list on those bearings where it shows the actual thickness of each bearing, but it was determined that it didn't really matter which one you used. I'm wondering, if the difference is just a few ten thousandths, then it's not going to change the reading you're getting from different colors when only reading to the thousandth?
If the run-out on your crank was bad, your plastigauge numbers would change when you rotated the crank 90 degrees.
Oh.. and these motors laugh at red-lines. Make sure all your valve springs are intact (I've broke a couple) and don't let that bother you. If the oil was really bad and they never changed it, the old crank and cam bearings would have deep gouges in them from debris.Last edited by trbig; 12-21-2014, 09:06 AM.Leave a comment:
-
JAT... You could check irregularity in the surface by using a glass table or mirror, maybe even hold the mating surface under the glass to see better.
GLLeave a comment:


Leave a comment: