Announcement

Collapse
No announcement yet.

The nebulous starter clutch

Collapse
X
 
  • Filter
  • Time
  • Show
Clear All
new posts

  • The nebulous starter clutch

    Obviously I need more things to work on, I keep finding reasons to tear apart my spare parts just for S&Gs.

    The starter clutch is one of those hardly ever a problem items on these bikes. So it is not often explored. I wanted a better understanding of exactly what goes on in there myself, so I took my spare primary shaft and started disassembly. I will not go into how to get the primary shaft out, as that involves splitting the engine cases.

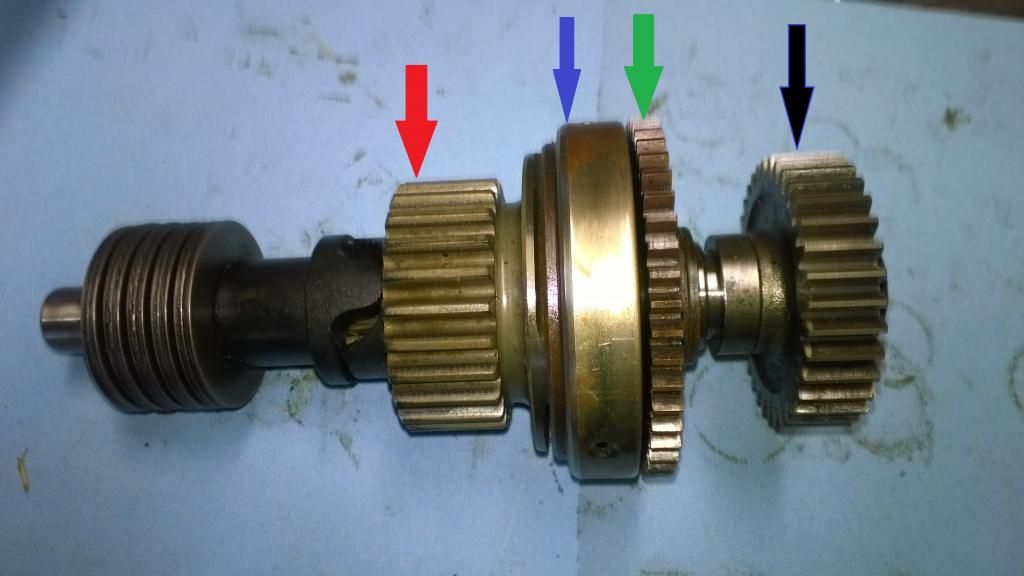
    Here you have the primary shaft. Red arrow is where the Hyvo chain connects, it is turned directly by the crankshaft. Primary and Crank turn at the same time, always! There is a mechanism in the shaft to absorb some of the force and any uneven rotation to the left in this photo. The blue arrow is the starter clutch, the green arrow is the gear that mates with the starter, so when it turns, the starter turns, and vice-versa. Black arrow is the gear that drives the main transmission shaft.

    Here you see the components removed from the shaft. Simply unscrew the nut on the end, and the rest of the parts will slide off. I used the starter clutch assembly as a slide hammer to knock that other gear off the shaft.
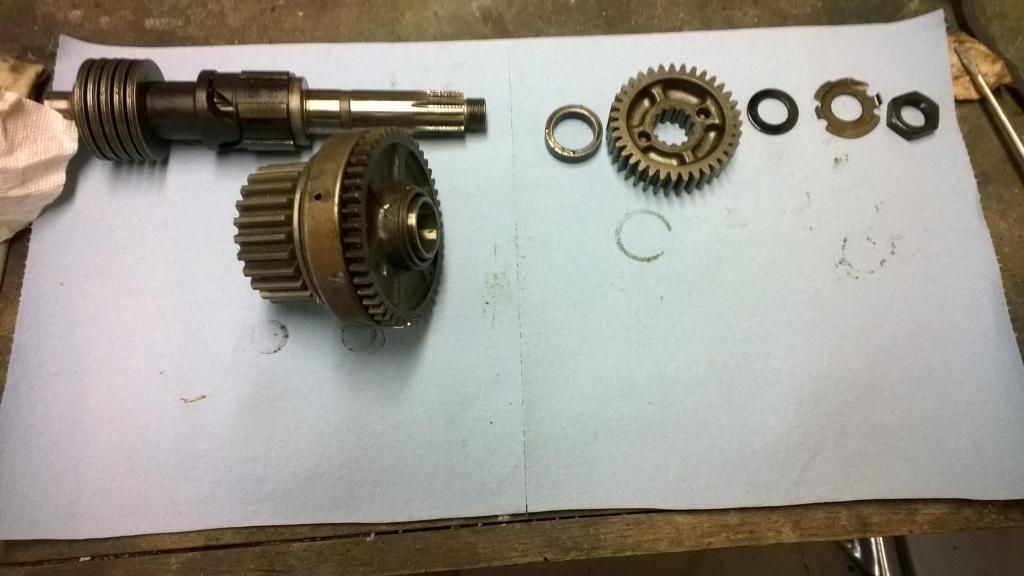

    From here the gear that engages the starter simply slides up out of the starter clutch assembly. It has a bearing shaft it rides on. It is not mated to the primary shaft, it spins freely separate from the primary shaft.
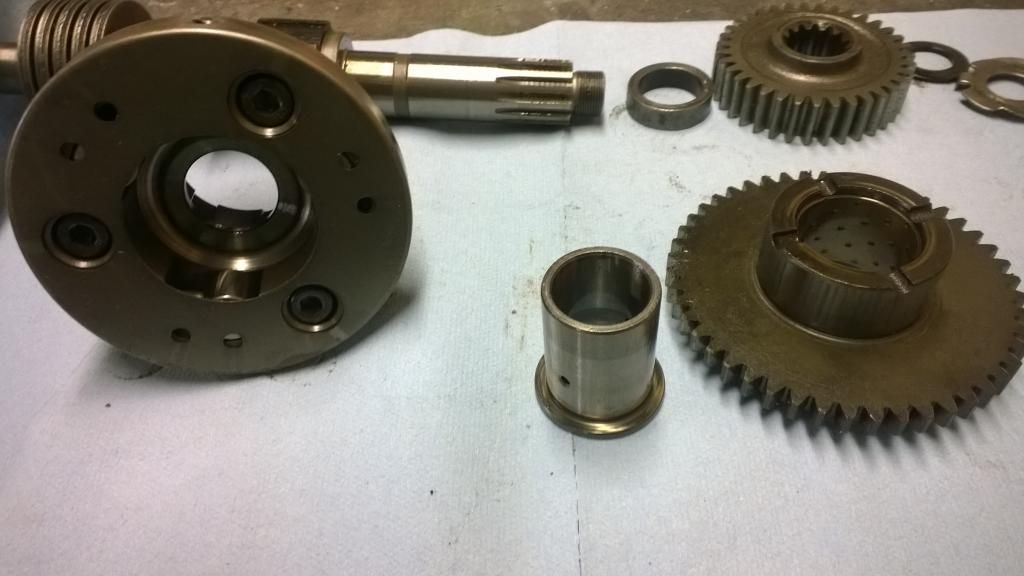

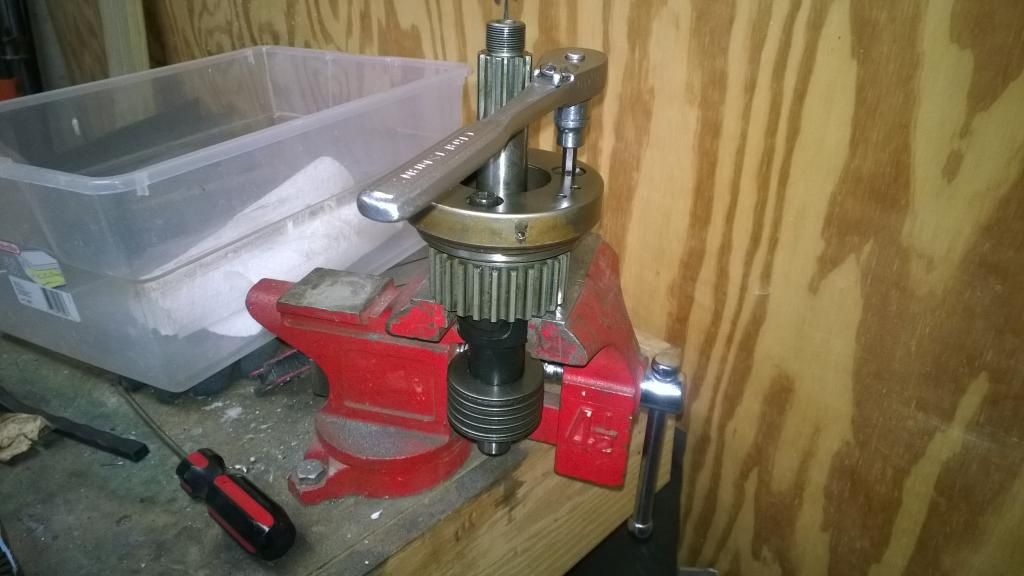
    Here you see the three 6mm hex head bolts that hold the starter clutch together. They are peened to the assembly on the other side, making them a PITA to break free.
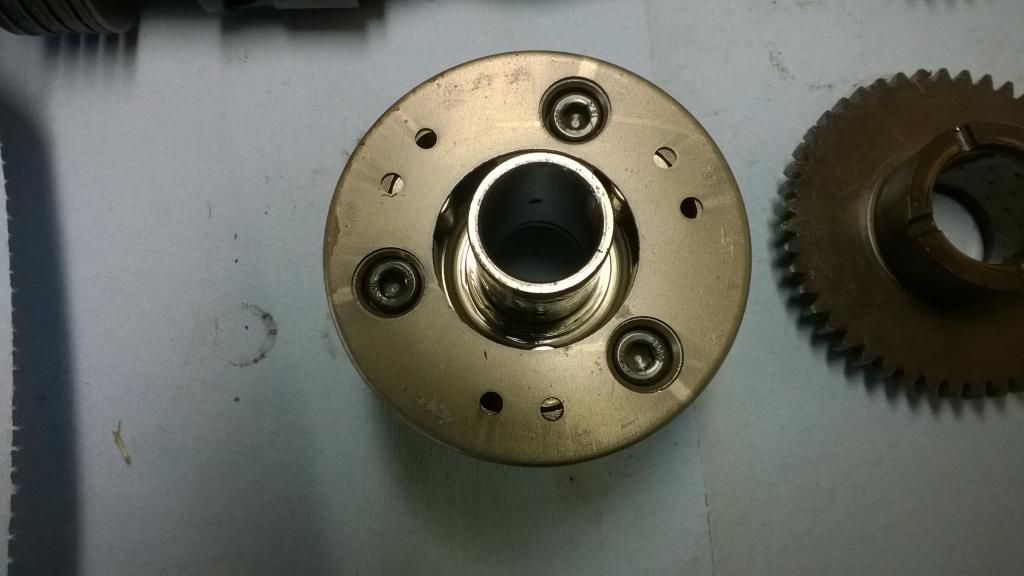

    This is how I got them loose. The jaws on the vice are below the gear and grabbing a non critical area on the shaft. They were still VERY tough to get turning.

    Now the Hyvo gear lifts off, with its little collar between the gear and the starter clutch.
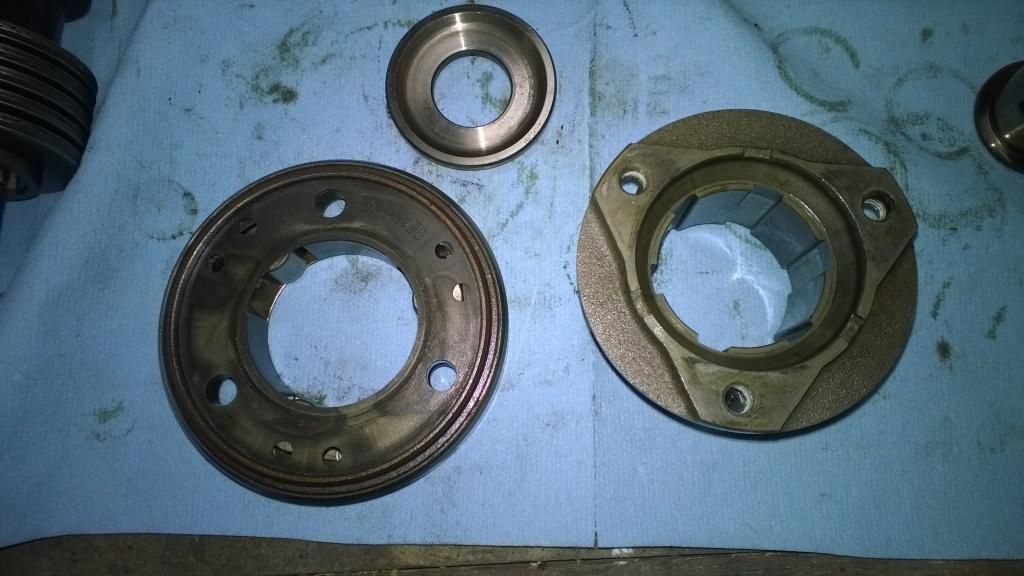

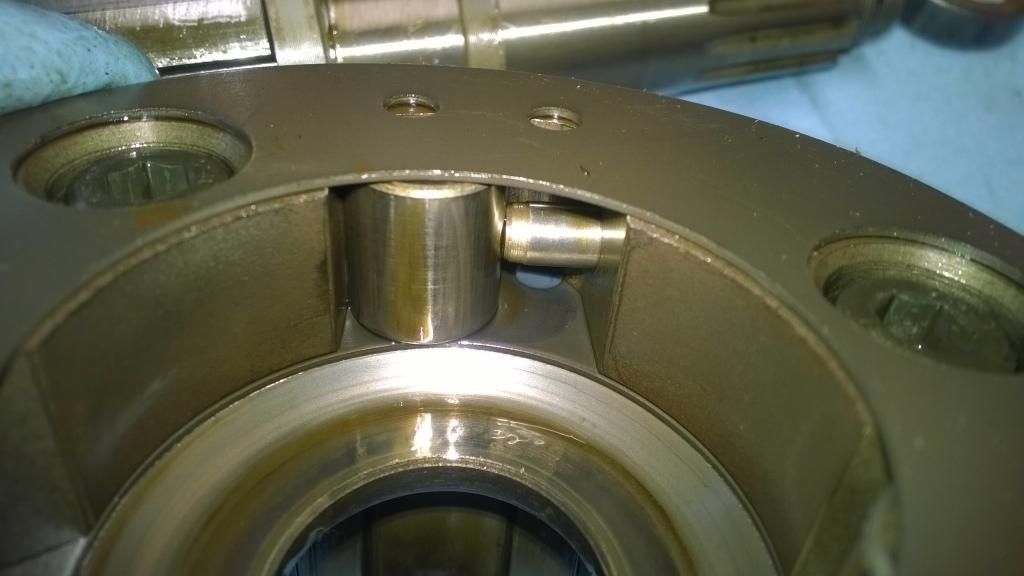
    Now you can see the starter clutch pawls, and the spring loaded plunger pushing them toward engaging.

    Here is an overhead after the cover plate has been removed (Note, the plate is marked which side goes toward the gear). If you look at the slot they sit in, it narrows, tightening the space between it and the primary shaft.
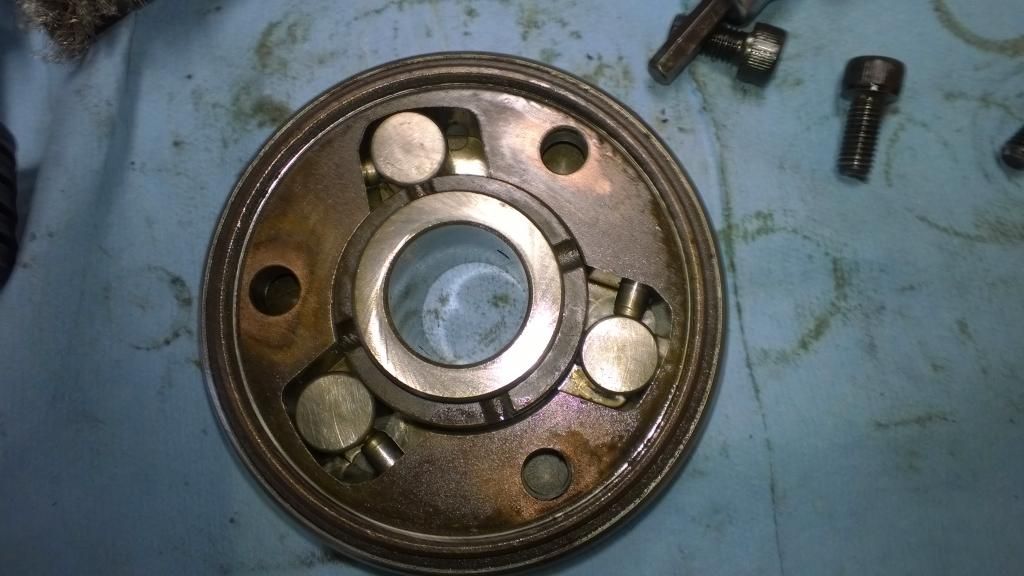

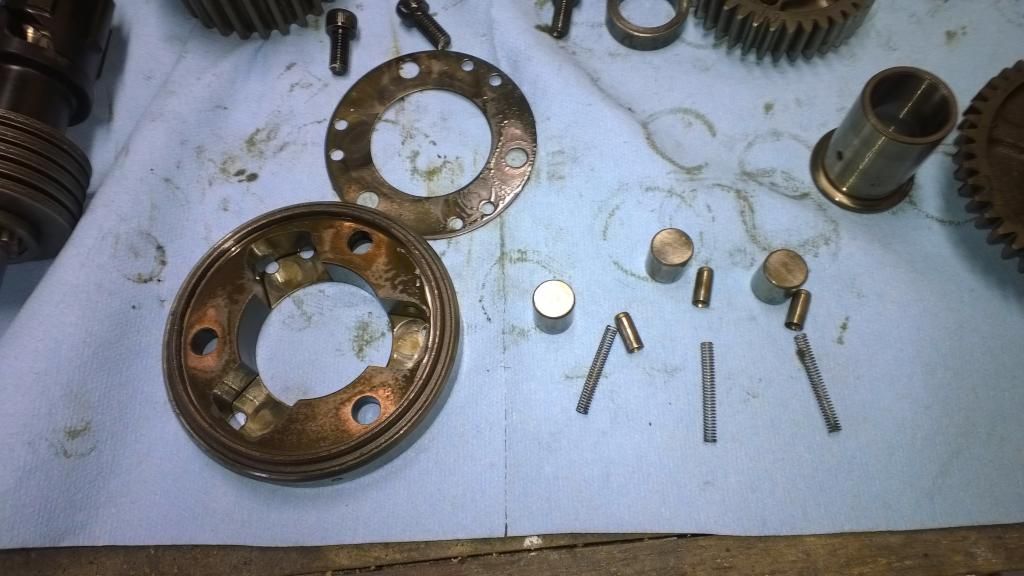
    The pawls simply lift out, and the plungers will then pull out along with their springs. A rebuild kit comes with new springs, plungers and pawls.

    Ok, so now that we have seen the innerds of this thing, how does it work?? Lets go back to the first picture. The left side of this picture is the left side of the engine. The Hyvo chain turns the shaft clockwise looking from the left side.

    So, looking again at the slots in the starter clutch, recalling your looking at the Hyvo gear side of the starter clutch assembly, this direction of rotation forces the pawls to the left as shown in this picture. Opening up the slot letting the pawls rotate and not bind with the shaft, or grab the starter gear. So when the starter is not engaged, and the engine is running, the starter gear can sit idle as the engine spins.

    Now when the engine is not turning, and you hit the starter button, the starter gear is turned, and in that case, the pawls are being forced toward the right side in the photo above, narrowing the space between the starter clutch and the starter gear. This causes them to bind and lets the starter turn the primary shaft, and therefore the engine by way of the Hyvo chain. As soon as the engine speed exceeds the starter speed, the starter clutch will release the starter gear as those pawls go back the other direction to the wider end of the slot.
    Hopefully that helps someone understand how that funky thing called the starter clutch works.
    Life is what happens while your planning everything else!

    When your work speaks for itself, don't interrupt.

    81 XS1100 Special - Humpty Dumpty
    80 XS1100 Special - Project Resurrection


    Previously owned
    93 GSX600F
    80 XS1100 Special - Ruby
    81 XS1100 Special
    81 CB750 C
    80 CB750 C
    78 XS750

  • #2
    Can We Use that Knowledge?

    Thank you Ron. Nice job.

    I have heard that one can revive a slipping clutch by simply roughening up the surface(s) inside the clutch.

    I note that the rebuild kits contain the cylindrical slugs ("pawls"?)and the spring loaded plungers.

    Intuitively, if I wanted to fix a slipping clutch, I would think to roughed up the material that the cylindrical slugs gets trapped against, inside and an outside of the cylindrical slugs.

    Yet the rebuild kits do the opposite.

    Has anyone tried fixing a slipping clutch by simply roughing the surfaces? If successful, which surfaces?
    -Mike
    _________
    '79 XS1100SF 20k miles
    '80 XS1100SG 44k miles
    '81 XS1100H Venturer 35k miles
    '79 XS750SF 17k miles
    '85 Honda V65 Magna ~7k miles
    '84 Honda V65 Magna 48k miles (parts bike)
    '86 Yamaha VMAX 9k miles

    Previous: '68 Motoguzzi 600cc + '79 XS750SF 22k miles +'84 Honda V65

    Comment


    • #3
      Hey Mike,

      Actually, I have never had an issue with mine. To get at these parts, you have to pull the engine from the bike, remove the middle drive, all the covers, the timing assembly, the rotor, the starter, the clutch, the oil passage cover, which requires removing the shift pawl setup. Then you split the cases, and remove the primary shaft.

      I will say that for the effort it takes to get in this far, I would really just splurge on the new parts.

      Don
      Life is what happens while your planning everything else!

      When your work speaks for itself, don't interrupt.

      81 XS1100 Special - Humpty Dumpty
      80 XS1100 Special - Project Resurrection


      Previously owned
      93 GSX600F
      80 XS1100 Special - Ruby
      81 XS1100 Special
      81 CB750 C
      80 CB750 C
      78 XS750

      Comment


      • #4
        Nice one. I've always wondered how the danged thing works!
        XS1100F 1980 European model. Standard. Dyna coils. Iridium plugs. XS750 final drive (sometimes). Micron fork brace. Progressive front springs. Geezer regulator/rectifier. Stainless 4 into 2 exhaust. Auto CCT (Venturer 1300) SOLD. New project now on the go. 1980 European model.

        Comment


        • #5
          Primary

          winter must be getting long eh Doug. Nice job. I had lots of fun with mine too. Just a word to the wise though, don't tamper with the round conical springs on the shaft. Not a good idea.
          mack
          79 XS 1100 SF Special
          HERMES
          original owner
          http://i946.photobucket.com/albums/a...ps6932d5df.jpg

          81 XS 1100 LH MNS
          SPICA
          http://i946.photobucket.com/albums/ad305/mack-055/2.jpg

          78 XS 11E
          IOTA
          https://youtu.be/wB5Jfbp6SUc
          https://youtu.be/RaI3WYHSuWA


          Have recovery trailer and shop if you breakdown in my area.
          Frankford, Ont, Canada
          613-398-6186

          Comment


          • #6
            Hey Don,

            Great Expose' on the starter clutch. Will have to copy and make this a "how to repair the starter clutch" tech tip!

            RadioGuy/Mike..... me thinks you didn't quite get the jist of what's happening inside the starter clutch, that the PRIMARY SHAFT is spinning thousands of rpms INSIDE the starter clutch....those little pawls/cylinders are supposed to spin freely. When the starter is working, the pawls GRAB the shaft like a pipe wrench, but they then need to be SMOOTH to be able to spin when the engine is running. Roughing up the surfaces would actually be detrimental in that it would probably cause metal particles to be broken/rubbed off and get into the oil/engine.

            I had a fellow...Train engineer or such in South Africa IIRC write about how his starter clutch was slipping. But it was difficult to get parts. He tore it apart and found a roughened up surface on the SHAFT that the pawls were trying to grab...but because it was ROUGH, they couldn't grab it very well= slipping! He put the shaft on a lathe, smoothed it out, the pawls were still smooth. Put it back together and it worked much better with the SMOOTH machined surfaced shaft!

            Now if we were talking Engine Drivetrain CLUTCH....then roughing up the surfaces of the steel plates does help in reducing slippage....but it's a totally different type of clutch and how it operates.

            T.C.
            T. C. Gresham
            81SH "Godzilla" . . .1179cc super-rat.
            79SF "The Teacher" . . .basket case!
            History shows again and again,
            How nature points out the folly of men!

            Comment


            • #7
              Well T.C., I wanted to think I had the gist, which is why I wouldn't think to roughen the pawl/cylinder, and instead the surfaces they should grab on.

              I visualize the increased friction would be beneficial to increase the grabbing force- better than a smooth surface. That's how I visualized it anyway.

              The idea of metal debris flakes is not something I thought about, although we could belabor the significance.

              Anyway, here is where I first noticed this idea of roughening:

              http://www.yamaha-triples.org/forums...122744#M122744

              I'm not sure which story to believe- perhaps we could use some more empirical evidence from our peers. Your buddy with the trains has his experience noted. At least one counterpoint is noted.
              -Mike
              _________
              '79 XS1100SF 20k miles
              '80 XS1100SG 44k miles
              '81 XS1100H Venturer 35k miles
              '79 XS750SF 17k miles
              '85 Honda V65 Magna ~7k miles
              '84 Honda V65 Magna 48k miles (parts bike)
              '86 Yamaha VMAX 9k miles

              Previous: '68 Motoguzzi 600cc + '79 XS750SF 22k miles +'84 Honda V65

              Comment


              • #8
                Hey again Mike,

                First, no aspersions intended. I thought you had meant roughing up the actual main shaft "grabbing surface" and that's what concerned me. The housing surfaces provide the pinching force to allow the rollers to grab the shaft, and so with worn/polished surfaces in/on the channels, it makes sense that it would allow the rollers to keep spinning/rolling and not STOP and WEDGE to allow them to pinch/grab the shaft.

                Okay, reviewed the Triples site post. He suggested roughing up the starter clutch HOUSING tracks/pinching channels....which does make sense with his description of smooth sections worn into the housing channels/tracks from the constant running/spinning of the main shaft and the pinch wheels.
                HE does not suggest roughing up the actual main shaft or the pinch wheels.

                This would be another thing to INSPECT when someone has a severely slipping starter clutch that doesn't respond to a new/strong battery and a change to non-synth type or lower visc oil. We know how much weaker certain springs in the engine become with age/heat exposure...ie. the drive clutch springs. Weak springs may also contribute to a weaker pinching affect, and if the main shaft and rollers are otherwise in pristine condition, then I would think the springs would be at fault. But ensuring a rougher channels surface may be an extra security move to ensure a successful repair, since it's such a PITA to get into it to begin with!

                T.C.

                PS: Hey Don, could you PULL the pinch rollers OUT of the housing and inspect the housing pinch channels to see if you can see a polishing affect on the surface of the channel vs. farther up the channel where the roller can't go?? This could help confirm the polishing affect of the rollers constantly spinning and the springs pushing just enough pressure to make the rollers rub/grind against the housing and eventually polish the surface extra smooth=slippery!? Uh...DOH... You did remove them in your 10 photo....and it looks like you can see a band of polishing in the channel....a closer view of that photo would be nice!
                T. C. Gresham
                81SH "Godzilla" . . .1179cc super-rat.
                79SF "The Teacher" . . .basket case!
                History shows again and again,
                How nature points out the folly of men!

                Comment


                • #9
                  T.C.:

                  I'll buy that story.

                  I kind of started this discussion by wondering aloud why the rebuild kits usually have only the cylinder/pawls and the spring loaded cups.

                  I was wondering why this would be the fix for a polished outer housing.

                  I intuitively don't expect springs to soften as much as others expect, but apparently they must if the rebuild kit works.

                  Appreciate your thoughts above.
                  -Mike
                  _________
                  '79 XS1100SF 20k miles
                  '80 XS1100SG 44k miles
                  '81 XS1100H Venturer 35k miles
                  '79 XS750SF 17k miles
                  '85 Honda V65 Magna ~7k miles
                  '84 Honda V65 Magna 48k miles (parts bike)
                  '86 Yamaha VMAX 9k miles

                  Previous: '68 Motoguzzi 600cc + '79 XS750SF 22k miles +'84 Honda V65

                  Comment


                  • #10
                    Thanks for the detailed write-up, DG!

                    Just curious, but are there any tricks to dealing with peened bolts besides careful application of brute force? The two suggestions I could find from a google search are to 1) Grind off the burr or 2) Try to tighten the bolt to expose the burr to break it off.

                    I've always been concerned about damaging threads by forcing them out. Perhaps I'm overly cautious? Of course "always" isn't exactly very often considering they don't come up very often.
                    82J · 81SH · 79SF Fire Damage · 78E · 79F Parts Bike · 04 Buell Blast
                    Website/Blog

                    Comment


                    • #11
                      TC, I will get a better pic of those slots maybe this evening.

                      As for the peened bolts, for me, every case is different. In this case, the bolt is pretty good sized, and the peen is basically a small punch. So it is very little area effected on a nice size bolt. I had no real concern about the bolt overcoming the deformed metal.

                      Now for the butterfly shaft screws, such a small fastener and about the entire thing is deformed. Some have had success just un screwing them, I have not.
                      Life is what happens while your planning everything else!

                      When your work speaks for itself, don't interrupt.

                      81 XS1100 Special - Humpty Dumpty
                      80 XS1100 Special - Project Resurrection


                      Previously owned
                      93 GSX600F
                      80 XS1100 Special - Ruby
                      81 XS1100 Special
                      81 CB750 C
                      80 CB750 C
                      78 XS750

                      Comment


                      • #12
                        Peened bolts on the starter clutch- I drilled that area with cobalt bits on my one project- then replaced the bolts with similar hardness.

                        On MKII butterfly shafts, my record is 9/10 successfully removed with a fresh American Philips head. The one failure was recovered with an easy-out.
                        -Mike
                        _________
                        '79 XS1100SF 20k miles
                        '80 XS1100SG 44k miles
                        '81 XS1100H Venturer 35k miles
                        '79 XS750SF 17k miles
                        '85 Honda V65 Magna ~7k miles
                        '84 Honda V65 Magna 48k miles (parts bike)
                        '86 Yamaha VMAX 9k miles

                        Previous: '68 Motoguzzi 600cc + '79 XS750SF 22k miles +'84 Honda V65

                        Comment

                        Working...
                        X