Well, I'd never try threading a standard pitch anything into our bike's metric-threaded holes. Somebody mentioned that regarding my air shocks, and it was not happenin'.
Questions about gauges and sending units
Collapse
X
-
1979 XS1100F
2H9 Mod, Truck-Lite LED Headlight, TECHNA-FIT S/S Brake Lines, Rear Air Shocks, TKAT Fork Brace, Dyna DC-I Coils, TC Fuse Block, Barnett HD Clutch Springs, Superbike Handlebars, V-Star 650 ACCT, NGK Irridium Plugs, OEM Exhaust. CNC-Cut 2nd Gear Dogs; Ported/Milled Head; Modded Airbox: 8x8 Wix Panel Filter; #137.5 Main Jet, Viper Yellow Paint, Michelin Pilot Activ F/R, Interstate AGM Battery, 14MM MC, Maier Fairing, Cree LED Fog Lights. -
Got a tentative reply back from Del City....I had to write to them a second time, and they said they would check with Stewart Warner regarding the Ohm Range. I then did some more Net Searching, and found a reply on another forum where a guy stated that ALL of the SW gauges and senders he had ever worked with/seen used the 240 -33 ohm range for all of their senders...fuel, pressure, temperature, etc.!
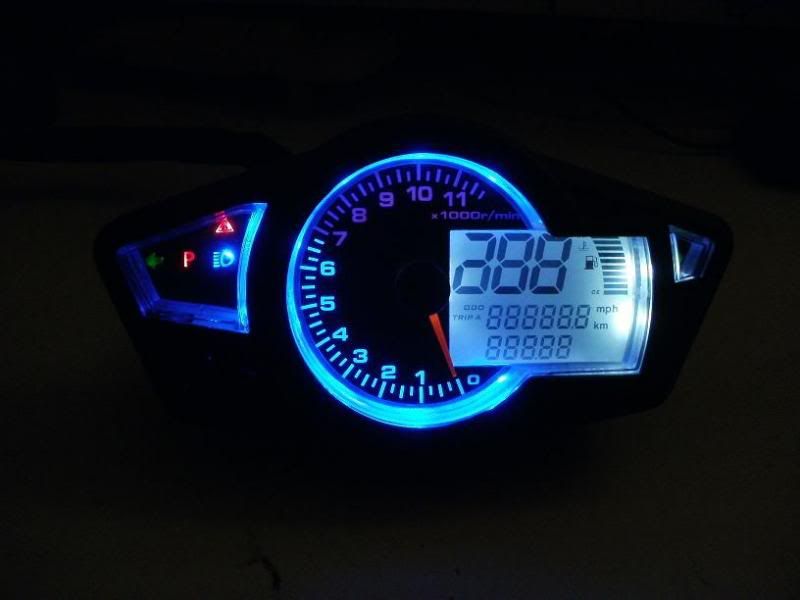
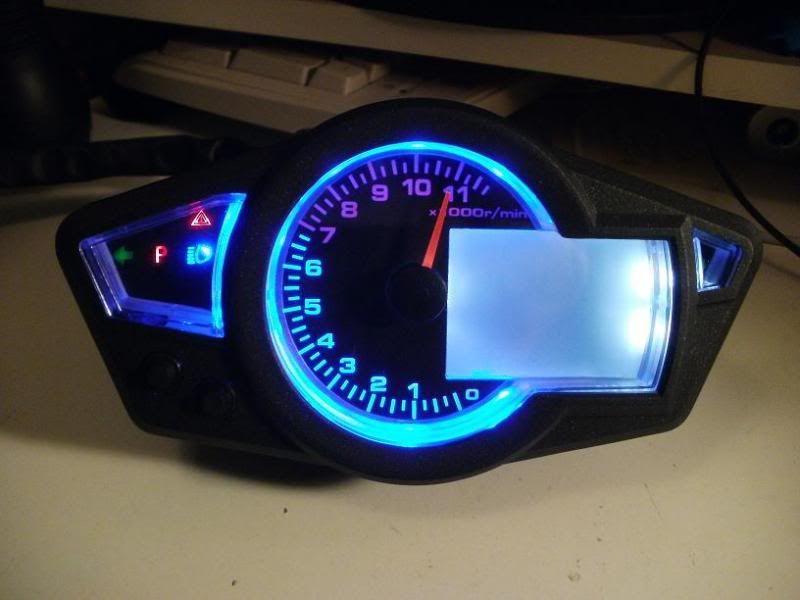
I know how we like pictures, so I took a couple of it tonight while I powered it up...one in very low light but also setting the camera sensitivity 2 stops lower to try to prevent it from GLARING. The second one was in more light just to show a little better view of the outline of the gauge and it's design. I'll be getting some more where I have it positioned with the OEM gauges for a better size comparison!
In this first one, you can see the turn signal, the red "P" which I will use as an OIL Pressure Switch similar to the RED one on our bikes, the blue high beam, and the red triangle...the over-rev warning. On the right side is the digital readout....showing Odo/Trip, the large size speed #'s, the smaller Odo, and then the Fuel and Temp scale along the right side. It shows both the gas pump symbol as well as the Thermometer symbol, and the letters H and F whihc are cut off in the picture at the top for either Hot or Full, and C and E at the bottom, for Cold or Empty.
This second one just shows where I caught it in the middle of it's TEST excursion where it runs the needle all the way up and then back down the dial, but the Digital readout hadn't energized yet! The two buttons on the lower left side are the Mode/Programming ones, where you can set the front TIRE/Wheel size, the Oil Temp Ohm range 100 or 500, and the Metric KPH or Standard/Usa MPH, the # of cylinders for the tach 2-4, and it even has a CLOCK!!
I've got a spare engine that I can take the Oil pressure switch out off and to the local Lowes to see if it will match up to the plumbing fittings/threadings...1/8 NPT or such! I'll report back whether it is standard sized or what, but I've seen folks with mods "T" fittings and such, so that's why I think they were able to just get them locally ie. Lowes/Home Depot/Ace???
T.C.T. C. Gresham
81SH "Godzilla" . . .1179cc super-rat.
79SF "The Teacher" . . .basket case!
History shows again and again,
How nature points out the folly of men!Comment
-
Pay attention on the oil sender thread. There's two 'common' 1/8" pipe threads, the US version which is 27 threads per inch, and the 'BSP' (British Standard Pipe) which is 28 threads per inch. The latter can be common on Japanese vehicles for some reason (hey, they do drive on the wrong side..I've got a spare engine that I can take the Oil pressure switch out off and to the local Lowes to see if it will match up to the plumbing fittings/threadings...1/8 NPT or such! I'll report back whether it is standard sized or what, but I've seen folks with mods "T" fittings and such, so that's why I think they were able to just get them locally ie. Lowes/Home Depot/Ace??? ) and almost impossible to spot by eye. If you even suspect that, check with a thread pitch gauge. One will 'fit' in the other hole, but leaks are common and it tends to trash the threads. DAMHIKIJK....
Fast, Cheap, Reliable... Pick any two
'78E original owner - resto project
'78E ???? owner - Modder project FJ forks, 4-piston calipers F/R, 160/80-16 rear tire
'82 XJ rebuild project
'80SG restified, red SOLD
'79F parts...
'81H more parts...
Other current bikes:
'93 XL1200 Anniversary Sportster 85RWHP
'86 XL883/1200 Chopper
'82 XL1000 w/1450cc Buell, Baker 6-speed, in-progress project
Cage: '13 Mustang GT/CS with a few 'custom' touches
Yep, can't leave nuthin' alone...Comment
-
Little update.
Thanks again Steve,
That makes sense, and it probably IS the BSP standard, haven't taken it off yet though. I did find some "T" 1 male to 2 female fittings in the BSP sizing on MSCDirect site. But I'm still fighting the sender issue....trying to find one with the right Ohm range. My research has yielded that VDO used a 180-10 ohm range. Found one at Napa/Echlin an dit's a 450- 46 ohm range=220 degrees...may go lower/ohm and higher temp, but not sure. IF I have to stay with a 1/8" NPT type, then I'll just need to get an adapter for the "T" fitting....NPT to BSP!?
I've got to do some more testing of the GAUGE to confirm as close as possible the OHM range, and what the max temp bar / ohm reading will be since it doesn't have an actual degree readout. THEN I have to decide what temp range I want to be the max....~ 250, 280? I've read that Harleys are noted to be 250+ and not unusual. What would you suggest as my MAX temp range for the gauge so that IF it gets that high that I'll know to stop and let the bike cool....like if I'm stuck in severe stop and go traffic in the middle of the summer!?
I put my new AGM battery(Scorpion brand) in the bike yesterday, and it fired right up after sitting for 6+ months....I LOVE SEAFOAM!!! I put it in the tank on my last ride, got it well into the carbs and such, and then garaged it.
I then temporarily connected the new Dig Gauge to see how the TACH would work...I had a wire tapped into the Orange wire at the TCI. Once I got the RPMS above 2k, it worked just great on 2 CYL MODE! I was wanting to take a short video to compare it to my OEM tach...but my OEM tach WASN'T working! It had been acting flaky this past year, occasionally bouncing wildly and such? So...no comparison video....but I'll be taking the gauges off and checking out the wiring just to make sure I'm still getting a signal on the tach wire from the mini race -alt. Anyways...below 2K the new Dig Gauge was erratic....I figured it wasn't getting a strong enough signal. I'll be putting a new direct wire tap on the (-) terminal right at the ignition spark plug COIL and see how that works!
I also scoped out the front wheel looking for a place to mount the Trigger MAGNET for the Speedo hall sensor...and have figured out that I can just drill a hole in the recess of the Front Rotor....this way I'll be able to mount the hall sensor on the backside of the left fork near the OEM speedo cable area.
Just need to get the OIL temp sender figured out, get the fuel sender for an XJ bike, and then I should be able to perform the complete install.
I need to figure out a modified custom HOUSING/mounting bracket for it. I'm going to be replacing my ROUND LED Voltmeter with a larger easier to see/read DIG #'s LED type readout gauge...and want to be able to mount it near/next to the new gauge in a DASH type configuration. I'll also need to mount a nice big GREEN LED light for a NEUTRAL light since the gauge didn't have one! SO...some fabrication is in my future!
But hopefully after it's all done, folks will be able to see that we can put an inexpensive DIG Gauge/Speedo/Tach cluster on our bikes with not too much trouble....once we figure out the right parts/senders to use.
T.C.
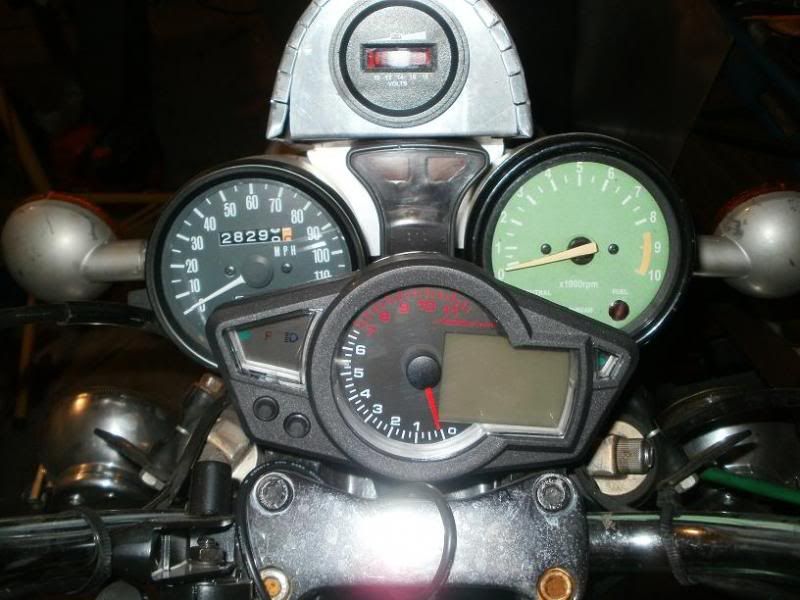
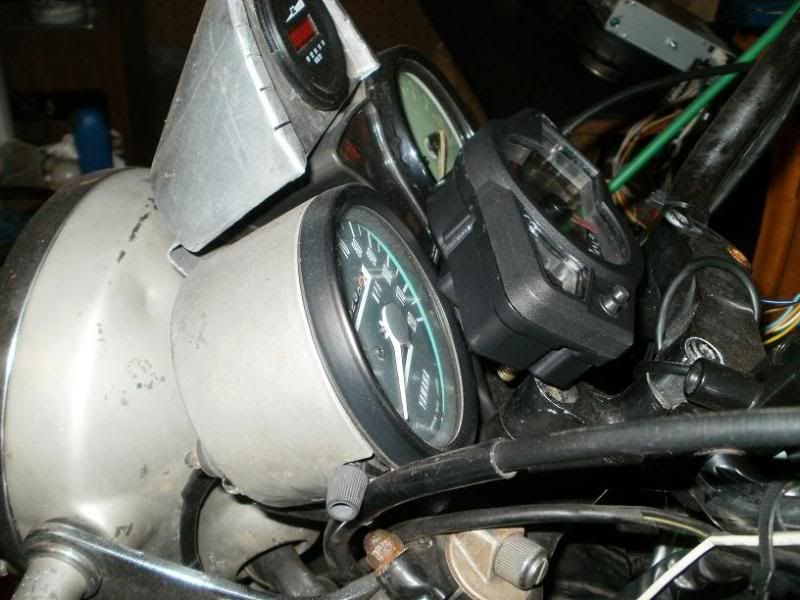
Forgot the PHOTOS....just to show a comparison of the SIZE of the Dig Gauge Cluster to the OEM! The Tach looks very close to the same size as OEM!
You'll have to excuse the uglyness of my headlight/gauge buckets/turn signals...were badly rusted and such, had painted them with some "silver/pseudo" chrome type paint, but it didn't last/hold up...just been too lazy to change it! Yes, that' s a 650 dark green faced SPEEDO...that's why it's a little smaller/offset in the cluster..and my patheticly repaired tach....the needle and the face reprinted on a sticky CD label, but it faded!
 T. C. Gresham
81SH "Godzilla" . . .1179cc super-rat.
79SF "The Teacher" . . .basket case!
History shows again and again,
How nature points out the folly of men!Comment
-
Well,
I did a bit more testing on the Dig Gauge with my "Pot". Testing the Temperature scale.....bottom was at ~240 ohms, and upper was at/near 20 ohms, so it looks like they used the Stewart Warner RANGE for both their Fuel gauge as well as their temperature gauge! And it didn't change whether I programmed it to the 100 or 500 ohm range!? However, remember that there's a LANGUAGE barrier with regards to their description. They describe it as an Oil MASS gauge....which to me would be pressure? The Red Letter P on the dash comes on with just a simple GROUND circuit like the oil pressure SWITCH.....it's either on or off, so I don't see why it would need a 100 or 500 ohm range? Yet....during the programming mode....I can switch between the 5 or the 1 but I didn't see any difference in the bars display with the different ohms ranges I tried! Oh Well....at least I now know what Ohm range it uses!
Secondly, I've been doing a little more thinking about connecting the oil temp sensor to a T at the OEM oil pressure location? I don't know how much FLOW the sensor will see at the END of the "T". I know the engine is pumping oil up to that location for the pressure sender switch, but I don't think/know if it's really circulating much there...and would it circulate into and out of the "T" and the angle?? So...it might also read a higher temp behind the engine/head due to the heat coming off the head? And then there's all of the adapters/T fittings needed to mount it there $$
So....I think I'll need to pull the oil pan and drill/tap and mount it into the side of the pan instead. This way it'll be submerged in the engine oil for a more accurate reading of the oil temp. And I guess I'll get the lower scaled sender with the 240 degree's max rating.
I'll be making a custom housing as mentioned in my previous post out of some 1/8" thick aluminum plate. I had seen that fancy Engine Turned pattern, but it was a bit too $$. My saddlebags and trunk are Aluminum Diamond Plate, but that is too lumpy. I then found some 1/10th scale 32 ga. plate used for RC type applications...looks like it will be perfect for a nice pattern/texture Venier and will match my bags! Stay Tuned.
T.C.T. C. Gresham
81SH "Godzilla" . . .1179cc super-rat.
79SF "The Teacher" . . .basket case!
History shows again and again,
How nature points out the folly of men!Comment
-
You need a higher temp sender range. You are going to max out that 240 degree sender all the time.Nathan
KD9ARL
μολὼν λαβέ
1978 XS1100E
K&N Filter
#45 pilot Jet, #137.5 Main Jet
OEM Exhaust
ATK Fork Brace
LED Dash lights
Ammeter, Oil Pressure, Oil Temp, and Volt Meters
Green Monster Coils
SS Brake Lines
Vision 550 Auto Tensioner
In any moment of decision the best thing you can do is the right thing, the next best thing is the wrong thing, and the worst thing you can do is nothing.
Theodore RooseveltComment
-
Thanks Nate,
After posting, I reviewed and found some on eBay, one with the high range 140 to 320 degrees. The gauge will start flashing when it gets too LOW of an ohm reading....below the 25 ohm range, and that is around 280 degrees, so hopefully it'll be a better range for monitoring and still fit within the range of the gauge readout.
CZ, yeah, I could probably do it with my little LATHE/MILL setup, but it would be a bit time consuming to say the least. Besides, after I found the mini-diamond tread plate....I think it will better match my bike and it's bags/trunk pattern anyways. Just waiting for all of the parts to arrive and then I can start "Playing" with the install and fabrication process.
T.C.T. C. Gresham
81SH "Godzilla" . . .1179cc super-rat.
79SF "The Teacher" . . .basket case!
History shows again and again,
How nature points out the folly of men!Comment
-
Update
Hey Folks,
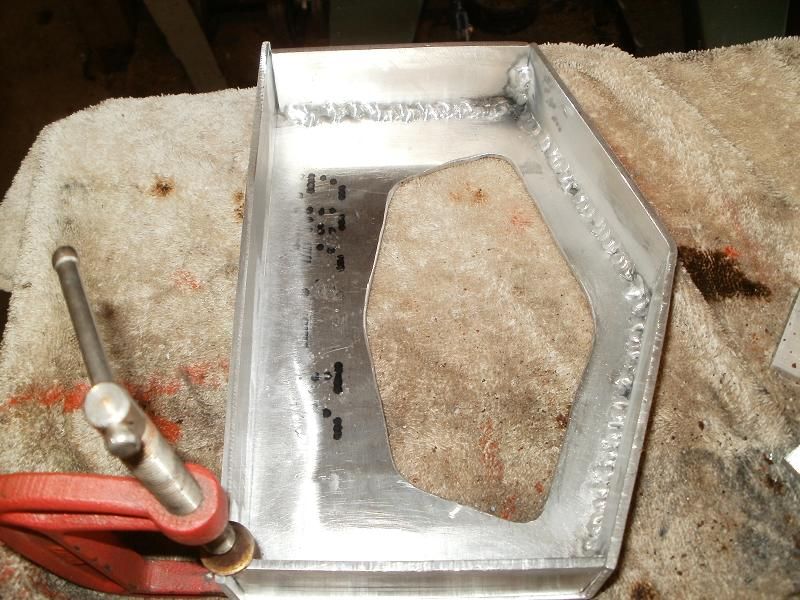
Well I got all of my sending units, parts and stuff, so have been able to make some progress on the MOD! I had a setback this past week though...involving welding ALUMINUM! Some of you may know that I had "played" with welding very thin aluminum many years ago when I made my 24" long aluminum diamond plate toolboxes into 18" long saddlebags! I used my Lincoln Pro-Mig 135 wire feeder, had it set to high wire feed and lowest power, along with PURE Argon shielding gas, and was able to get them done.
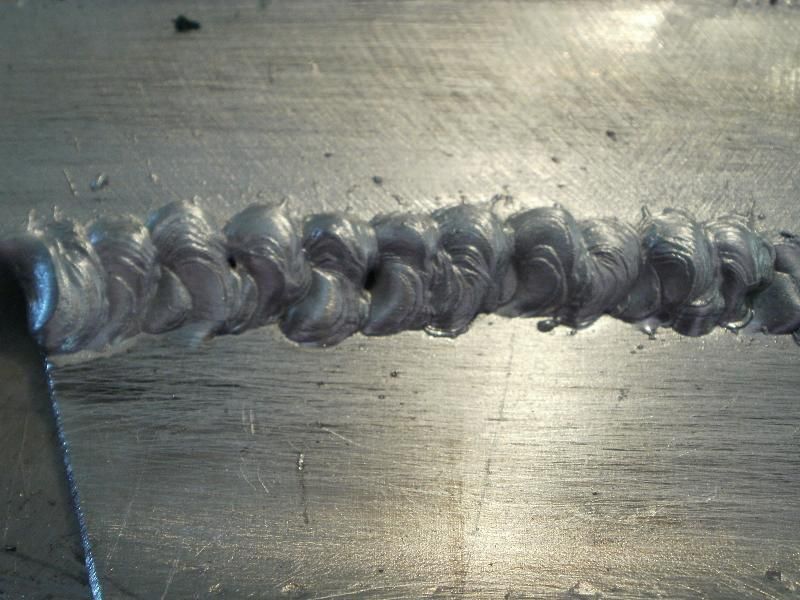
However, with this MOD, I am using 1/8" thick aluminum plate....and wanted/needed to be able to weld it to make a nice box/compartment to house my gauge cluster and such. But the 4043 wire I was using was just too soft...kept birdnesting right at the feeder, and I was still using the coiled wire LINER for my unit's gun. SO....after a little more research I found that there is another filler wire...5356 which has more magnesium vs. silicone, and is generally stiffer. For this application....low heat....it will be fine, so I picked up a roll at the local welding shop. I loaded it into my welder, still using the coiled wire LINER, cranked it up to the 2nd power setting and feed rate of ~9 out of 10. VIOLA Worked like a charm, no more birdnesting. I also took a few extra steps to try to ensure success....I scrubbed/roughed up the surfaces to remove the thin Oxide layer that forms in a matter of days when just exposed to AIR, and then I also used my HEATGUN at 1000 degree setting to PREHEAT the area as well.
Some of the "beads" in the first below example of my open box were with the earlier flimsy wire, the later ones are much better/deeper, still not PRETTY but that's what they make grinders for!

Okay, first is the aluminum plug with steel Magnetic core for the speedo, it's about the size of a dime but I didn't put one in the picture for comparison. I drilled a hole in my front left rotor...didn't get it quite centered! And then J-B Welded it in place. The plug has a "C" clip provided you had a flat thin piece of metal to stick it into...I didn't!
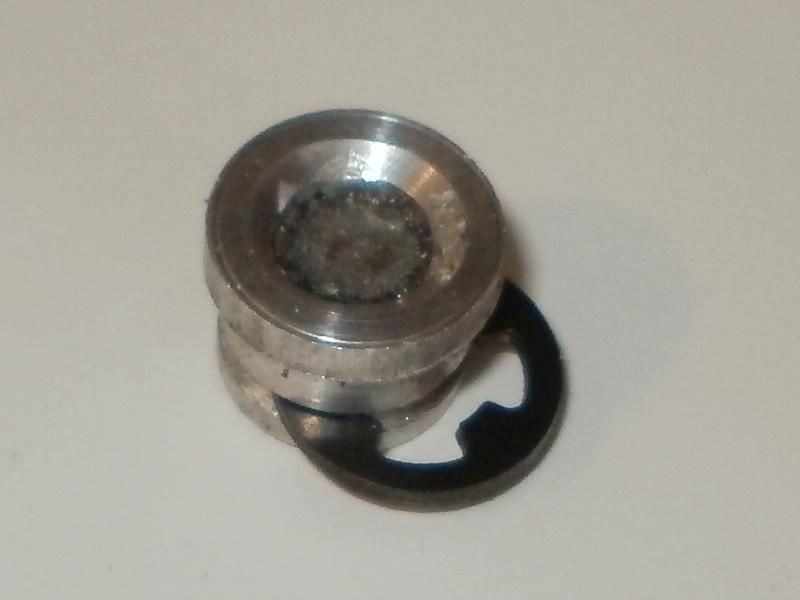
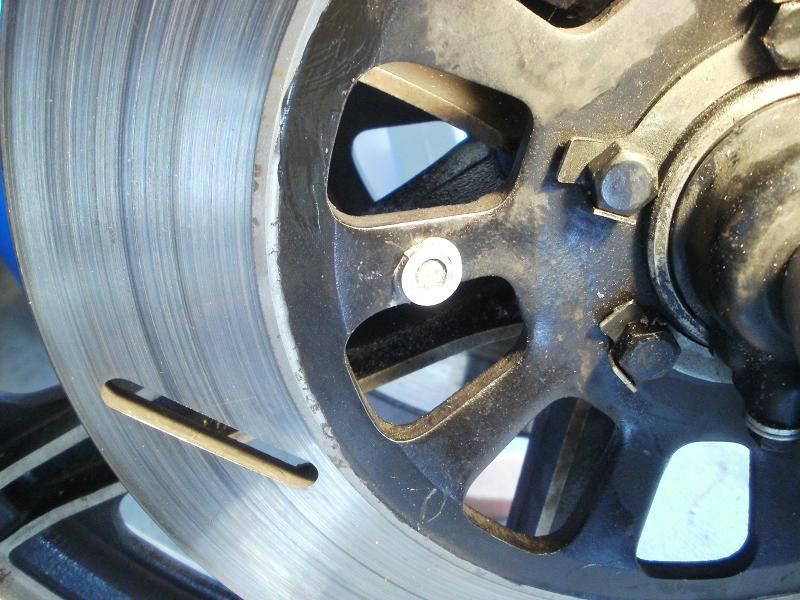
Next are the partially assembled/welded gauge box/compartment and example of bead.
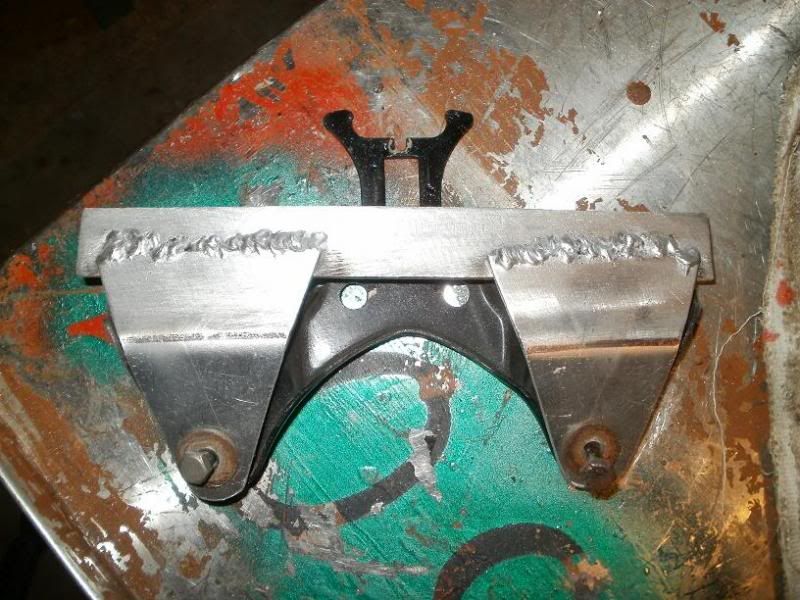
Below I used the OEM gauge bracket to fashion one out of some of the pieces I had left over after cutting out the gauge faceplate...since I could now weld I didn't have to waste these, nor did I have a piece big enough to cut this shape out of anyways!!!
And this is just a MOCKUP showing how it will be positioned on the mounting bracket, the new Digital #'s voltmeter, and my GREEN LED neutral light indicator!
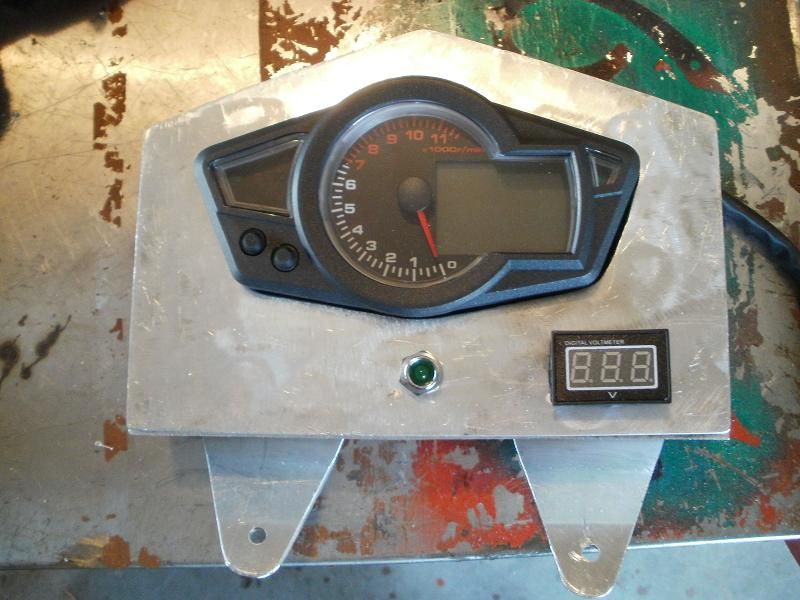
Remember, this is a rough mockup, I still have the fancy 1/10th scale diamond plate venier to put over it and such!!! I think it will look very sharp once it's done and mounted. Just have to sort out that bird's nest of a wiring mess in the headlight bucket...AND I got a New to me headlight bucket to replace my old one....BLING!!
T.C.T. C. Gresham
81SH "Godzilla" . . .1179cc super-rat.
79SF "The Teacher" . . .basket case!
History shows again and again,
How nature points out the folly of men!Comment
-
TC,
Your constant evolution in XS11 technology never ceases to amaze me. Keep it coming!Marty (in Mississippi)
XS1100SG
XS650SK
XS650SH
XS650G
XS6502F
XS650EComment
-
Not as far along as I had hoped!
Hey again folks,
Well, it's amazing me how long this whole fabrication and conversion is taking me! I have been expecting to see REV's bike/thread by now also!
Anyways, I finalized the gauge box, and put the mini-diamond plate venier on it. Looks "OKAY", not as pristine as I had wanted/hoped, but then I'm not a sheet metal artist! So...just a couple of shots of it mounted to the handlebars above the headlight bucket....no HEADLIGHT assembly in it yet.
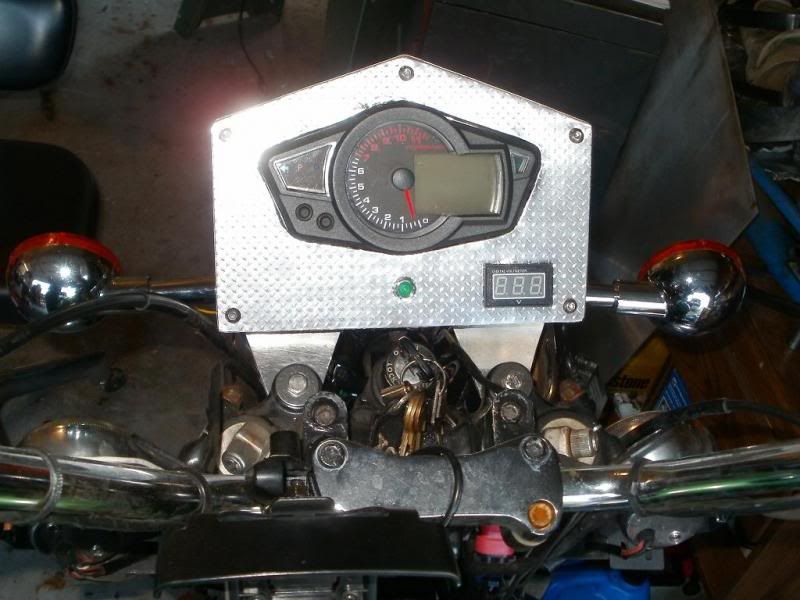
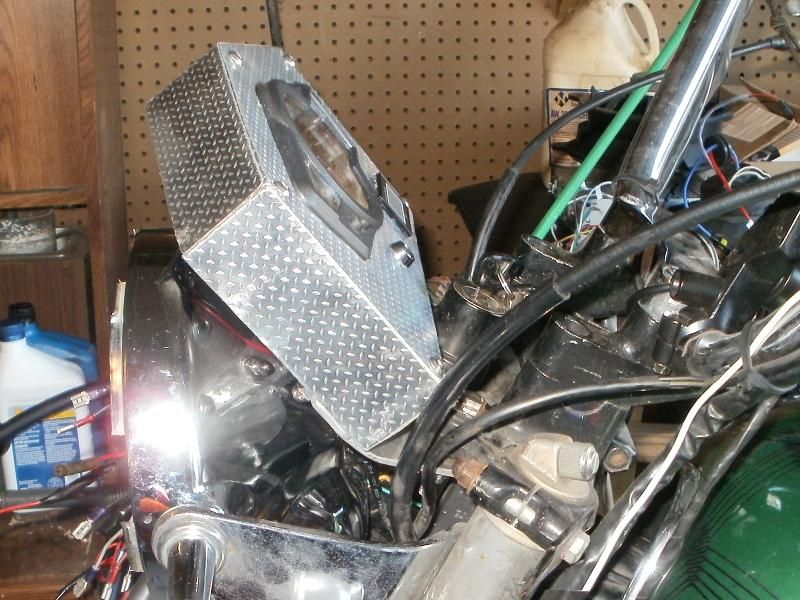
Thankfully that nasty BlackIce trojan variant that I got ahold of didn't get to my PHOTOBUCKET photos so I have a lot of them there!
I also got a functioning fuel tank float(Thanks Andreas) from a Standard that fit into my XJ tank. I had to drop my headers to drill and tap a 1/4" NPT hole for my oil sender unit....did that to my SOFA plate so I didn't have to damage my OEM engine tranny/oil case! I've got the wiring pretty well figured out. Did a test on it, my neutral light was acting buggy??? I've still got to run the speedo sensor cable and mount the sensor to the bottom of the fork, and remove the OEM speedo drive cable....won't be needing it. I need to figure out something to fit/stick over/into the speedo drive unit to keep dirt/dust out of it?? Guess I could use an OLD speedo cable end, cut off the cable/sleeve a few inches from the attachment, put a vacuum plug cap or something over it and reattach it to the bike/wheel/speedo drive unit.
I know last year I helped George/GloweVa with a replacement speedo cable, wondering if he kept his old broken one or not???
I hope to have this thing fully functional soon, and will take a Video or two of it in action! Stay tuned.
T.C.T. C. Gresham
81SH "Godzilla" . . .1179cc super-rat.
79SF "The Teacher" . . .basket case!
History shows again and again,
How nature points out the folly of men!Comment
-
I'll look around to see if i still have it. I am kind of a pack rat when it comes to stuff like that.Hi, my name is George & I'm a twisty addict!
80G (Green paint(PO idea))
The Green Monster
K&N A/F, TC's fuse block, '81 oil cooler, TC's homemade 4-2 w/Mac Mufflers, Raptor 660 ACCT
Got him in '04.
bald tire & borrowing parts
80SG (Black w/red emblems & calipers)
Scarlet
K&N A/F, TC's fuse block, WJ5, Shoei bags, Raptor 660 ACCT.
Got her in '11
Ready for the twisties!
81H (previously CPMaynard's)
Hugo
Full Venturer, Indigo Blue with B/W painted tank.
Cold weather rideComment
-
I'm done!
Okay folks, I think I'm done with this mod.
Here's the link to the YouTube video showing it working.
The bike was cold so no complaining about the popping! The TACH is a bit jumpy at first, then it settles down once I actually start revving it. Some of you electrical gurus might be able to give me a tip as to what to do to make it more stable at lwo rpms/idle? I thought I had read on here about someone that had installed a tach, and has to put resistor in line or such?? I tried and thought I had taken much more video whilst riding/driving but finger must have his the shutter/on/off button...only had 17 seconds...but was mainly showing that the OEM speedo...still connected was showing essentially the same speed as the Dig Speedo!
I also put on some new hi power LED aux driving lights, but will post about them in my HID thread!
T.C.T. C. Gresham
81SH "Godzilla" . . .1179cc super-rat.
79SF "The Teacher" . . .basket case!
History shows again and again,
How nature points out the folly of men!Comment
-
High Jumping Tachometer
Man! That looks good, T.C.!
I wonder if the tach input is picking up voltage transients or RF. How is the tach wire connected and routed?
The tach reads higher at low RPM as if it were shorting to something, not just jumping. If there's no short, it could be picking up the inductive 'kick' from the two ignition coils or the noise from the spark plug wires/spark plugs before it straightens up and flies right. Heck, it could be picking up the low-frequency A/C ripple from the alternator too before the 'noise' goes out of range for the tach to be able to read when the RPMs pick up.
Or the new tach's hosed and you need a new one....
.-- Scott
_____
♬
2004 ST1300A: No name... yet
1982 XJ1100J: "Baby" SS Brakes, '850 FD, ACCT
1980 XS1100G: "Columbo" SS Brakes, '850 FD, ACCT
1979 XS1100SF: "Bush" W.I.P.
1979 XS1100F: parts
2018 Heritage Softail Classic 117 FLHCS SE: "Nanuk" It's DEAD, it's not just resting. It is an EX cycle.
♬Comment
-
Hey Scott,
First, welcome back, missed seeing you here. Secondly, the tach is wired directly to a tap off of the negative side of one of the plug coils. I had it sitting on the bikes seat a few weeks ago for a test run. I had a tap wire connected to the same wire as one of the pickup coil trigger wires just at the TCI and it did the same thing. I thought it might have just been a WEAK signal being so far from the ignition coil? I ran a direct 16ga wire tap directly from the negative side of the ignition/spark plug coil to the gauge on the TT. It just runs up from the coil around the frame neck and into the headlight bucket wiring cluster.
SO.....what can I do to try to ruleout these contributing factors/problems? IF it's RF interference.....would using a SHIELDED wire be worth a shot? The gauge itself in the aluminum box..I don't know how much shielding that may provide...or if it amplifies it???
Remember, I have the 1 wire Mini-race alt, this tach doesn't get any signal from the ALT anymore, so no tap on one of the alt phases. So In don't know how much RF comes off of the mini-race alt...but it is designed for use in race car applications...and they use some sophisticated fancy ignition electronics nowadays so I would hope that it was made to keep RF down so as not to interfere with those type of components??
T.C.T. C. Gresham
81SH "Godzilla" . . .1179cc super-rat.
79SF "The Teacher" . . .basket case!
History shows again and again,
How nature points out the folly of men!Comment

Comment