For those of you who may be looking for a little different style, or who prefer chrome I have a Tech Tip for you. This tip will tell you all I know about installing Virago Gauge pods and gauges on your XS or XJ 1100. This tip is for people who are moderately experienced with the wiring on these bikes, because it will get a little confusing. When I installed my pods, I made a lot of other changes to my wiring harness at the same time, so some of my info you may use, and some you may not. I will not be able to explain every wire you need to cut and how to route it. For that you will have to use your wiring diagram and figure it out yourself. I'll explain as good as I can.
Why switch to Virago Gauges and pods? Because the Virago gauge pods include a built in chip fuse panel, they are cool looking with their sleek bullet style and chrome, and have white gauge faces that a lot of people like. And for those of you who have a 1980 or later speedometer that only reads to 85 MPH, you'll be glad to know that the Virago speedo reads up to 125 MPH. That's about the top speed of an XS with stock gears anyway.
IMPORTANT NOTES:
1. The Virago speedometer works identical to our own and will not need to be calibrated. Your speedo cable hooks up the same and the length will work just fine.
2. The wiring has the same exact color coding as an XS or XJ. That includes the idiot lights, speedometer sensor, fuses etc...
3. If you are trying to install these on an XJ, you will not be able to hook up the extravagant warning system. Virago gauge pods only come with the basic idiot lights. Fuel, oil, high beam, neutral indicator, left, and right.
4. The mounting brackets for these gauges will have to be altered depending on whether you're putting them on an XJ, or XS triple tree. If you have an XJ the virago gauge brackets will fit in the triple tree mounting holes if you remove the metal sleeves inside the rubber mount bushings. If you have an XS11 triple tree, you will have to alter the gauge brackets to fit into the mounting holes, because the mounting holes on the XS are too wide for the gauge mounting bolts.
5. The only thing I haven't been able to test yet, is the speedo sensor in these gauges. The speedo sensor is used to send a signal to the turn signal auto cancelling unit. I have installed different turn signals on my bike and no longer have the stock signals. I may have to get rid of my turn signal canceller anyway so I haven't been able to try it out. In all actuality, the speedo sensor may just work fine on an XS.
6. The tachometer cannot be hooked up the same as the XS tach is hooked up. The Virago tach gets it's signal from the number 1 coil (Orange Wire). You may think to yourself that this will not work because the Virago is a 2 cylinder engine, but it does work, because although an XS/XJ have 4 cylinders, our coils operate with the wasted spark system. In other words, they fire 2 times in a complete spark cycle of the engine, rather than 4 like a person might think. The XS/XJ tach hooks up to the REC/REG (White Wire), and that will not work. So you simply hook the Orange tach wire from the Virago tach , to the Orange wire that goes to the #1 coil. The tach will work as intended.
Here are some pics and explanations.
First the LOOKS!
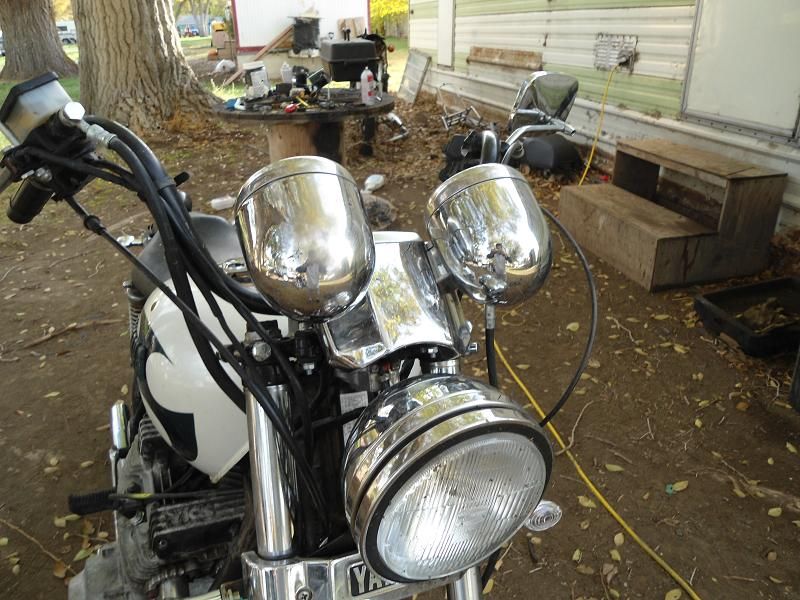
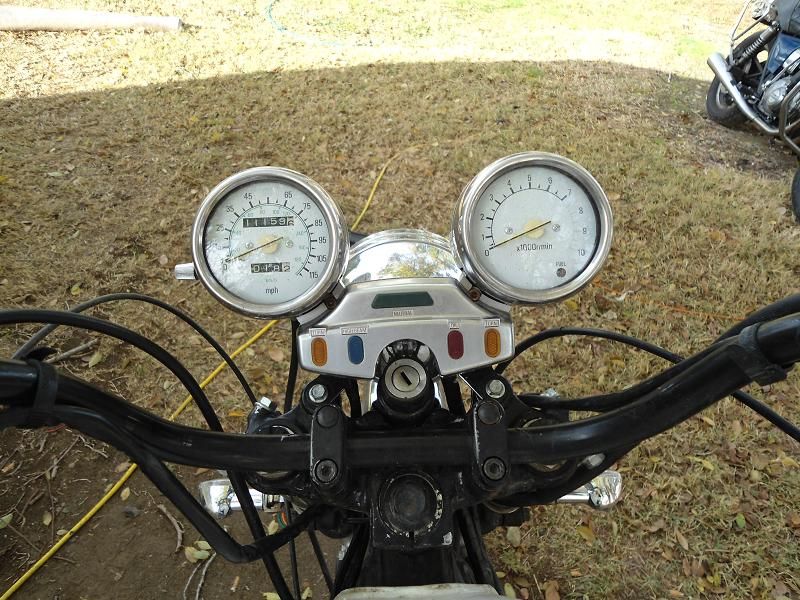
Here is face of them. Wouldn't you like to stare down at those bad boys?
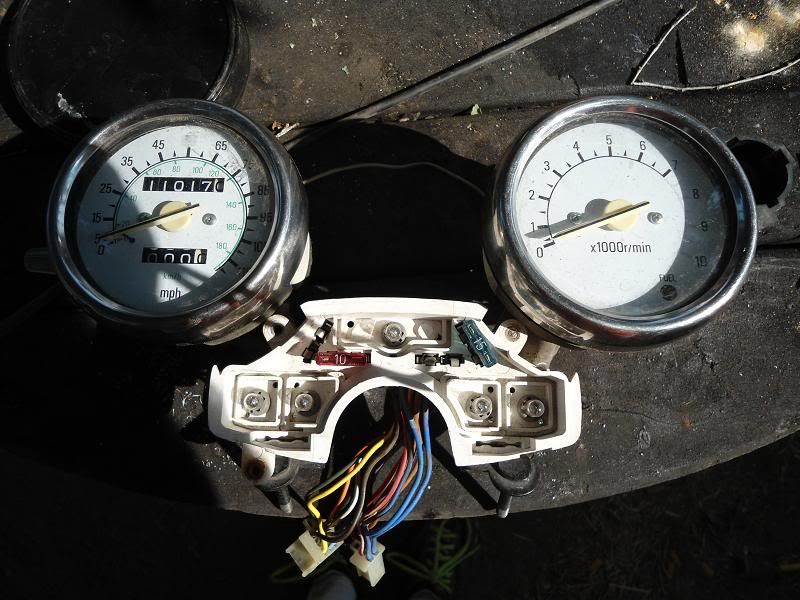
Here is a pic of the cool chip fuse panel located behind the light panel. There are 2 fuses not installed in the photo, sorry about that.
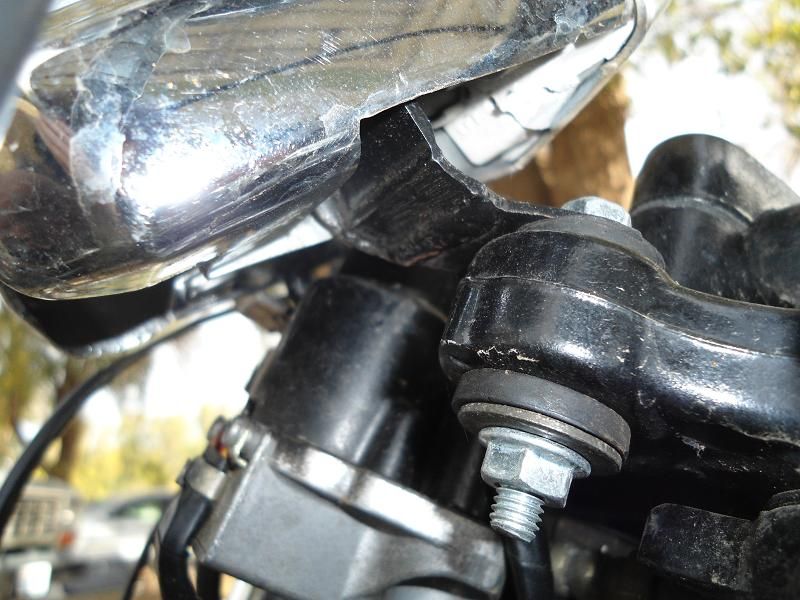
Here is a pic of the mounting tabs for the gauge pod. Even though I installed these on an XJ, I am using an XS Special top triple tree bracket because I switched to round bars. So if you look closely, you can see that I had to cut off the Virago pod mounting brackets, and I just simply welded new ones on to match the XS Special top triple tree mounting holes.
Wiring:
As previously stated, the color coding for all the wires in the Virago gauge pods are identical to the XS and XJ. The only differences between how you wire your bike and how I wired mine, are going to depend on which electrical components you have or don't have, and which model of bike you have because there are slight differences in the wiring harnesses according to the model of the bike.
I elected to install a different headlight and re-route all of my pigtails from the headlight bucket to underneath the tank. I'm sure most people will keep their original headlight and use as many factory pigtail connections as they can if doing this mod. That's fine too.
In order to wire these gauge pods you will need to have a handy little tool to remove connectors from the factory pigtails, and replacement connectors to use as well.
Wiring the idiot lights and sensors in the Virago gauge pods is very straight forward. All you have to do, is look at the color of the wire, attach a new pigtail connector to it, then plug it into it's respective slot in your existing OEM pigtails to replace the XS gauge wires.
Wiring the fuse panel is going to be more complicated. This will involve modifying your main wiring harness. The general idea, is to reroute whatever wires are running to your tube fuse panel located in the battery area on your bike, up to the fuse panel in the gauge pods.
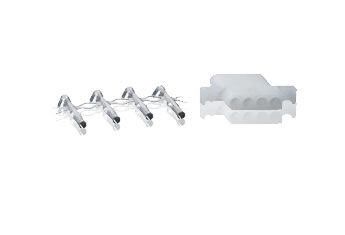
1st you will need to buy a new pigtail connector. Radio shack has a nice assortment of kits for your choosing. These kits come with the plastic housings, and all the connectors you will need. Here's an example. These are round pin connectors and should work fine, but there are many styles of pigtail connectors out there to choose from. Whatever style connectors you choose, make sure it will handle the amount of electricity going to your fuses.

Next, you need to remove your main wiring harness and unravel all the tape from it. As you unravel the gooey sticky tape, you should wrap a small amount of tape around all the areas on your harness that branch off and go to the components on your bike. This will keep your harness much neater and easier to work with. At this point, you can either put the harness back on your bike and work with it that way, or make all of your splices with the harness off of the bike. This choice will depend on where you decide to locate the pigtail for the wires going to the new fuse panel in the gauge pod. I would recommend locating the new pigtail under the gas tank rather than all the way up to the headlight bucket which is already cram packed with wires. If you locate the pigtail under the tank, it will be easier to work with your harness out of the bike on a table or your shop floor.
One circuit at a time is the key to success when modifying your harness. An easy circuit to start with is your tail lights. Look at your wiring diagram and trace out the path of the circuit you are rewiring. Simply cut the wire as close to the tube fuse panel as you can, then use that wire to run to your pigtail.
The other circuits will be a little more complicated. Many of the circuit wires coming from the fuse panel branch out to components mounted all over the bike. The thing to pay most attention to, is the path of travel through these components. The wires will more than likely, come from the ignition switch, to the fuse panel, then out to the components. You shouldn't have to buy any wire because Yamaha was very generous with the amount of wire they installed on these bikes. You should start at the wires coming from the ignition switch to the fuse panel, remove it, route it to the new pigtail, then focus on distributing power from the new fuse panel to the components.
Sorry I can't provide a step by step tutorial on splicing the wires and where to route them. That would cause more confusion than it's worth because of the differences in wiring harnesses on these bikes. That's why this tech tip is only recommended for people with moderate wiring experience. You'll just have to use your noggin.
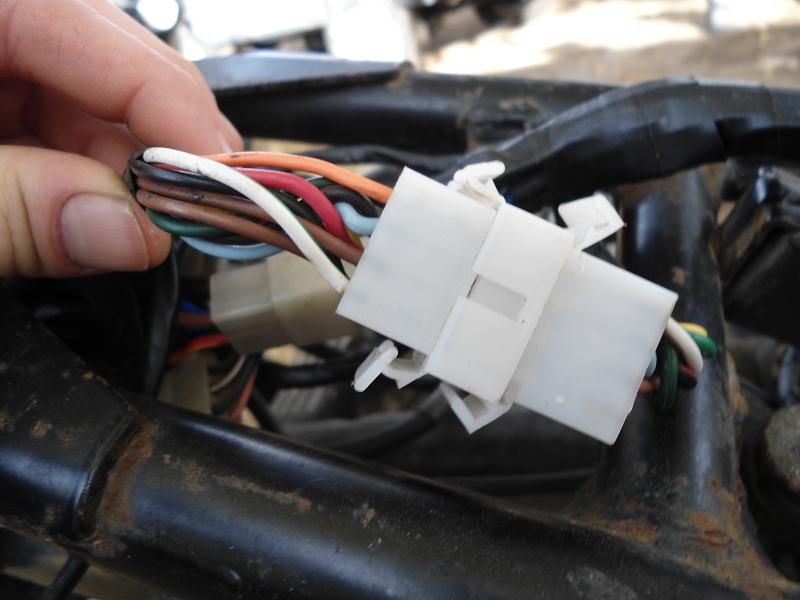
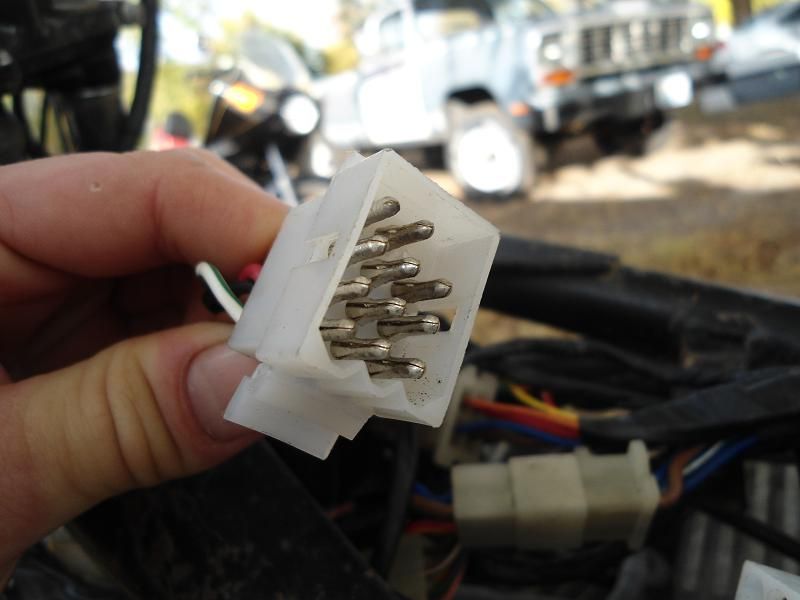
Here is a pic of my new pigtail located under the tank on my XJ. Don't let this pic confuse you, keep in mind my pigtails are relocated from the headlight bucket to under the tank. The pigtail your looking at includes all the idiot lights, and sensors that run to the the gauges, and the blue wire that runs to the tail light. I used a blade style pigtail connector for the fuses.
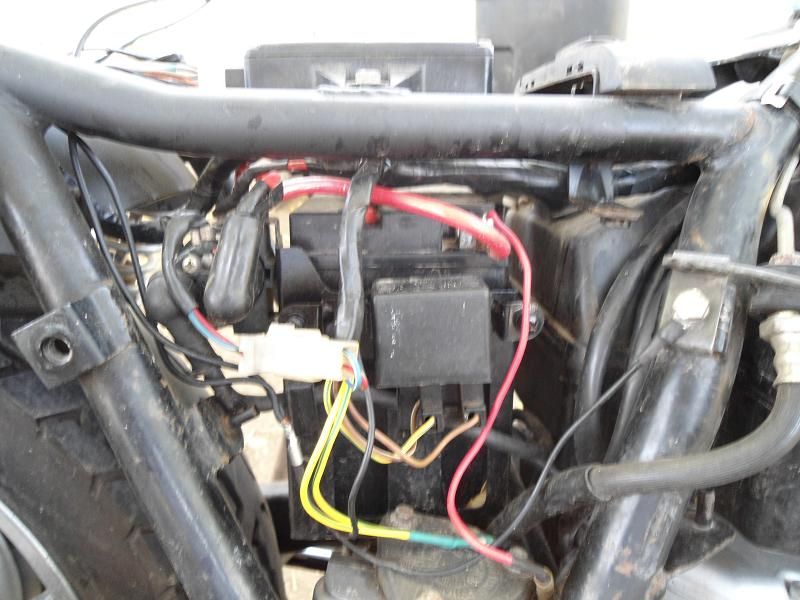
Here is a pic of the battery area where the fuse panel used to be located. I Know I could tidy the wiring up a little better, but you get the general idea I hope.
Well there it is, I apologize again for not being more help with wiring the pods, I'd just rather avoid causing even more confusion. If you need help, there is always help around that can help you as you go. Enjoy.
Why switch to Virago Gauges and pods? Because the Virago gauge pods include a built in chip fuse panel, they are cool looking with their sleek bullet style and chrome, and have white gauge faces that a lot of people like. And for those of you who have a 1980 or later speedometer that only reads to 85 MPH, you'll be glad to know that the Virago speedo reads up to 125 MPH. That's about the top speed of an XS with stock gears anyway.
IMPORTANT NOTES:
1. The Virago speedometer works identical to our own and will not need to be calibrated. Your speedo cable hooks up the same and the length will work just fine.
2. The wiring has the same exact color coding as an XS or XJ. That includes the idiot lights, speedometer sensor, fuses etc...
3. If you are trying to install these on an XJ, you will not be able to hook up the extravagant warning system. Virago gauge pods only come with the basic idiot lights. Fuel, oil, high beam, neutral indicator, left, and right.
4. The mounting brackets for these gauges will have to be altered depending on whether you're putting them on an XJ, or XS triple tree. If you have an XJ the virago gauge brackets will fit in the triple tree mounting holes if you remove the metal sleeves inside the rubber mount bushings. If you have an XS11 triple tree, you will have to alter the gauge brackets to fit into the mounting holes, because the mounting holes on the XS are too wide for the gauge mounting bolts.
5. The only thing I haven't been able to test yet, is the speedo sensor in these gauges. The speedo sensor is used to send a signal to the turn signal auto cancelling unit. I have installed different turn signals on my bike and no longer have the stock signals. I may have to get rid of my turn signal canceller anyway so I haven't been able to try it out. In all actuality, the speedo sensor may just work fine on an XS.
6. The tachometer cannot be hooked up the same as the XS tach is hooked up. The Virago tach gets it's signal from the number 1 coil (Orange Wire). You may think to yourself that this will not work because the Virago is a 2 cylinder engine, but it does work, because although an XS/XJ have 4 cylinders, our coils operate with the wasted spark system. In other words, they fire 2 times in a complete spark cycle of the engine, rather than 4 like a person might think. The XS/XJ tach hooks up to the REC/REG (White Wire), and that will not work. So you simply hook the Orange tach wire from the Virago tach , to the Orange wire that goes to the #1 coil. The tach will work as intended.
Here are some pics and explanations.
First the LOOKS!

Here is face of them. Wouldn't you like to stare down at those bad boys?

Here is a pic of the cool chip fuse panel located behind the light panel. There are 2 fuses not installed in the photo, sorry about that.

Here is a pic of the mounting tabs for the gauge pod. Even though I installed these on an XJ, I am using an XS Special top triple tree bracket because I switched to round bars. So if you look closely, you can see that I had to cut off the Virago pod mounting brackets, and I just simply welded new ones on to match the XS Special top triple tree mounting holes.

Wiring:
As previously stated, the color coding for all the wires in the Virago gauge pods are identical to the XS and XJ. The only differences between how you wire your bike and how I wired mine, are going to depend on which electrical components you have or don't have, and which model of bike you have because there are slight differences in the wiring harnesses according to the model of the bike.
I elected to install a different headlight and re-route all of my pigtails from the headlight bucket to underneath the tank. I'm sure most people will keep their original headlight and use as many factory pigtail connections as they can if doing this mod. That's fine too.
In order to wire these gauge pods you will need to have a handy little tool to remove connectors from the factory pigtails, and replacement connectors to use as well.
Wiring the idiot lights and sensors in the Virago gauge pods is very straight forward. All you have to do, is look at the color of the wire, attach a new pigtail connector to it, then plug it into it's respective slot in your existing OEM pigtails to replace the XS gauge wires.
Wiring the fuse panel is going to be more complicated. This will involve modifying your main wiring harness. The general idea, is to reroute whatever wires are running to your tube fuse panel located in the battery area on your bike, up to the fuse panel in the gauge pods.
1st you will need to buy a new pigtail connector. Radio shack has a nice assortment of kits for your choosing. These kits come with the plastic housings, and all the connectors you will need. Here's an example. These are round pin connectors and should work fine, but there are many styles of pigtail connectors out there to choose from. Whatever style connectors you choose, make sure it will handle the amount of electricity going to your fuses.


Next, you need to remove your main wiring harness and unravel all the tape from it. As you unravel the gooey sticky tape, you should wrap a small amount of tape around all the areas on your harness that branch off and go to the components on your bike. This will keep your harness much neater and easier to work with. At this point, you can either put the harness back on your bike and work with it that way, or make all of your splices with the harness off of the bike. This choice will depend on where you decide to locate the pigtail for the wires going to the new fuse panel in the gauge pod. I would recommend locating the new pigtail under the gas tank rather than all the way up to the headlight bucket which is already cram packed with wires. If you locate the pigtail under the tank, it will be easier to work with your harness out of the bike on a table or your shop floor.
One circuit at a time is the key to success when modifying your harness. An easy circuit to start with is your tail lights. Look at your wiring diagram and trace out the path of the circuit you are rewiring. Simply cut the wire as close to the tube fuse panel as you can, then use that wire to run to your pigtail.
The other circuits will be a little more complicated. Many of the circuit wires coming from the fuse panel branch out to components mounted all over the bike. The thing to pay most attention to, is the path of travel through these components. The wires will more than likely, come from the ignition switch, to the fuse panel, then out to the components. You shouldn't have to buy any wire because Yamaha was very generous with the amount of wire they installed on these bikes. You should start at the wires coming from the ignition switch to the fuse panel, remove it, route it to the new pigtail, then focus on distributing power from the new fuse panel to the components.
Sorry I can't provide a step by step tutorial on splicing the wires and where to route them. That would cause more confusion than it's worth because of the differences in wiring harnesses on these bikes. That's why this tech tip is only recommended for people with moderate wiring experience. You'll just have to use your noggin.
Here is a pic of my new pigtail located under the tank on my XJ. Don't let this pic confuse you, keep in mind my pigtails are relocated from the headlight bucket to under the tank. The pigtail your looking at includes all the idiot lights, and sensors that run to the the gauges, and the blue wire that runs to the tail light. I used a blade style pigtail connector for the fuses.


Here is a pic of the battery area where the fuse panel used to be located. I Know I could tidy the wiring up a little better, but you get the general idea I hope.

Well there it is, I apologize again for not being more help with wiring the pods, I'd just rather avoid causing even more confusion. If you need help, there is always help around that can help you as you go. Enjoy.
Comment