 Tweet
Tweet
I know some members have expressed reluctance to tackle a fork rebuild, and there's really no reason for that. They're not hard to rebuild, the biggest hassle is getting them off and on the bike, and sometimes getting the damper screw out. Follow along while I rebuild my XJ forks. These are a bit different from XS forks (and I'll note the differences) but otherwise the procedure is the same....
Do read through the service manual for things to look for, spring specs, etc. If you have standard forks, some parts will be slightly different.
The first thing to do is remove the outer dust seal. Use a small screwdriver to work it off then set it aside. Sorry, no pic but this is easy
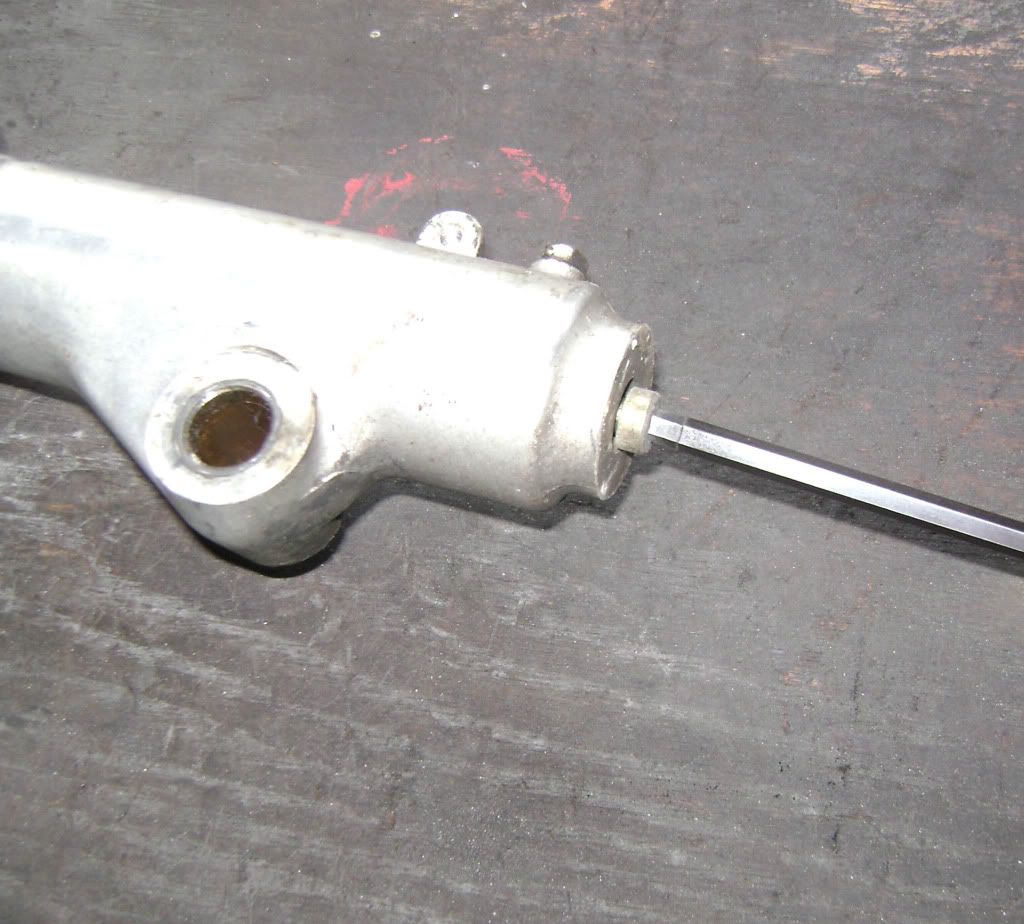
The next thing I'll do is remove the damper screw at the bottom of the fork with a 6mm allen. If you're working on 'standard' forks, you'll need a long 8mm allen socket. With the fork assembled, sometimes the spring pressure with prevent the damper from spinning. But this doesn't always work, if it doesn't go ahead to the next step... On XJ forks, the damper is internally held from rotating so this will work every time. Once this bolt is out, all the internals will come out of the fork lower, so pay attention... You will also start leaking oil out this hole, so you may want to drain it for a bit to cut down on the mess...

Remove the fork cap. I have a damaged lower tree that I use as a 'fixture' to hold the forks for some things like this, if you don't loosen (not remove) the cap before you pull the forks off the bike. A large adjustable wrench with very good jaws is what I use for these. If you couldn't get the damper bolt out, look down below for more info then remove it.
The XJ cap has a long rod attached so it will stay in place; the XS forks don't, so don't drop them as that can damage the threads. There's sometimes some force behind these, so have a good grip. Remove the main spring.

Remove the clip retainer (c-clip) for the seal and remove the old fork seal by prying it out... You'll need a pair of snap-ring pliers if you have a Special or XJ, the standard forks use a wire-type clip.
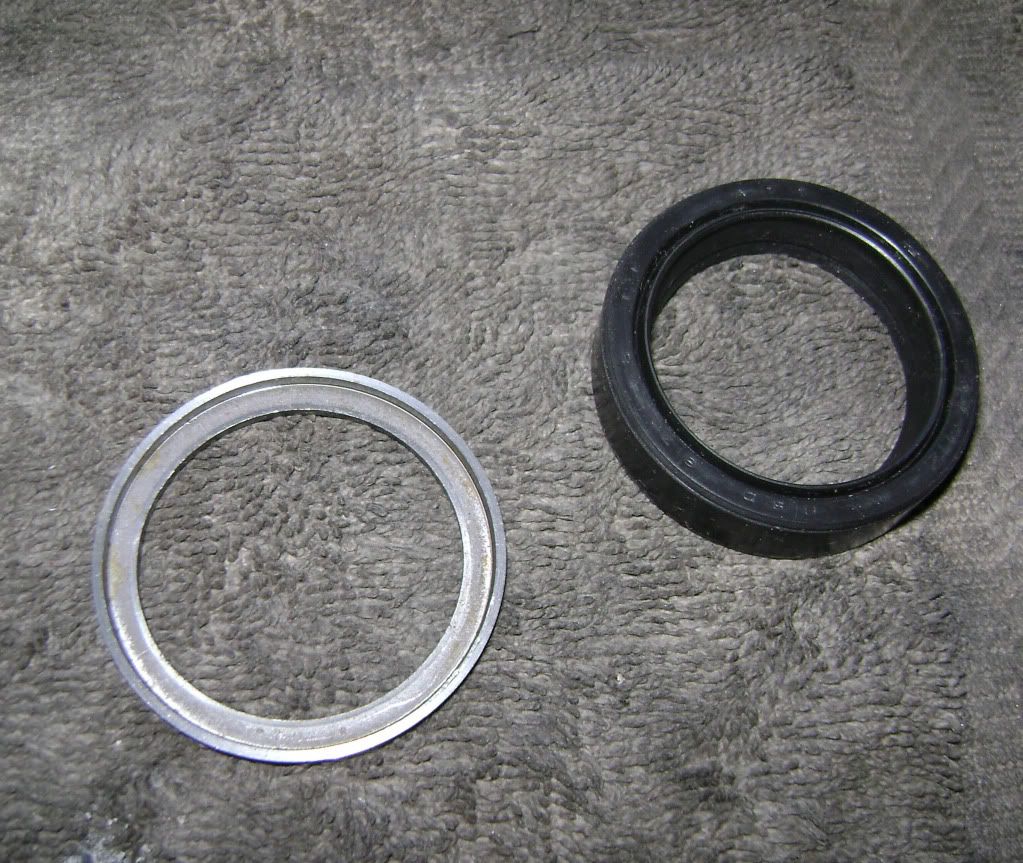
... and note which side of the seal and spacer goes 'up/out'. Only the Specials and XJ have that spacer, not the standards. The '78-79 standards have a thin washer between the seal and the retaining clip, missing on the later models.
At this point, clean/check all your parts, repolish the lowers if you feel ambitious Make sure your fork tubes aren't bent; rolling the two against each other will quickly show if they are. Spend some time getting the inside of the slider clean, you'll probably find a bunch of crud in the bottom. Also check for free movement of the tube inside the lower; if the lower has any dents and the tube is 'sticky', you should replace the lower.

Ok, here's all the bits for one fork. Starting at the bottom and left to right, you have: the fork tube, the main spring, damper bolt, lower stop, damper (with rebound spring installed), fork cap, seal spacer, seal, seal retainer, and outer dust boot. Let's put 'er together...

Slide the damper with the rebound spring into the fork tube. Use some fork oil (or even some light oil) to lube the seal.

Move the tube around until the damper comes out the lower end of the tube...

Slip the main spring into the tube and use it to hold the damper in place, then install the lower stop onto the damper. Note that this is a XS, not XJ stop; I forgot to take this pic....

This is to clarify the difference, and to make a special note if you are working on XJ forks. The XJ stop is on the left; note the collar and the notch cut into it. That notch indexes on the drain screw in the fork lower. You're now ready to install the inner tube in the fork lower, do so. Again, if you're working on a set of XJ forks make sure the the stop is fully onto the damper and while sliding the tube/lower together that the screw goes into the notch. Once it's in as far as it goes, reinstall the damper bolt. If the bolt head goes into the recess in the lower before tightening, you don't have the screw/notch aligned; try again. Once it's good, tighten the bolt.
Ok, right here a bunch of you are going 'WTF? You haven't installed the fork seal!! How do you expect to get that in???' No problem....

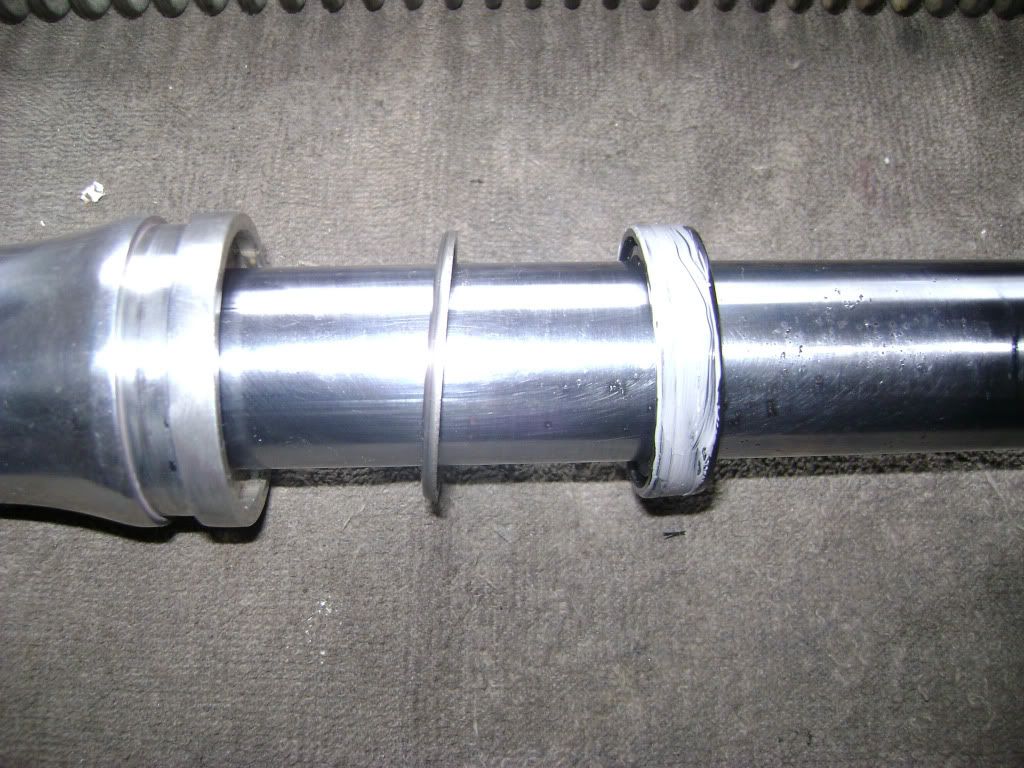
Here's my install tool; a 2' piece of 1.5" schedule 40 PVC. As you can see it's just slightly smaller than the OD of the seal. You need one end cut square.
Slip the spacer and seal down the fork tube. I'll put a light coating of Yamabond on the seal...

Let the inner tube collapse into the lower, slide the PVC over the tube and give it about three medium whacks with a rubber hammer...

... and the seal is in. No fuss, no muss. Install the retaining clip and outer dust seal and you're nearly done. Reinstall the main spring, fill with fork oil of your choice, put on the fork cap and it's ready to go on the bike...
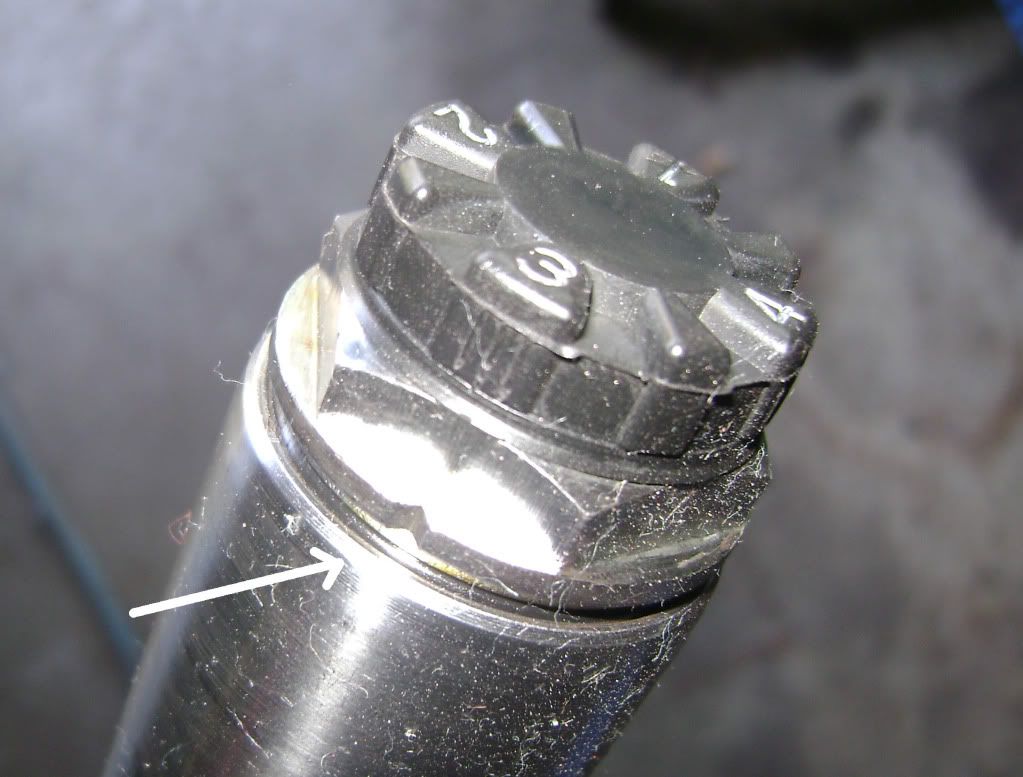
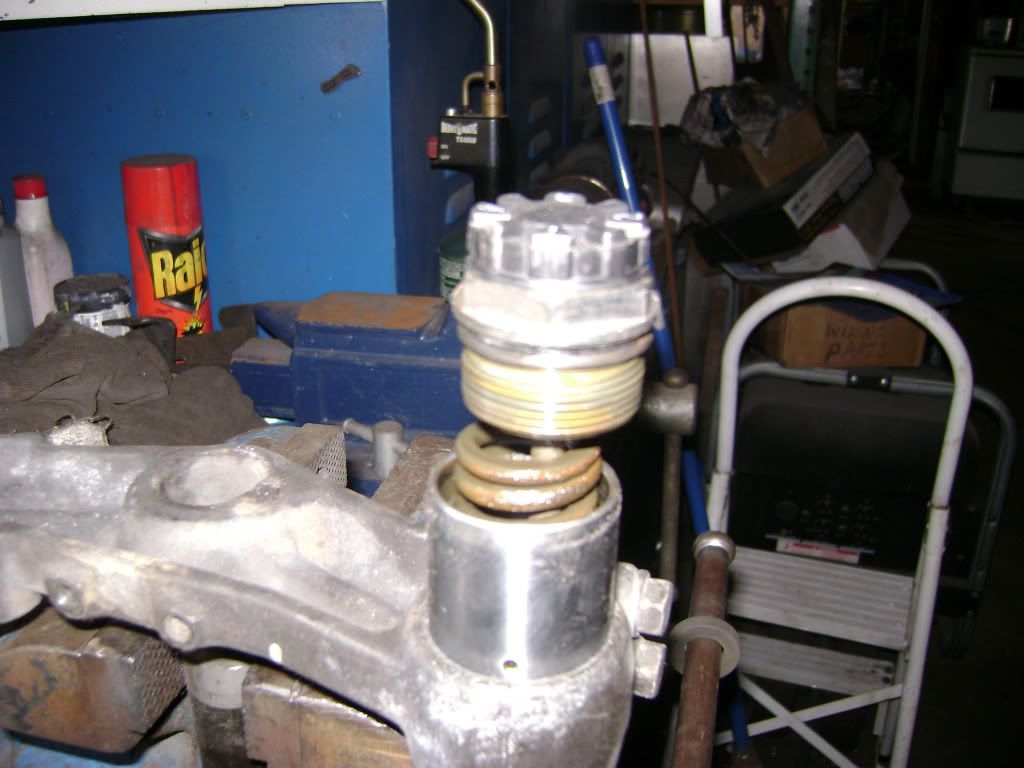
If you're rebuilding XJ forks, there's one thing specific to these you need to check; location of the damper detent. When installing the forks in the triple tree, note there's an arrow at the top tree where the fork clamps. That arrow needs to be pointing at a number, which one it doesn't matter. The detent in the cap is shown by the notch (as seen in the pic) and that needs to line up with a number also; again, which number doesn't matter. You can set the notch pointing at the arrow, or rotate the fork tube by 90 degree increments if you're trying to hide some rust. If you get the 'register' of the detent 'off', the damper won't be set right and you may have handling issues.
A few things I'll note....
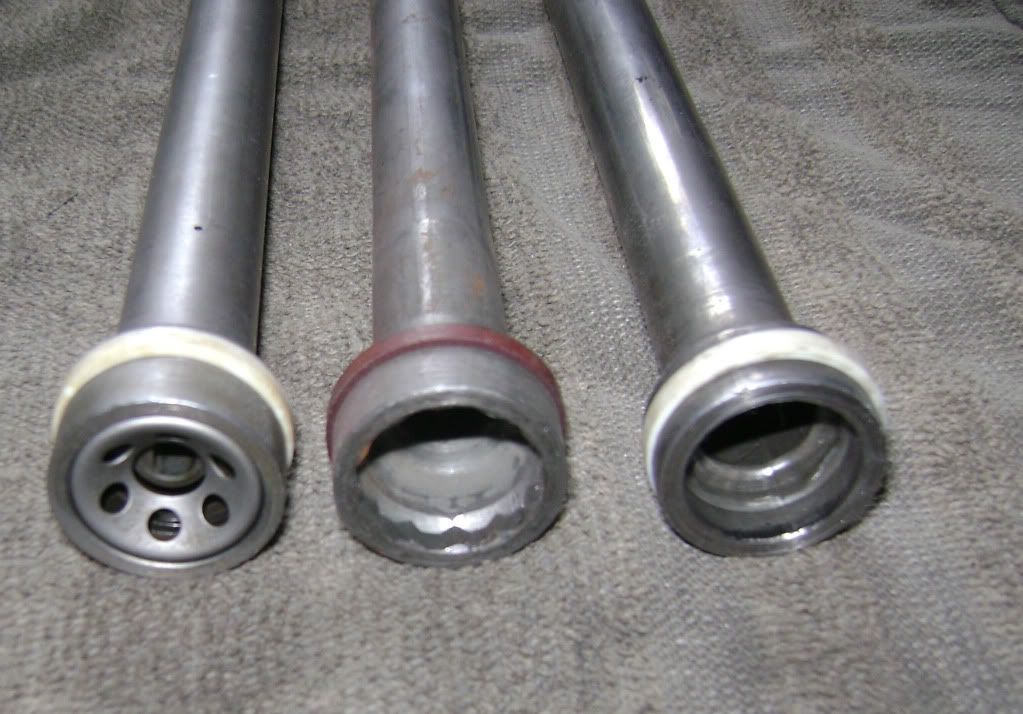
Here's the three damper types. XJ on the left, standard in the middle, and Special. If you couldn't get the damper bolt out of the standard or Special, note the difference. The standard damper can be held by making a 'tool' out of some threaded rod with a 19mm or 3/4" nut on the end, that will fit into the top of the damper. Got a Special, or don't want to bother? Use a wooden broom handle and pushing hard against the damper, remove the bolt.
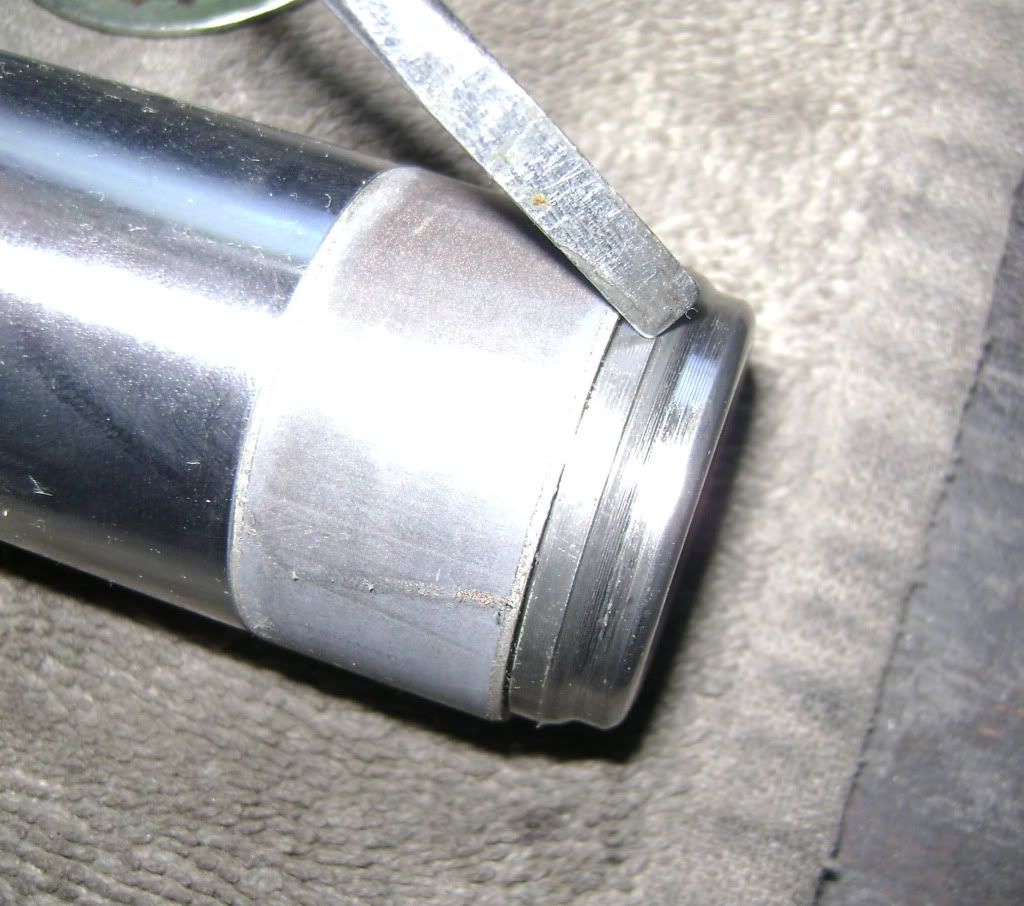
There's been a number of notes about cutting the new seals on Special forks when using the factory procedure. I'll bet this is the problem; they left a sharp edge here (really sharp, like a razor). File this off and I'll bet the problem will go away...
A few more, no pics. If you want/need to lower the bike in the front and don't want to/can't raise the forks in the trees, you can lower the bike by increasing the length of the rebound spring. However much longer the spring is, that's how much you'll lower the bike. You can double-up on stock springs, or substitute another; old valve springs of the same diameter work well. This will increase preload on the main spring or if you have a preload spacer installed, shorten it by the same amount you add.
Aligning the forks. There's been discussion about how to do this; start at the top or bottom when tightening the pinch bolts? The XS manual is silent on this, but I've always started at the bottom tree. The XJ manual agrees with me; with the top tree loose (pinch bolts and stem bolt), set your height out of the top tree, then tighten the lower bolts, then the upper.
One last thing; after comparing Special/XJ forks, you could swap most parts back and forth. The basic machining is the same, so you could use XJ lowers (with their more-conventional brakes) on a Special or install the adjustable dampers into Special forks. The latter mod will raise ride height slightly (3/4"?) but is something to think about...
Any questions and comments welcome!
Do read through the service manual for things to look for, spring specs, etc. If you have standard forks, some parts will be slightly different.
The first thing to do is remove the outer dust seal. Use a small screwdriver to work it off then set it aside. Sorry, no pic but this is easy
The next thing I'll do is remove the damper screw at the bottom of the fork with a 6mm allen. If you're working on 'standard' forks, you'll need a long 8mm allen socket. With the fork assembled, sometimes the spring pressure with prevent the damper from spinning. But this doesn't always work, if it doesn't go ahead to the next step... On XJ forks, the damper is internally held from rotating so this will work every time.
Once this bolt is out, all the internals will come out of the fork lower, so pay attention... You will also start leaking oil out this hole, so you may want to drain it for a bit to cut down on the mess... Remove the fork cap. I have a damaged lower tree that I use as a 'fixture' to hold the forks for some things like this, if you don't loosen (not remove) the cap before you pull the forks off the bike. A large adjustable wrench with very good jaws is what I use for these. If you couldn't get the damper bolt out, look down below for more info then remove it.
The XJ cap has a long rod attached so it will stay in place; the XS forks don't, so don't drop them as that can damage the threads. There's sometimes some force behind these, so have a good grip. Remove the main spring.
Remove the clip retainer (c-clip) for the seal and remove the old fork seal by prying it out... You'll need a pair of snap-ring pliers if you have a Special or XJ, the standard forks use a wire-type clip.
... and note which side of the seal and spacer goes 'up/out'. Only the Specials and XJ have that spacer, not the standards. The '78-79 standards have a thin washer between the seal and the retaining clip, missing on the later models.
At this point, clean/check all your parts, repolish the lowers if you feel ambitious
Make sure your fork tubes aren't bent; rolling the two against each other will quickly show if they are. Spend some time getting the inside of the slider clean, you'll probably find a bunch of crud in the bottom. Also check for free movement of the tube inside the lower; if the lower has any dents and the tube is 'sticky', you should replace the lower. Ok, here's all the bits for one fork. Starting at the bottom and left to right, you have: the fork tube, the main spring, damper bolt, lower stop, damper (with rebound spring installed), fork cap, seal spacer, seal, seal retainer, and outer dust boot. Let's put 'er together...
Slide the damper with the rebound spring into the fork tube. Use some fork oil (or even some light oil) to lube the seal.
Move the tube around until the damper comes out the lower end of the tube...
Slip the main spring into the tube and use it to hold the damper in place, then install the lower stop onto the damper. Note that this is a XS, not XJ stop; I forgot to take this pic....
This is to clarify the difference, and to make a special note if you are working on XJ forks. The XJ stop is on the left; note the collar and the notch cut into it. That notch indexes on the drain screw in the fork lower. You're now ready to install the inner tube in the fork lower, do so. Again, if you're working on a set of XJ forks make sure the the stop is fully onto the damper and while sliding the tube/lower together that the screw goes into the notch. Once it's in as far as it goes, reinstall the damper bolt. If the bolt head goes into the recess in the lower before tightening, you don't have the screw/notch aligned; try again. Once it's good, tighten the bolt.
Ok, right here a bunch of you are going 'WTF? You haven't installed the fork seal!! How do you expect to get that in???' No problem....
Here's my install tool; a 2' piece of 1.5" schedule 40 PVC. As you can see it's just slightly smaller than the OD of the seal. You need one end cut square.
Slip the spacer and seal down the fork tube. I'll put a light coating of Yamabond on the seal...
Let the inner tube collapse into the lower, slide the PVC over the tube and give it about three medium whacks with a rubber hammer...
... and the seal is in. No fuss, no muss. Install the retaining clip and outer dust seal and you're nearly done. Reinstall the main spring, fill with fork oil of your choice, put on the fork cap and it's ready to go on the bike...
If you're rebuilding XJ forks, there's one thing specific to these you need to check; location of the damper detent. When installing the forks in the triple tree, note there's an arrow at the top tree where the fork clamps. That arrow needs to be pointing at a number, which one it doesn't matter. The detent in the cap is shown by the notch (as seen in the pic) and that needs to line up with a number also; again, which number doesn't matter. You can set the notch pointing at the arrow, or rotate the fork tube by 90 degree increments if you're trying to hide some rust. If you get the 'register' of the detent 'off', the damper won't be set right and you may have handling issues.
A few things I'll note....
Here's the three damper types. XJ on the left, standard in the middle, and Special. If you couldn't get the damper bolt out of the standard or Special, note the difference. The standard damper can be held by making a 'tool' out of some threaded rod with a 19mm or 3/4" nut on the end, that will fit into the top of the damper. Got a Special, or don't want to bother? Use a wooden broom handle and pushing hard against the damper, remove the bolt.
There's been a number of notes about cutting the new seals on Special forks when using the factory procedure. I'll bet this is the problem; they left a sharp edge here (really sharp, like a razor). File this off and I'll bet the problem will go away...
A few more, no pics. If you want/need to lower the bike in the front and don't want to/can't raise the forks in the trees, you can lower the bike by increasing the length of the rebound spring. However much longer the spring is, that's how much you'll lower the bike. You can double-up on stock springs, or substitute another; old valve springs of the same diameter work well. This will increase preload on the main spring or if you have a preload spacer installed, shorten it by the same amount you add.
Aligning the forks. There's been discussion about how to do this; start at the top or bottom when tightening the pinch bolts? The XS manual is silent on this, but I've always started at the bottom tree. The XJ manual agrees with me; with the top tree loose (pinch bolts and stem bolt), set your height out of the top tree, then tighten the lower bolts, then the upper.
One last thing; after comparing Special/XJ forks, you could swap most parts back and forth. The basic machining is the same, so you could use XJ lowers (with their more-conventional brakes) on a Special or install the adjustable dampers into Special forks. The latter mod will raise ride height slightly (3/4"?) but is something to think about...
Any questions and comments welcome!


Comment