 Tweet
Tweet
I'm posting this one as I found that alignment seems to be pretty critical with these. There's been lots of reports of problems with these not quite working right, and particularly if you got a 'project' bike where these may be disassembled or if you're unsure if the PO put them together right or you suspect missing/wrong parts.
Before attempting installation of the Special fronts, make sure the forks are aligned with the rotors centered in the slots in the forks. This isn't an issue with the LH/XJ rear. Got it aligned? Let's go...
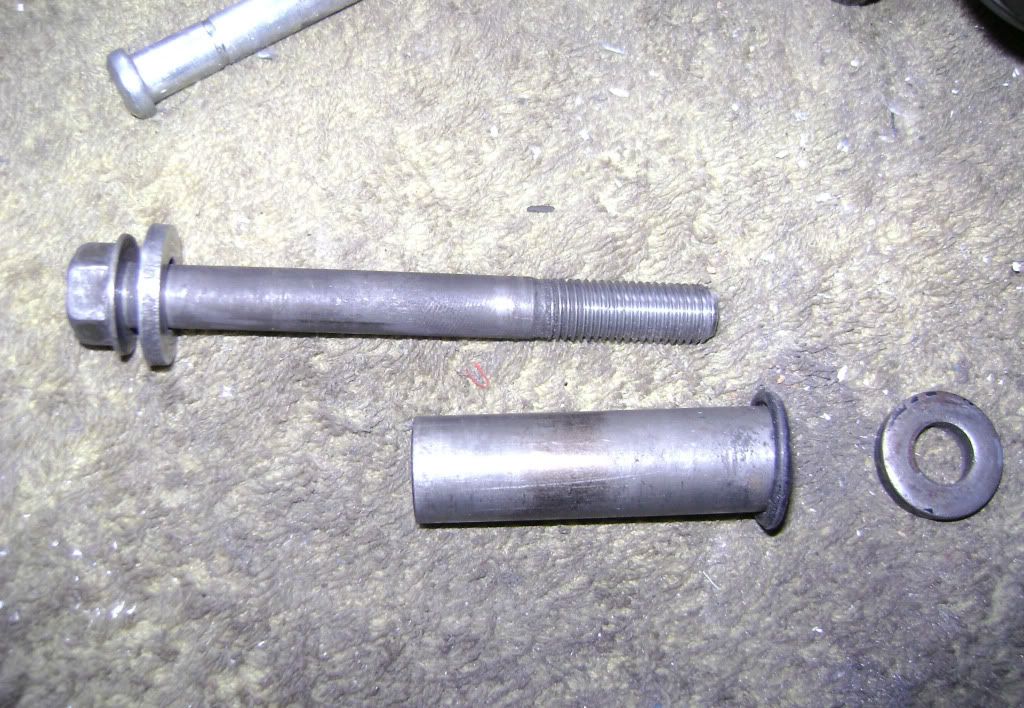
Here's the needed hardware. You've got the long mounting bolt, make sure this isn't bent, even slightly. If it is, you should replace it. There should be a washer under the bolt head, this is to prevent the bolt head from eating away at the aluminum caliper body. Next is the pivot sleeve; this is what you bolt down tight and the caliper pivots on this as the pads wear. Note the o-ring on the end; this is important. This performs two functions; one, it helps 'seal' the sleeve from 'stuff' that may prevent free movement. Two, this acts as a 'bumper' to allow the free play but prevent rattling. A 9/16 x 3/4 x 3/32 o-ring will work here if yours is missing. Last, there's a thick washer. The one I have here isn't original, but was fitted.

All bits in order on the caliper. Time to bolt it on....
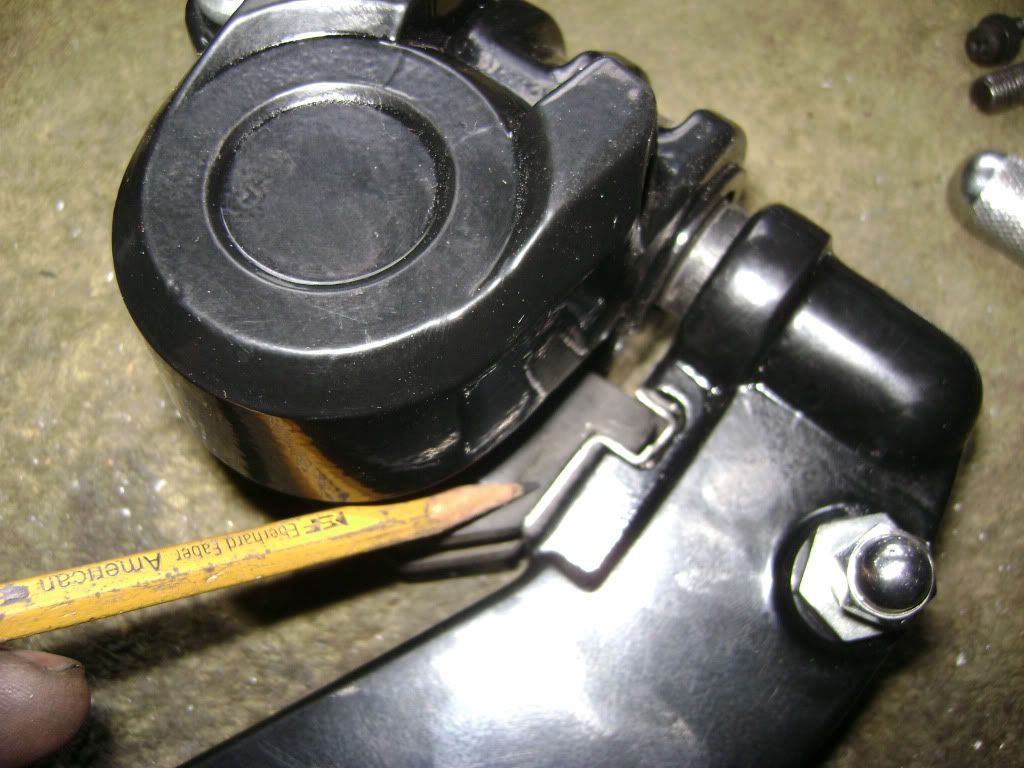
This is where you want to check for proper clearance. With the mounting bolt tight and the caliper pushed towards the mount, install your pads. Keeping the pads firmly against the retainer, try slipping in the pad retaining pin. If it drops right in, you're good. If you have to pull the pads away from the retainer to install the pin, the washer is too thick. This can put stress on the mounting bolt and sometimes bend it. If you have to force the pin in, the washer is too thin and you won't get free movement of the caliper. If the retainer is missing (even if you have the right parts), you'll have an 'extra' .030" clearance between the pads and the mount, which may cause problems with the bolt. In this case, the washer needed to be .200" thick due to the homemade retainer.
Questions or comments welcome!
Before attempting installation of the Special fronts, make sure the forks are aligned with the rotors centered in the slots in the forks. This isn't an issue with the LH/XJ rear. Got it aligned? Let's go...
Here's the needed hardware. You've got the long mounting bolt, make sure this isn't bent, even slightly. If it is, you should replace it. There should be a washer under the bolt head, this is to prevent the bolt head from eating away at the aluminum caliper body. Next is the pivot sleeve; this is what you bolt down tight and the caliper pivots on this as the pads wear. Note the o-ring on the end; this is important. This performs two functions; one, it helps 'seal' the sleeve from 'stuff' that may prevent free movement. Two, this acts as a 'bumper' to allow the free play but prevent rattling. A 9/16 x 3/4 x 3/32 o-ring will work here if yours is missing. Last, there's a thick washer. The one I have here isn't original, but was fitted.
All bits in order on the caliper. Time to bolt it on....
This is where you want to check for proper clearance. With the mounting bolt tight and the caliper pushed towards the mount, install your pads. Keeping the pads firmly against the retainer, try slipping in the pad retaining pin. If it drops right in, you're good. If you have to pull the pads away from the retainer to install the pin, the washer is too thick. This can put stress on the mounting bolt and sometimes bend it. If you have to force the pin in, the washer is too thin and you won't get free movement of the caliper. If the retainer is missing (even if you have the right parts), you'll have an 'extra' .030" clearance between the pads and the mount, which may cause problems with the bolt. In this case, the washer needed to be .200" thick due to the homemade retainer.
Questions or comments welcome!

Comment