
 Tweet
Tweet
Just got my ZRX carbs from the fedex man today, and after reading all the threads on the swaps members have done I was wondering if anyone had a thread with the swap from start to finish with pics, just so that i don;t miss any crucial steps. This is my first bike, came without carbs, and i am trying to do the whole thing right. any help wopuld be greatly appreciated.
-
80 MNS; 81 Venturer -
G'day Nick,
As a few others on these forums would agree, you're definitely going in the right direction as far as carburetors are concerned. After a fairly large hiatus in working on my XS1100 (due to numerous tool throwing tantrums / frustrations caused by carburetor tuning), I've finally come back to it and got a hold on a set of '03 ZRX carbies. Needless to say, they were a breath of fresh air when it came to tuning carbs.
As far as the install goes, I really feel that it's hard to go wrong with this conversion. I've recently completed my install, and it would probably only be a couple of days solid work. Provided you check the carbs over before you try and install them to make sure everything is fine, and you have no mechanical issues with the engine, it's a snap.
Rather than snapped screwdrivers. Which happened once.
Unfortunately, I always forget to take photos as I do something on a bike, so I can't really give a pictorial step by step. That said though, I think there are a few pitfalls to watch for, and a couple of considerations to take. I'll give you some of the things I did, and what worked for me:
While the carbies were off the bike
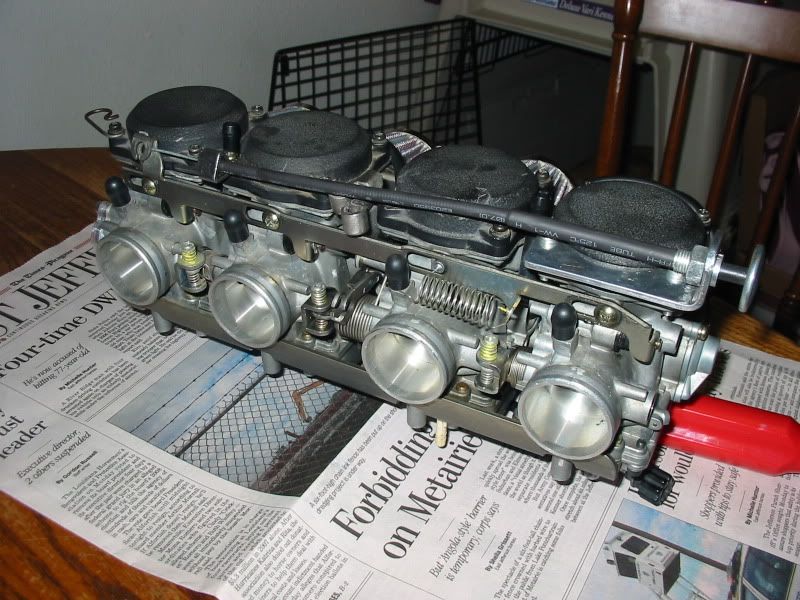
- Prior to install, as with everything its best to know what you're working with. I'd highly recommend doing a quick strip-down of the carbs and give them a clean out. I didn't seperate the bodies, I didn't feel it was necessary given their condition. But everything else came off, and got a once over with the carb cleaner and air compressor.
- Jetting. Whilst this is usually something that needs to be sorted as you go, some of the guys here have given their settings, which I used as ballpark figures for my bike. While you clean the carbs, see what pilots and mains are installed. My pilots were 36's and the mains were around 90's from memory. 90's were always going to be a bit on the small side for mains, and I happened to have a set of 135 Mikuni jets sitting on the bench. Trick here is that the Keihin mains can be dearer to buy than the equivalent Mikuni. And luckily, the Mikuni jets slot right in. I think the 135s might be going a bit towards a bit rich unless you've done work to the bike, so perhaps 130s or 132.5s would do alright? I'll sort this on mine later, I just wanted to ride it first. I left the 36 pilot jets in, and it seems to be fine on the idle at the moment.
- Idle mixture screws. This is where I spent an afternoon swearing at myself and all that was within earshot. I'd like to save you this experience. Since the idle mixture screws were plugged off with blanks, I figured I'd drill them out, since I figured they would need adjusting (and they do, I ended up running mine at around 2 1/2 turns out or so). Unfortunately, the bloke behind the drill (this duffer right here) tried to do the first carby with far to big a drill-bit. End result was the bit grabbed the screw tower and sheared it off at the body. Ohhh maannnn. The next half hour was not my finest moment... Long story short, I managed to get it TIG welded back on, and after a bit of stuffing around all was well again. Was EXTREMELY lucky this didn't bugger the carbs. Please don't do this to yours. After that, I ended up using a punch to get the blanking plugs out. But yeah, make sure you adjust those screws out a bit.
- The vacuum advance mechanism. Oh yes, that little bugger. Whilst you might think this would come later, it's probably just as easy to sort it now. Has to be done eventually. If you look in the 'Modifications' section of these marvelous forums, you'll find someone came up with a neat solution to this, so I can't take credit for this one. Basically, the ZRX carbs don't accommodate the vacuum advance. And if you put the vac advance line on the intake boot like on stock XS carbies, it'll work back to front. Not ideal. So, if you look under the carb body near the idle mixture screw, you'll see a cast in 'hollow'. I used a 1/16" drill bit, and carefully (soooo very very carefully) drilled a hole on an angle towards the back of the carb. It needs to exit on the rear edge of the throttle butterfly (the airbox side of it). I have no idea how, but I fluked it first go. Then, just get a vacuum barb and attach it to the hole somehow (I used Quicksteel, love that stuff). But the pictorial how-to in the Modifications folder is an awesome guide on doing it. Worked a treat.
Things that came up during the install
- Throttle cable. Unfortunately, the XS cable didn't play nice with the carbies right off the bat. The Kwakka carbs are a push/pull design, unlike the nice and simple XS pull throttle. Me being me (stingy), I modified my cable to fit. It required cutting off some of the outer sheath of the cable, and also required (for me, at least) the shortening of the inner cable. Naturally, this means the cable end had to be re-soldered. It didn't really cause much of a hassle though. Then I just bent the cable holder bracket on the carbies to accept the cable end. I must stress this is probably best considered a temp-fix. Ideally, a set of ZRX cables would be a better idea, but I'm not sure whether they'd be the right length. So far I haven't had an issue though.
- Air intake. Since your bike has no carbs, I'm unsure if you'll be using an airbox or pods. I've tried both, and I'm sticking with the airbox, even if it is for primarily cosmetic reasons. More chrome the better, yeah? If you're using pods, you'll have no worry, but fitting the stock airbox on gave me a bit of concern. Nothing huge though. When trying to slide the boots over the carbs, just remember that it will actually fit. Even if it goes feel like you're shoving the square peg into the round hole. Its just fiddly. Also, since the carb bodies are narrower, the airbox will need to move about an inch closer to the engine. I had to remove the left airbox bracket to let this happen, since the frame was stopping it. You'll see what I mean when you give it a crack.
- Vacuum ports. The ZRX carbs have vacuum ports on each body near the intake boots. Along with the ones on the intake boots themselves, don't forget to plug all these off. Unless you're operating your petcocks off them, obviously...
Post-installation
....
Nah, just get in and ride the bugger. At least, I hope that's how it goes for you.
But seriously, other than that I really don't think there's much else that will bring you unstuck. I'm pretty much just fine-tuning and fiddling now, but its a heck of a lot of fun to ride now. I do apologise for the text-only response, I can understand that pictures are a much better way to follow along. If you want any photos of my set-up for reference, let me know and I'll try and sort something out. I hope this helps you out.
Cheers.
-HobbsyCurrent playthings:
1981 Yamaha XS1100H - 1179cc Wiseco bore kit, 36mm ZRX1200 carburetors, damn thing has been completely rebuilt from the frame up. Yep, its been a long time coming.
1988 Yamaha XT600 Tenere - She'll go just about anywhere!
1986 Yamaha FJ1200 - The previous tourer, replaced by the XS11. Someone had to go.
1974 Chrysler Valiant Charger - Because you can't only have 2 wheeled toys draining the cash. -
Thanks
Thanks for taking the time to write all of that, good read and i think it should sum it up for me. If you want to send some pics i wouldn't mind comparing my end result. Either way your helps greatly appreciated.80 MNS; 81 VenturerComment
-
Did you happen to shimm your needles and clip your springs by chance80 MNS; 81 VenturerComment
-
Not as of yet, but it seems others have found success doing that. I haven't had the time to fiddle with that yet. Depends on how well it runs when I get to it. I'm always hesitant to clip springs (or snip things in general), since if it runs worse afterwards, its a one way thing.Current playthings:
1981 Yamaha XS1100H - 1179cc Wiseco bore kit, 36mm ZRX1200 carburetors, damn thing has been completely rebuilt from the frame up. Yep, its been a long time coming.
1988 Yamaha XT600 Tenere - She'll go just about anywhere!
1986 Yamaha FJ1200 - The previous tourer, replaced by the XS11. Someone had to go.
1974 Chrysler Valiant Charger - Because you can't only have 2 wheeled toys draining the cash.Comment
-
Here is a bit of what I did
Believe me, this is a big 'bang for the buck' mod and I am the guy who figured out the vacuum advance tap. Do a search for ZRX Vacuum Advance and you should find that thread here. Here are a few things I did to make the mod.
BTW, I ended up running 138 mains and 45 pilot jets (these are Keihin jets) but then these might not be the right jet sizes for your machine. And I feel there is no need to shim the needles as it makes the midrange come on earlier and the Keihins have excellent fuel circuits that work up to quarter throttle.
Start with your idle mixture screws 1 turn out. Factory recommendation is 3/4 turn but these bikes like a slightly rich mixture at idle. I recommend you get ahold of a right angle screwdriver to adjist these or you will end up with fin burns on your hands. Motion Pro sells one that is reasonable.
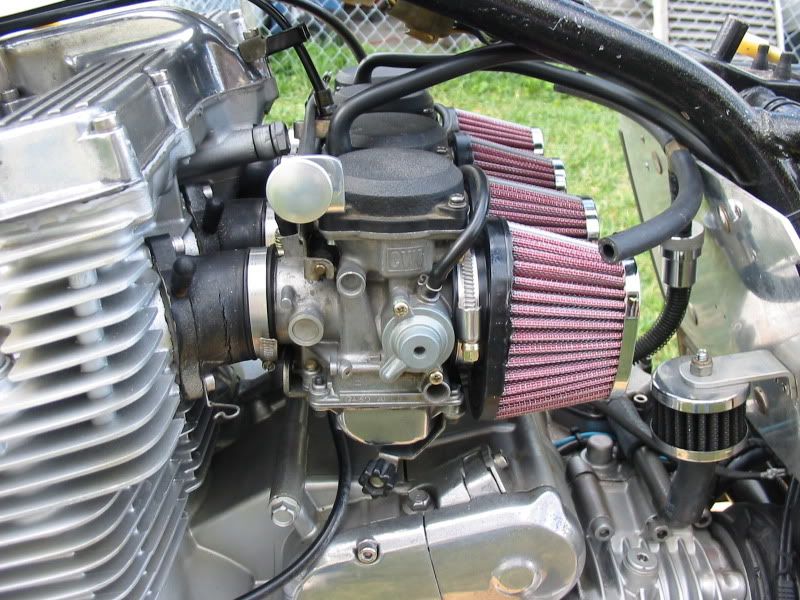
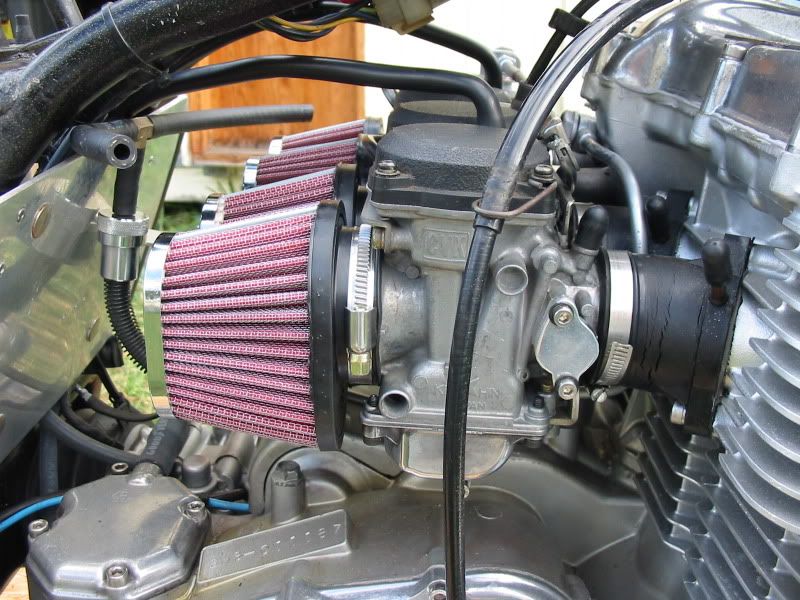
Yes the carbs are push/pull but you only need the pull cable. The return springs are plenty stout enough. I have heard of some guys switching cables but what I did was make a small insert to fit into the cable holder on the carb end. Then I removed about 1/2 inch of the sheathing on the stock cable and it fit perfectly (you can barely see that in the center picture below).
You will need to make up a choke (enrichener) setup. I used a common choke cable vailable at any auto parts store.
You can remove the K-Trik throttle position sensor on the right hand side abd cover it with a small aluminum plate or, just leave it on.
Stay away from setting the carb float levels by measuring but instead set them up on a level bench and use some clear tubing to measure the fuel bowl levels. As I recall the factory setting is 1mm above the bowl/body mating surface.
Fixing the fuel feeds is a snap as they have a single feed. Just a simple drop from each petcock to a TEE and then down to the carbs is all you need. I installed a single small filter. And yes, I use plain old automotive tubing instead of all the 'high tech' motorcycle fuel lines available.
If you are running pod filters then you are home free on the intake side but if you are keeping the stock air box then you might need ot make a slight mod there since these carbs are not quite as long as the stock Mikunis.
Thats about it. You should be able to take care of this in a weekend or a solid day if you work at it dilligently.
Here is a picture or two.
 Mike Giroir
79 XS-1100 Special
Once you un-can a can of worms, the only way to re-can them is with a bigger can.Comment
-
I see you have your vacuum ports plugged off seperately, i read somewhere(i think the kawasaki 1100 clymer) that it was better to plug them all together... Could you perhaps take a close-up of that throttle cable mod you spoke of, i have an idea of what you mean, but as they say a pictures worth a thousand words. thanks once again.80 MNS; 81 VenturerComment
-
I do not think I can get a picture of the little insert that will show you anything useful without taking a bunch of stuff apart. But, it was a simple brass fitting that I filed down so it fit into the sort of triangular part on the top of the Keihin carbs to accept the stock cable. It keeps the cable sheath from wanting to push through when you give it the gas. All I did was grind down a fitting so it was the correct size and then used a hacksaw to cut a slot in one side of the fitting so I could get it over the cable. Then the cable and the fitting slip into the receiver on top of the carbs (it emmulates the stock setup).
Some have tried connecting the vacuum nipples together in all sorts of arrangements but I never did. These machines were designed to let each carb, cylinder, exhaust act independently (with the exception of the models with the YICS system). So I just cap them all off. The only drawback is that now we have two sets of rubber caps to monitor for heat cracks and possible vacuum leaks. I just change them all once a year when I do my spring tuneup.Mike Giroir
79 XS-1100 Special
Once you un-can a can of worms, the only way to re-can them is with a bigger can.Comment
-
Will these carbs work on an 82' XJ1100?Gene (Florida)
1980 XS1100SG
Accel Coils
4-1 Jardine ExhaustComment
-
When you come to install the carbs, try warming the rubber intake boots with a hairdryer first, makes them a bit more pliable for the new carbs to push in.Rob
XS Eleven SF
Could this be the finest Triumph Bonneville ever built ?
(Cycle January 1979)Comment
-
2H7 (79) owned since '89
3H3 owned since '06
07 Triumph Tiger 1050 (night rider)
"If it ain't broke, modify it"
☮Comment
-
I see no reason why they will not work on an 82 XJ provided there is room enough for the carbs and pod air filters. Now when it comes to mating these up to an XJ stock air box I am completely in the dark but it seems doable.Mike Giroir
79 XS-1100 Special
Once you un-can a can of worms, the only way to re-can them is with a bigger can.Comment
-
Thanks TadRacer.
I went a head a bought a set of ZRX1200 carbs.
Crazy thing this past week. I ran into a set of FJ1200 carbs while I was in Florida on business. I asked the guy to send me a photo not really expecting much.....The carbs look like new. I picked those up as well for $100.
I might put the ZRX1200 carbs on my xs1100 and the FJ1200 carbs on the xj1100 I'm tinkering with.Gene (Florida)
1980 XS1100SG
Accel Coils
4-1 Jardine ExhaustComment
-

Well, I got this far. I have a question on the vacuum line on Carb 2. I have been looking all over for an image with an installed ZRX12 carb on an XJ1100.Gene (Florida)
1980 XS1100SG
Accel Coils
4-1 Jardine ExhaustComment
-

This might be too close of a photo.Gene (Florida)
1980 XS1100SG
Accel Coils
4-1 Jardine ExhaustComment


Comment