Announcement

Collapse
No announcement yet.

Carb Cleaning 101 REVISED!!!

Collapse
X
 
  • Filter
  • Time
  • Show
Clear All
new posts

  • Carb Cleaning 101 REVISED!!!

    Edited by Crazy Steve. Kat posted this originally (expanding it primarily with pictures on a tip posted by Maans Smit), but the original post only illustrated the late type carbs. So this is being edited/expanded once more to better cover both carb types; the '78-79 and '80-82. Make sure you watch for the differences, and I'd highly recommend that you look here: http://www.xs11.com/forum/showthread...811#post363811 first before starting your rebuild if you're not very familar with these carbs. The bulk of the pictures are of the late style carbs and there's not any major differences in the process, so don't be confused if your carb doesn't look exactly like the pic. There's also different schools of thought on whether or not to disassemble the individual carbs off the rack; there's pros and cons for both methods, but this will ultimately be up to you and what condition the carbs are in. This tip also won't get into jetting as that has just too many differences between types and how an individual bike may be set up; jetting guides will be found elsewhere in these tech forums or in the manual. With all this said, let's start....
    I've taken the carb cleaning tips here at XS11 starting at the disassembly and added pictures with a few of my own tricks thrown in...

    Disassembling the carbs:

    I like to work cleanly, so I usually first wash the gunk off the outside of the bank of carbs before I start removing parts. The main idea is to keep the insides of the four carbs separate. They should go back into the same carb they came out of unless a part needs to be replaced. So put them in front of you on a biggish piece of clean paper/cloth the way they sit in front of you on the scoot. No 1 on the left and 4 on the right. Now just turn the bank of carbs upside down.
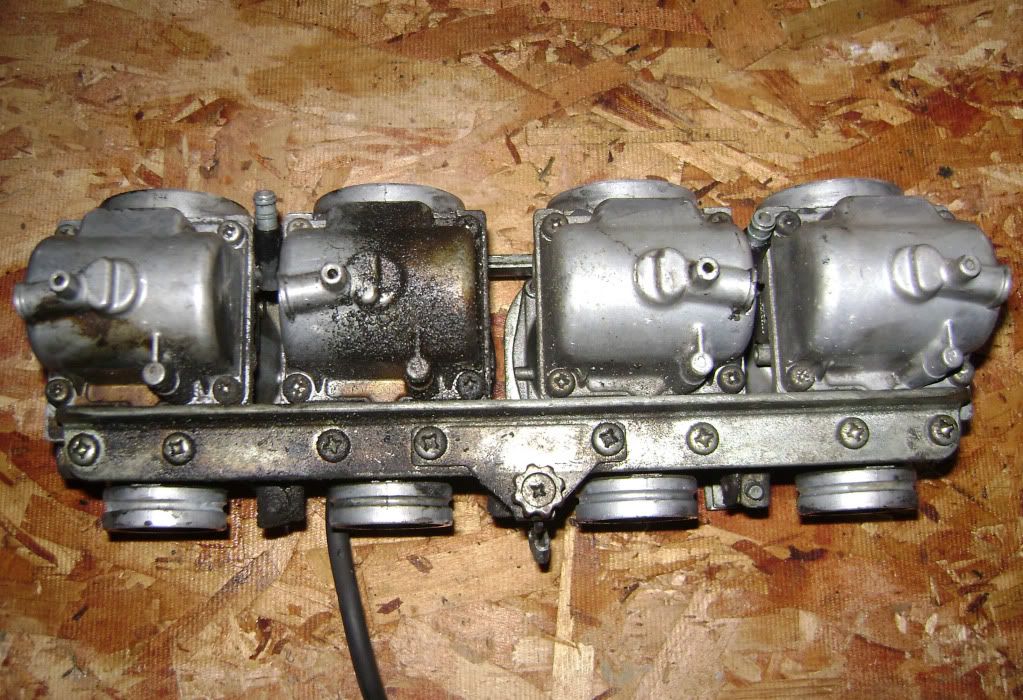


    First you're going to remove the float bowls which are the bottoms of the carbs. I like to first spray all screws/nuts/connections lavishly with PB Blaster or a similar product to make things easy. Note here these are '81-82 type bowls and are side-specific.
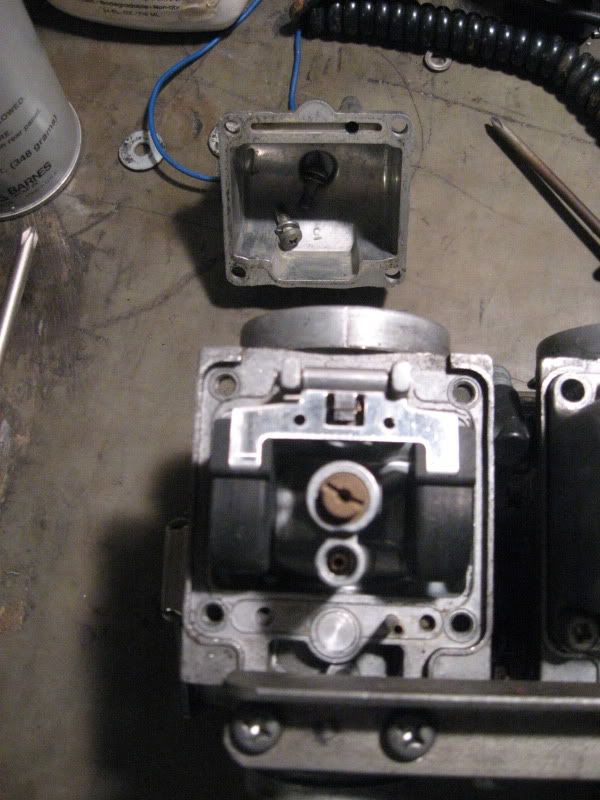


    Unscrew the four Phillips (or whatever screws - mine came with Phillips and I replaced them with cap/Allen screws) on the corners of each float bowl, then carefully lift each one off. If the gasket comes out without tearing it may be able to be reused, otherwise you'll need a new one. Make sure you keep all internal parts with the carb body it was removed from.
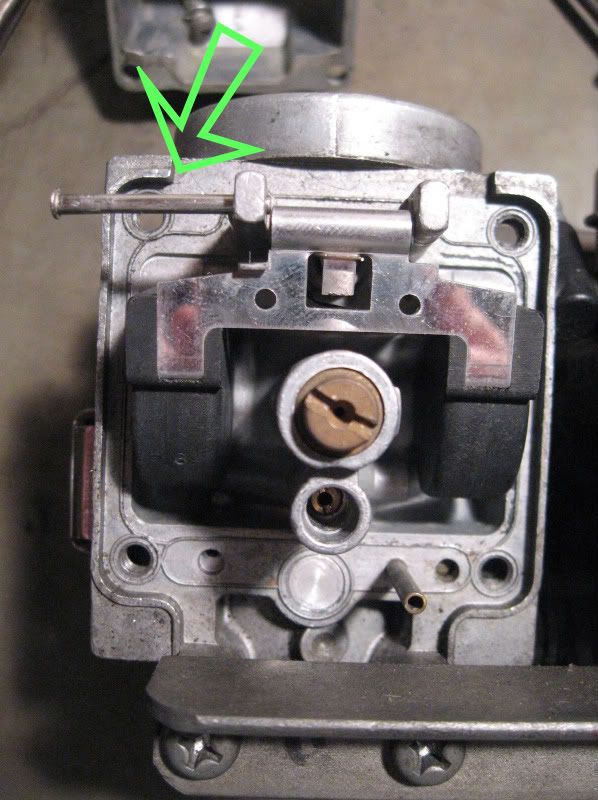


    You'll see the float under the float bowl. It is held by a pin which goes through two posts which are part of the carb body. THOSE POSTS BREAK EASILY.
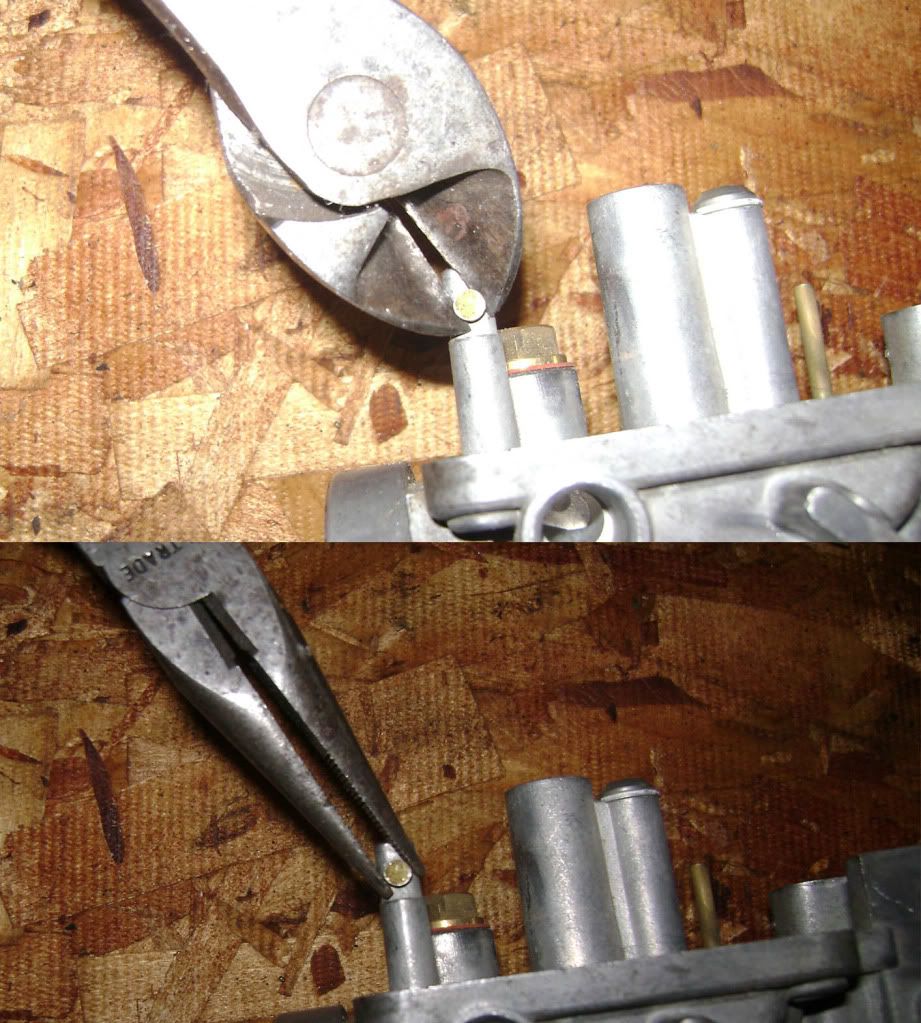


    Again, those posts break easily. There's several methods for removing the float pin; you can use a sharp pair of wire cutters as shown but don't pry, just squeeze. You can also use a pair of needlenose pliers and grip the pin head, twisting while gently pulling outwards until the pin comes loose. Some have used a small nail or pin and lightly tapped from the end opposite the head, but use extreme caution if using this method as this is how many posts get broken. If you have an electric soldering iron (the larger the better), applying heat to the post with the pin head on it will help by expanding the aluminum a bit.
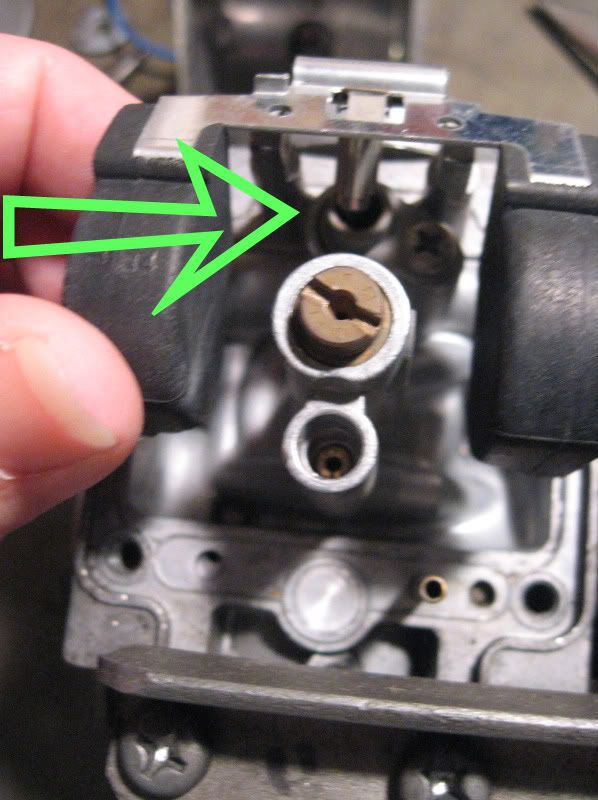


    Lift the float and float needle up and off the carb. The late carbs have a viton-tipped needle that if the rubber is still resiliant can be reused. The early carbs will have a solid-steel needle. If the steel needle isn't worn, it can be polished and reused. Be aware that these are a leading cause of carb leaks, and it's hard to 'eyeball' these to tell if they're good. If you have doubts, I'd recommend replacement of both the needle and the seat.
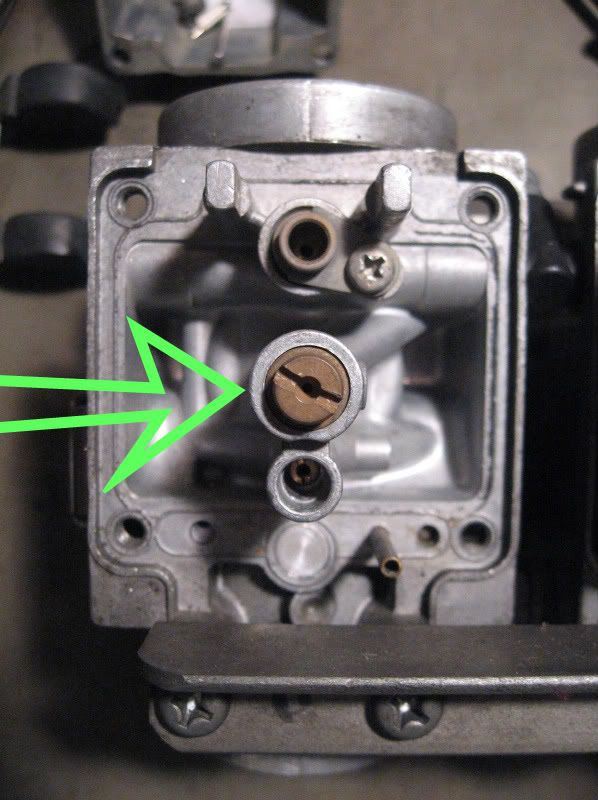


    Ok, several things going on here; the large 'screw' is the main jet. Unscrew it and remember to take its copper/brass washer with it. Above it is the float valve seat. To remove this, take out the screw and the 'Y' clamp that hold it in, then gently grip it with some pliers (if you intend to reuse it) and twist and pull until it's out. There's a o-ring seal on this, replace this if it's more than a year or so old; this is another known leak problem (on the late carbs) as these dry out/shrink. The early carbs will have a hex-head on the seat and are threaded in; simply put the right size socket on it and unscrew it. Both seats will have a small dome-shaped filter on them, don't lose these. If you find much 'stuff' under these, I'd recommend breaking the rack to remove the fuel 'tees' so you can thoroughly clean these passages out. Anything left in here can quickly cause even new valves to leak.
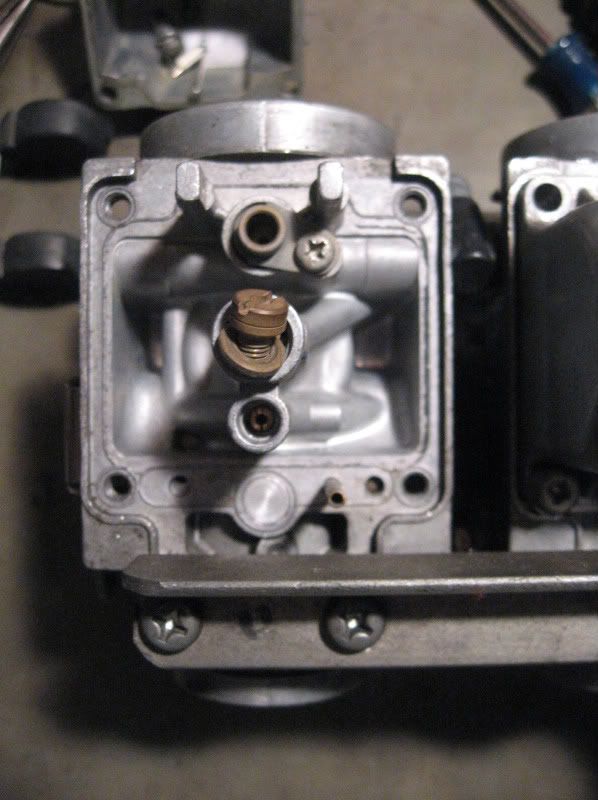


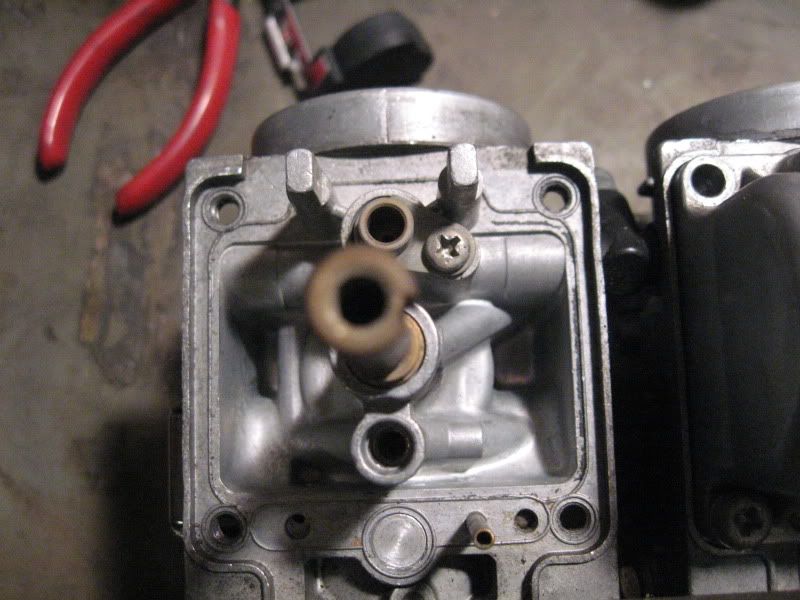
    Directly below the now-removed main jet is the pilot jet. On most late carbs, this will be 'open' as seen here. Some '80 carbs may have a rubber plug covering this, if you found the remains of one or it doesn't fit tightly in the hole, you'll need to replace it (for more info on this recheck the linked guide). The '78-79 carbs will have a screw with a thin washer covering this passage, remove the screw.
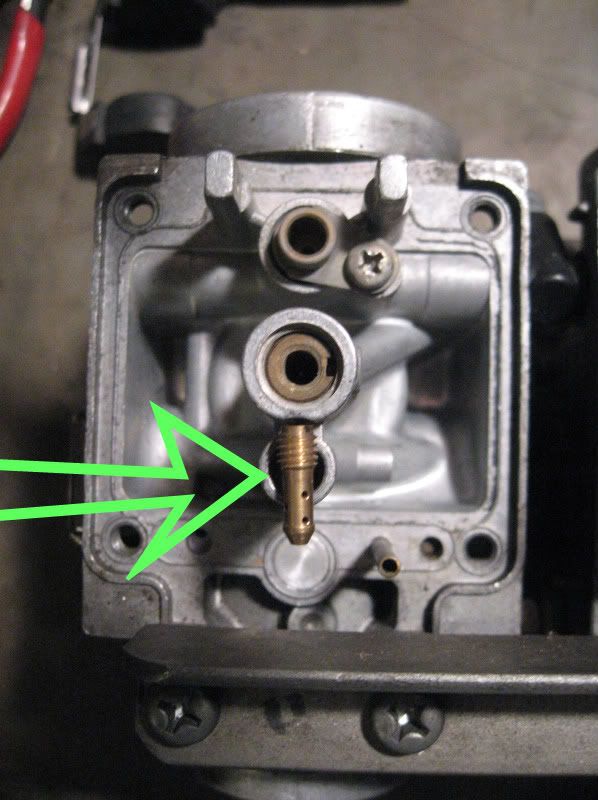


    The standard pilot jets are usually size 42.5. NOTE: The pilot jets are brass/copper and the screwdriver slots on top of them strip out easily and then it's hell to get them out. I had to drill one out. So make sure your screwdriver is sharp and fits tightly when you put it in the jet, and put pressure on it and turn slowly. It helps to soak the jets in penetrating oil before you try and get them out. Especially if they haven't been out lately.

    Part 2 to follow
    81 SH Something Special
    81 frame, 80 tank and side covers, 79 tail light and carbs, 78 engine, 750 final drive mod, Geezer rec/reg, 140 mains, LH wheels


    79 SF MEAUQABEAUXS
    81SH Nor'eas tah (Old Red)
    80 LG Black Magic
    78 E Standard Practice


    James 3:17

    If I can make at least one person smile, or pee their pants a little, or maybe spit out their drink; then my day is not wasted.

    “Alis Volat Propriis”

    Yamaha XS 1100 Classic
    For those on FB

  • #2
    .... moving on....


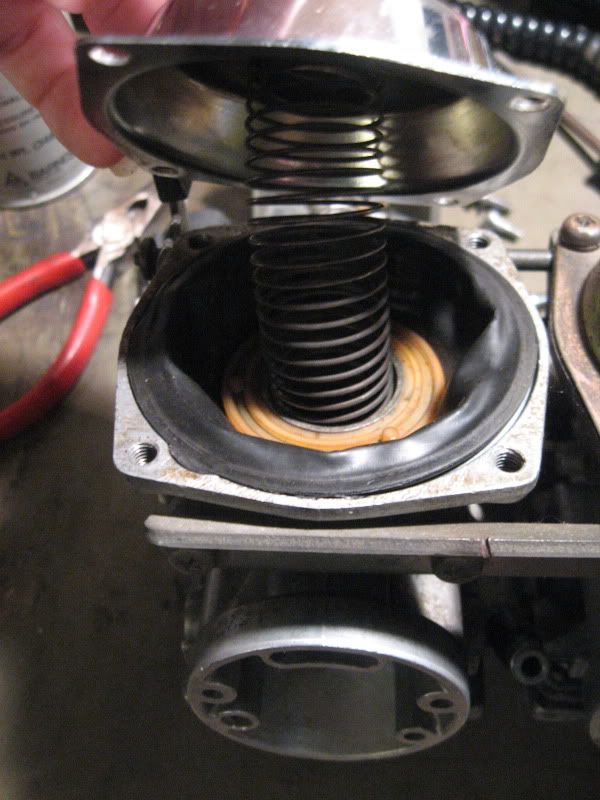
    Turn the carbs around, put a thick cloth under them so the posts don't break or get damaged, and unscrew the screws holding the tops of the carbs/ diaphragm covers and remove them, the diaphragm springs and the brackets between the carbs.


    Slide the diaphragm assembly and needle out. These can be delicate, so handle them with care; the rubber can tear easily, and dropping them on a hard surface can damage the slides enough to make them unusable. After you get them out, hold them up to a strong light and look for holes. Minor pinholes, you may be able to repair them. Big holes or rips, you'll need new ones. This used to be major disaster if you needed to replace these, there's now a reasonably-priced replacement available... look here: http://www.xs11.com/forum/showthread.php?t=33250 Upon reassembly, make certain to match up this 'tab' on the diaphram with the matching relief in the carb body. Check the jet needles sticking out of the slides; look for bends and heavy wear or 'roughness'. If they're bent, you may be able to straighten them, but badly worn ones should be replaced. Make sure they move freely in their holes; if not, they'll need to be removed and cleaned.


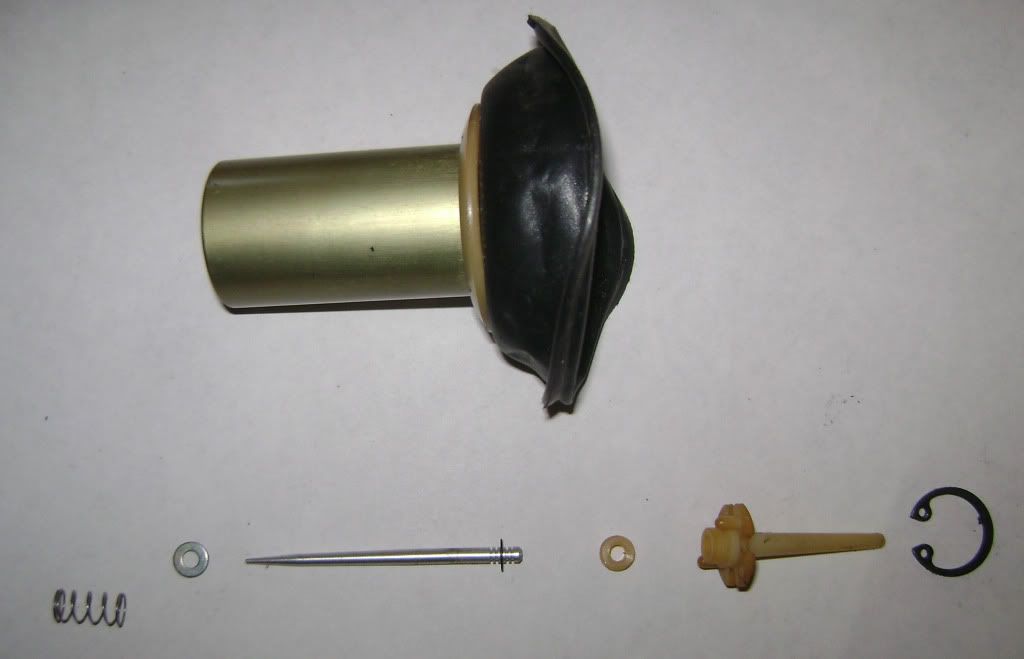
    Here's a pic of the '78-79 type needle jets. They assemble in the order shown into the slides, and are held in by the c-clip on the far right. Note that these are adjustable by moving the c-clip; the '80-82 ones aren't and only have one position. The '80-82 are similar, but are removed by taking out the two screws inside the slide as seen in the pic above.


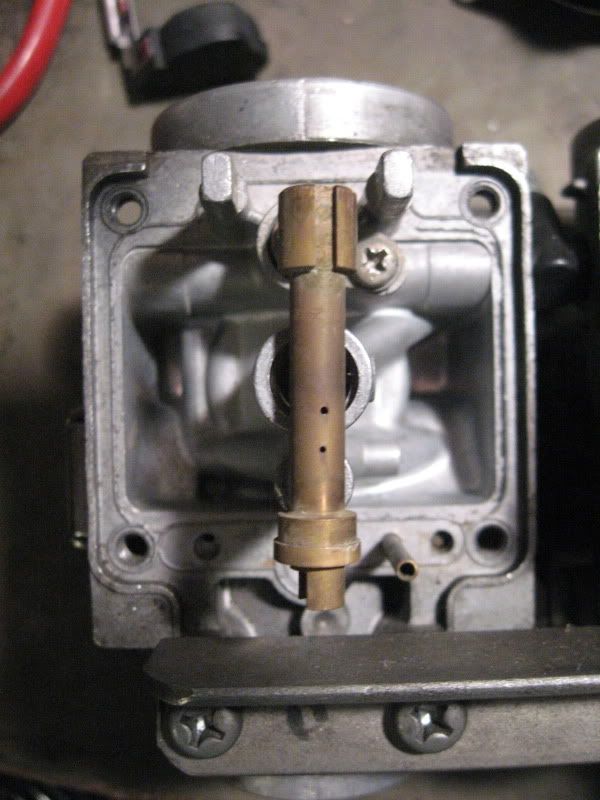
    Turn the carb around again and look in the hole where the main jet came out. You'll see the 'needle jet' also known as the emulsion tube. If it pushes out easily into the slide area, remove it. If not, soak it with penetrating oil and tap it out gently from the bottom of the carb, i.e. the main jet hole, with a thin flat screwdriver (round the sides of the hole so you don't damage the thread for the main jet) or a small wooden dowel or pencil. Don't try to pull it out from the slide hole with pliers, you run too much of a risk of damaging the tube. I usually use a small wooden dowel or a pencil to gently tap it through...


    The emulsion tube out...


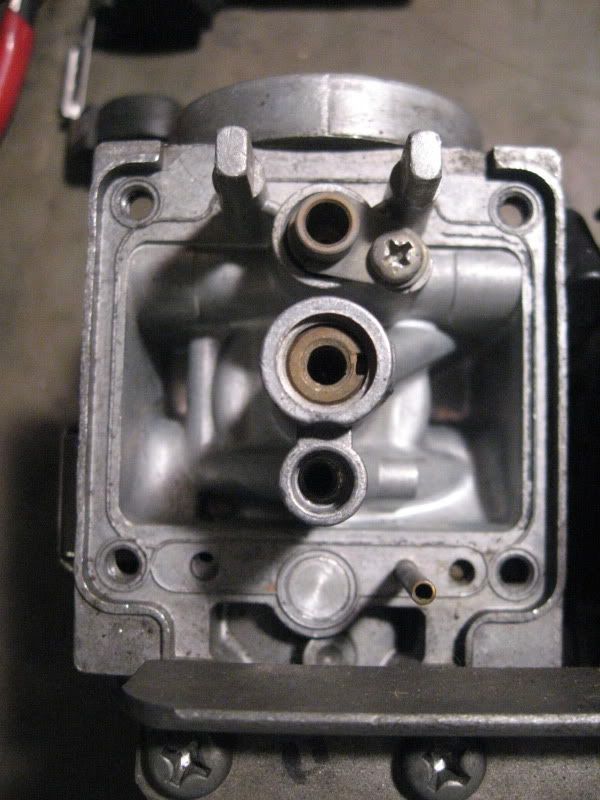
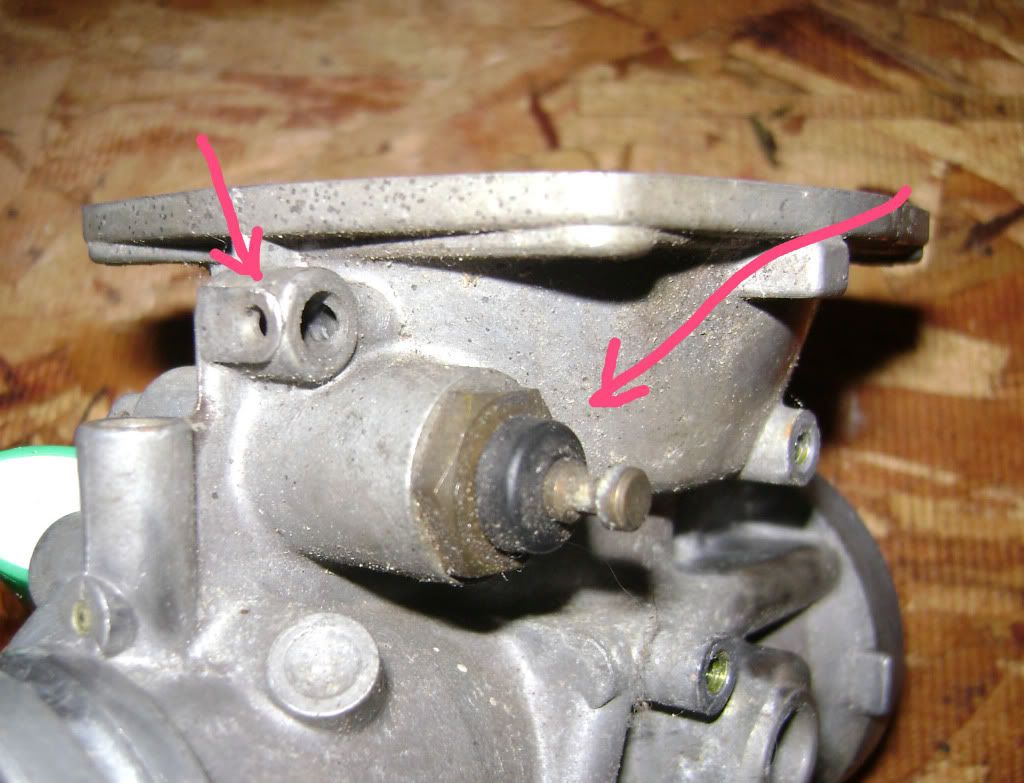
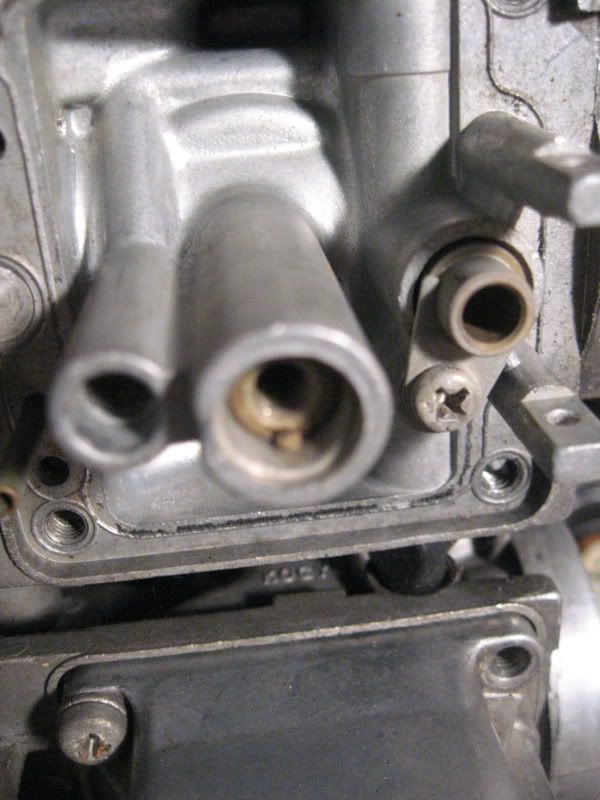
    If you look at the inlet/airbox side of the carb body you'll see at 8 o'clock the air pilot jet to be removed and cleaned. Again, make sure the screwdriver fits firmly in the slot. The small jet at the 4 o'clock position isn't removable. The other hole(s) are vents.


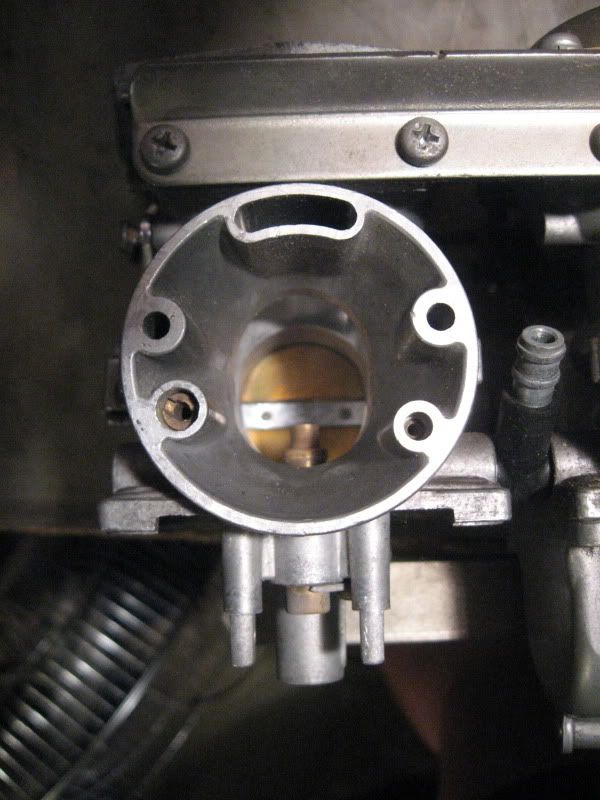
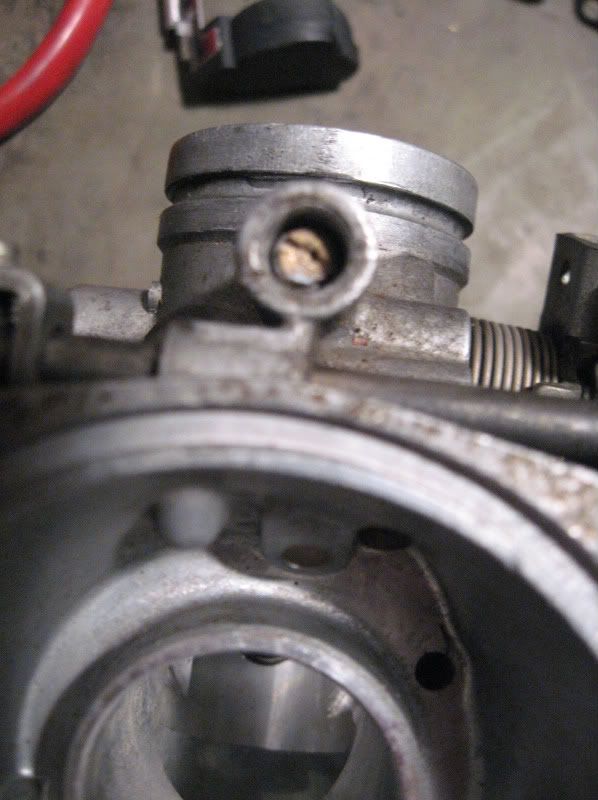
    On top of the outlet side of the carb (small mouth which connects to the carb boot/engine) is the idle mixture screw which is the screw you turn to adjust your idle mixture, e.g. when you Colortune. Pictured is the late carb, so this screw is down inside the tower. You may find this hole plugged if the carb hasn't been rebuilt, you need to remove the plug. Drill a small hole in the plug (don't go too deep or you'll damage the screw), then install a small screw in the hole and pull the plug out. After exposing the idle screw, this is the same as all the other jets; the slot is easily stripped, so make sure your screwdriver is sharp and you keep pressure on it while you turn. Some penetrating oil can help. Once you get the screw out, you should find (in order) the screw, a spring, a small washer, and a small o-ring. You'll probably have to pick the washer and/or o-ring out with a paperclip. The o-ring will likely have to be replaced. These parts will come in a rebuild kit, so don't worry about their condition unless you don't plan to buy a kit.

    The early carbs are slightly different; the screw is exposed, simply remove it. If the plastic 'anti-tamper' cap is still present, cut that off. All you have is the screw and the spring, no other parts. But these screws are noted for the tips breaking off in the carb body if they're turned in too far, so check for that. The tips can also be damaged, so look for that too. Again, these will be furnished in a rebuild kit. If you have broken tips stuck in the carb bodies, do a forum search for the various methods of removing them. Sometimes they need to be drilled out...

    Check your choke linkage for operation; if it's frozen or very stiff, you'll probably have to break the rack apart...


    ... so you can remove the enrichener pistons ('starter plunger') as shown here. Remove these with a socket. These should move freely (except for the slight spring tension) out and snap back in. When disassembling the choke linkage, watch for a small spring and ball in this hole in the number 1 and 4 carbs; this 'detents' your choke, so try not to lose them. Frozen or stiff linkage is why you find carbs with the choke lever broke off....

    Ok, the carbs are apart, on to cleaning and reassembly....
    81 SH Something Special
    81 frame, 80 tank and side covers, 79 tail light and carbs, 78 engine, 750 final drive mod, Geezer rec/reg, 140 mains, LH wheels


    79 SF MEAUQABEAUXS
    81SH Nor'eas tah (Old Red)
    80 LG Black Magic
    78 E Standard Practice


    James 3:17

    If I can make at least one person smile, or pee their pants a little, or maybe spit out their drink; then my day is not wasted.

    “Alis Volat Propriis”

    Yamaha XS 1100 Classic
    For those on FB

    Comment


    • #3
      Upon reassembly...

      First, let's talk about cleaning. Number one, a compressed air source is mandatory for cleaning these. You have to be able to blow air through all the various passages to be sure they're clear or you'll likely be wasting your time. Second, you can't get these too clean; the slightest bit of crud left behind can come back and haunt you. Make sure every part, passage, opening, and hole is as clean as possible. There used to be a lot of talk about 'triple-cleaning' these carbs, that was simply because owners weren't getting them clean enough the first two times...

      Next, what are you going to use to clean them? This can depend on so many factors; how much do you want to spend, how bad are your carbs, what is available to you? The best/strongest cleaners IMO are either the Yamaha carb dip cleaner (available through your local dealer) or Berrymans Chem-dip (available at most auto parts stores). Price-wise I believe they're about the same (about $25-30 for a gallon container), but there is one major difference. The Yamaha dip is safe on rubber parts, the Berrymans isn't; put rubber parts into that and it will destroy them. I (Crazy Steve) personally use the Berrymans as I haven't found any crud it won't remove. But if you find you need to dip the whole carb body, you'll need to remove the throttle shafts to protect it's seals (for this, search the forum; it's been covered as to the best methods). From there, some have had success with Pine-sol, Simple Green, spray-can carb cleaner and maybe a few other cleaners, as well as ultrasonic cleaners and heating the cleaning solution. Again, there's been a lot of discussion in the forums as to different cleaning methods, pick one that you think will work for you. I'd highly recommend that you soak all the small metal parts (particularly the jets) in carb cleaner, at least the stuff you can buy in spray cans. You can use gas or thinner to clean the exterior of the carbs. Be safe whatever you use, wear eye protection, etc, etc...

      OK, you've got everything clean enough to pass a white-glove inspection. Reassembly is pretty much just a matter of putting the carbs back together. We'll note the 'special' places that need particular attention, so let's go...


      Make sure you take note of the notch and pin when putting the emulsion tube back into place... don't force this.


      The tube does NOT go in from this side... It's sitting here for the picture ONLY... (Thank you Don)


      The notch in the emulsion tube should fit on this pin.


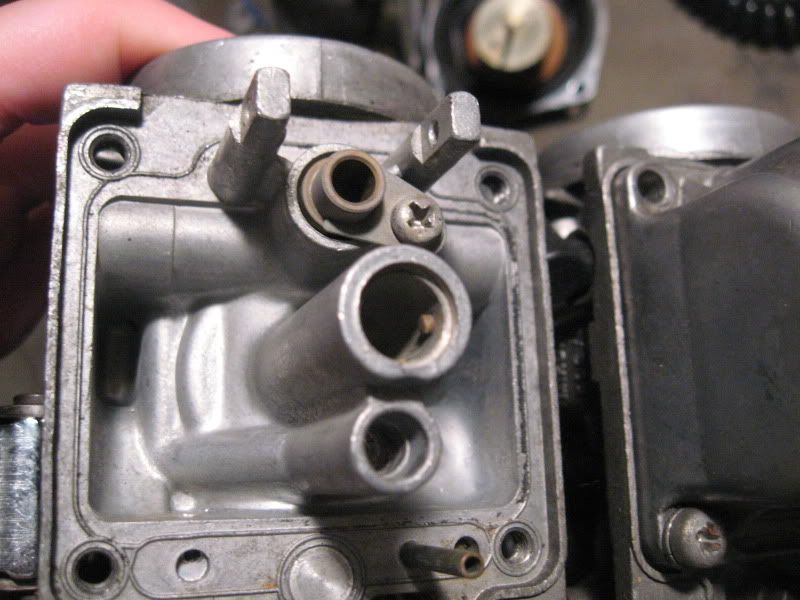
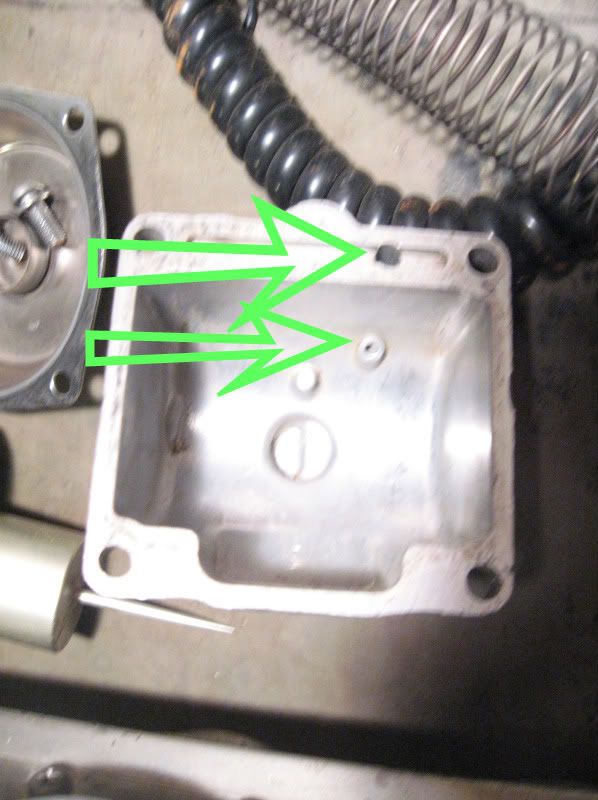
      Also.. make sure you clean this particular tunnel in the float bowl... and it WILL hit you in the eye as it goes through if you aren't careful... DAMHIKIJD

      By the way... a MAJOR thanks to John for being so patient in teaching me all of this...

      Of course, you'll have to set some stuff; the float levels and a rough 'set' on the idle screws. For the floats, if you have brass units, set them to 1" (+/- .040") from the gasket surface to the top of the float with the carb upside down. The plastic floats should be set to .906" (+/- .020"). Note this isn't year-specific, but depends on the float type; if you install plastic floats in early carbs use this number. The '81-82 carbs have a rather involved setting process, you'll find that discussed in the forums as well as in the service manual, but this number will get you close on those. Make sure you check both sides, sometimes the float can be twisted; adjust as needed. You may need to adjust the floats up or down depending on your combination while you tune the bike. For the idle screws, about 1 1/2 turns out from lightly seated will be a good start for the early carbs, about 2 to 2 1/2 for the late carbs. This will just be a starting point, you'll still need to sync/adjust these for best performance on your bike.

      Again, thanks to Wildkat and Maans Smit for the original posts, hope this is helpful!

      I think that's it, comments welcome!
      Last edited by crazy steve; 03-24-2012, 07:16 PM.
      81 SH Something Special
      81 frame, 80 tank and side covers, 79 tail light and carbs, 78 engine, 750 final drive mod, Geezer rec/reg, 140 mains, LH wheels


      79 SF MEAUQABEAUXS
      81SH Nor'eas tah (Old Red)
      80 LG Black Magic
      78 E Standard Practice


      James 3:17

      If I can make at least one person smile, or pee their pants a little, or maybe spit out their drink; then my day is not wasted.

      “Alis Volat Propriis”

      Yamaha XS 1100 Classic
      For those on FB

      Comment


      • #4
        Bump!

        Here's a bump so somebody will notice this!
        Fast, Cheap, Reliable... Pick any two

        '78E original owner - resto project
        '78E ???? owner - Modder project FJ forks, 4-piston calipers F/R, 160/80-16 rear tire
        '82 XJ rebuild project
        '80SG restified, red SOLD
        '79F parts...
        '81H more parts...

        Other current bikes:
        '93 XL1200 Anniversary Sportster 85RWHP
        '86 XL883/1200 Chopper
        '82 XL1000 w/1450cc Buell, Baker 6-speed, in-progress project
        Cage: '13 Mustang GT/CS with a few 'custom' touches
        Yep, can't leave nuthin' alone...

        Comment


        • #5
          Perfect timing for a "bump". Spring is carb cleaning season.
          Rob
          KEEP THE RUBBER SIDE DOWN

          1978 XS1100E Modified
          1978 XS500E
          1979 XS1100F Restored
          1980 XS1100 SG
          1981 Suzuki GS1100
          1983 Suzuki GS750S Katana
          1983 Honda CB900 Custom

          Comment


          • #6
            No other comments? Good, bad, anything to add? I'll leave this here a few more days, then send it the tech forum....
            Fast, Cheap, Reliable... Pick any two

            '78E original owner - resto project
            '78E ???? owner - Modder project FJ forks, 4-piston calipers F/R, 160/80-16 rear tire
            '82 XJ rebuild project
            '80SG restified, red SOLD
            '79F parts...
            '81H more parts...

            Other current bikes:
            '93 XL1200 Anniversary Sportster 85RWHP
            '86 XL883/1200 Chopper
            '82 XL1000 w/1450cc Buell, Baker 6-speed, in-progress project
            Cage: '13 Mustang GT/CS with a few 'custom' touches
            Yep, can't leave nuthin' alone...

            Comment


            • #7
              crap i had a huge reply ready to go and everything went south. I will have to redo it and send it again.
              2-79 XS1100 SF
              2-78 XS1100 E Best bike Ever
              80 XS 1100 SG Big bore kit but not fully running yet.
              Couple of more parts bikes of which 2 more will live!

              Comment


              • #8
                Ok maybe I scrolled down too fast and missed a few things but in order to shorten my reply time so i do not lose it again I will try to do it in point form
                -The screens and O-rings under the seats should be mentioned. May as well replace or inspect while they are that far apart.
                -The tubes for fuel and venting should be mentioned and possible repairs or replacements mentioned or linked to.
                -Post repairs should be linked to this thread as many will have to do it.
                -The 5 positions of the emulsion tube needles should be visited or linked to here as well as show which way the springs should work in them as members have had issues with them.
                -the fact that needle jets do have a small spring which can sieze and how to clean them. Adjusting float heights will be affected.
                -Proper ways to set float heights. Include info on the plastic floats or link to such info as many have issues with that. Sight tube adjustment for later carbs could be linked to.
                -The thumb over the kidney shaped hole trick to check the diagphragms for leaks would be good info to include.
                -TRBIG's post on how to synch bu the holes is good info.
                -Proper ways to balance/synch carbs such as http://www.youtube.com/watch?v=Hr6_Q...eature=related would be good info to have here.
                -Carb circuit diagrams would be very informative or links to them. as well as links to http://oldmanhonda.com/MC/Rcarbs.html and http://www.factorypro.com/tech/carbt...m_engines.html
                -Diaphragm repair, removal and install and suppliers could be included or linked to as well.
                -Descriptors of which is which for the air horn holes could be better.
                -Choke or enricher linkage and detent balls etc should be shown.
                -Possibly polishing methods for the steel needles and seats would be beneficial.
                -Viton tipped replacements or links.
                -Butterfly shaft seals should be covered somewhat.

                Probably a few more things that could come to mind but it as it is for carb cleaning maybe many of these do not fit. Thing is that if one wants to make a good article about this subject it would be good to include links which users can use to answer many other issues while they are taking the carbs apart.
                Just my opinion but I would make it as all inclusive as possible.
                2-79 XS1100 SF
                2-78 XS1100 E Best bike Ever
                80 XS 1100 SG Big bore kit but not fully running yet.
                Couple of more parts bikes of which 2 more will live!

                Comment


                • #9
                  Yep, this is what I'm talking about!

                  Rasputin's points, and my replies....

                  1-The screens and O-rings under the seats should be mentioned. May as well replace or inspect while they are that far apart.

                  I did mention these, but no pics as I was working with the original post.

                  2-The tubes for fuel and venting should be mentioned and possible repairs or replacements mentioned or linked to.

                  Again, I mentioned these briefly but if you don't break the rack apart it's not usually an issue. BikerPhil posted a 'tee' fix recently, I'm going to try to get that into the tech tips, once I get that done I'll add a link.

                  3-Post repairs should be linked to this thread as many will have to do it.

                  I thought about this, but there's really no 'definitive' repair out there. Different methods done by various members, depending on how theirs broke, but not all methods will work for everyone. I've got an idea for a 'everyman' fix, but I haven't had time to do anything with it yet...

                  4-The 5 positions of the emulsion tube needles should be visited or linked to here as well as show which way the springs should work in them as members have had issues with them.

                  I mentioned that (but remember, that's only true on the '78-79 carbs) and did show the assembly for the early carbs. I will note that 'standard' position for the early carbs should be the center groove.

                  5-the fact that float needles do have a small spring which can sieze and how to clean them. Adjusting float heights will be affected.

                  Good call, I'll add a note about that. I mentioned 'cleaning' the float valves, but to be honest I don't want to encourage this as this can cause a newbie grief if the valves are marginal.

                  6-Proper ways to set float heights. Include info on the plastic floats or link to such info as many have issues with that. Sight tube adjustment for later carbs could be linked to.

                  I purposely left some info out, as I think you should be at least looking at the manual, and this was a way to do that...

                  7-The thumb over the kidney shaped hole trick to check the diagphragms for leaks would be good info to include.

                  I don't think that's needed here, as I mentioned checking the diaphrams after they're removed. But I will add this the ID guide...

                  8-TRBIG's post on how to synch by the holes is good info.

                  Yep, just moved that into the 'tips under construction' forum and once I get it posted I'll add a link...

                  9-Proper ways to balance/synch carbs such as http://www.youtube.com/watch?v=Hr6_Q...eature=related would be good info to have here.

                  10-Carb circuit diagrams would be very informative or links to them. as well as links to http://oldmanhonda.com/MC/Rcarbs.html and http://www.factorypro.com/tech/carbt...m_engines.html

                  Both 9 and 10 should properly be in a 'tuning' tip; I'm trying to keep these tips limited to the project at hand (in this case disassembly/reassembly of the carbs) to avoid information overload.

                  11-Diaphragm repair, removal and install and suppliers could be included or linked to as well.

                  I did include a link to ToolmakerTims diaphram repair tip...

                  12-Descriptors of which is which for the air horn holes could be better.

                  I'll clarify that a bit...

                  13-Choke or enricher linkage and detent balls etc should be shown.

                  I showed the linkage in the ID guide, and included a link to it.

                  14-Possibly polishing methods for the steel needles and seats would be beneficial.

                  See answer 5...

                  14-Viton tipped replacements or links.

                  I should have mentioned new parts suppliers, I'll add that.

                  15-Butterfly shaft seals should be covered somewhat.

                  I thought about this, but again, this isn't generally part of a 'normal' rebuild. I will mention at least checking them, but actual disassembly really should be a separate tip because of the degree of difficulty.

                  .....it would be good to include links which users can use to answer many other issues while they are taking the carbs apart.

                  I fully agree, and I've tried to include the ones I'm aware of. But there's a ton of threads/posts out there, and finding (and remembering!) them all can be a daunting task. If there's more than the ones you've included here that you know about, please post links to them in the 'updated tech forums' thread that's stickied and I'll do my best to get them linked or posted as tech tips.

                  THANKS!
                  Fast, Cheap, Reliable... Pick any two

                  '78E original owner - resto project
                  '78E ???? owner - Modder project FJ forks, 4-piston calipers F/R, 160/80-16 rear tire
                  '82 XJ rebuild project
                  '80SG restified, red SOLD
                  '79F parts...
                  '81H more parts...

                  Other current bikes:
                  '93 XL1200 Anniversary Sportster 85RWHP
                  '86 XL883/1200 Chopper
                  '82 XL1000 w/1450cc Buell, Baker 6-speed, in-progress project
                  Cage: '13 Mustang GT/CS with a few 'custom' touches
                  Yep, can't leave nuthin' alone...

                  Comment


                  • #10
                    Great!

                    ill say thanx Steve from all members for a very thorough explanation. exactly what i went through cleaning my carbs in Jan.
                    the only thing i would add is before removing the idle mixture screws, seat them first and count the # of turns. my 81SH was set at 2.5 turns out and thats where i set them on installation. i also painted a white line on the tower where the mix screw slot lined up before i counted the turns in so i knew where it started.
                    the only issue i had was losing the tiny steel choke rod ball and finding it after i put it back together. keeping that ball/spring in the hole u cant see when reinstalling the rod on carb 1,4, was very difficult.
                    Great Thread!!!
                    Last edited by mjpxs11sh; 03-26-2012, 11:24 PM.
                    Max

                    81 XS1100SH Black Beast Mutt
                    Kerker 4/1
                    stock carbs and air box.
                    78 headlite, handle bars,
                    1 set of ea-160/85mph guages,
                    crash bars, cruise control

                    Other 2 Wheelers
                    78 XS1100E jet kit, Kerker 4/1, air pods, jet kit-RIP
                    94 CBR1000F jet kit,Two Bros pipe, K&N Filter

                    Comment


                    • #11
                      Ok, I've applied the 'final' revisions to this and it's now posted in the tech tips!

                      Thanks!
                      Fast, Cheap, Reliable... Pick any two

                      '78E original owner - resto project
                      '78E ???? owner - Modder project FJ forks, 4-piston calipers F/R, 160/80-16 rear tire
                      '82 XJ rebuild project
                      '80SG restified, red SOLD
                      '79F parts...
                      '81H more parts...

                      Other current bikes:
                      '93 XL1200 Anniversary Sportster 85RWHP
                      '86 XL883/1200 Chopper
                      '82 XL1000 w/1450cc Buell, Baker 6-speed, in-progress project
                      Cage: '13 Mustang GT/CS with a few 'custom' touches
                      Yep, can't leave nuthin' alone...

                      Comment


                      • #12
                        Excellent Carb Cleaning Help

                        Just wanted to say Thanks to Kat and Steve, looks like that was a lot of work to put together. I haven't started a Carb Clean yet, too many other things to work on. The 79 came in before the winter for some upgrades, but I haven't stopped working yet.
                        Thanks again for all the help
                        Rock Hound TX
                        Rock Hound
                        79' Eleven Special

                        Comment


                        • #13
                          Very nice work!
                          XS1100F 1980 European model. Standard. Dyna coils. Iridium plugs. XS750 final drive (sometimes). Micron fork brace. Progressive front springs. Geezer regulator/rectifier. Stainless 4 into 2 exhaust. Auto CCT (Venturer 1300) SOLD. New project now on the go. 1980 European model.

                          Comment


                          • #14
                            Good stuff

                            This info is great. I would have been too intimidated to try the process without it. Between this info and some help from the gurus, I got it apart, cleaned and back together. And it started the first time I hit the button.

                            If I can do it, anyone can.

                            Got my Carbtune in the mail today. Wouldn't you know I have to work tonight, tomorrow and Sunday, so the wait continues.
                            1978 XS1100E "Goliath"
                            Full Pacifico faring
                            Hard saddle bags
                            Hard trunk
                            Uni air filter
                            In the process of restoration

                            It is impossible to rightly govern a nation without God and the Bible. George Washington

                            Let us with caution indulge the supposition that morality can be maintained without religion. Reason and experience both forbid us to expect that national morality can prevail in exclusion of religious principle. George Washington

                            Comment


                            • #15
                              Wondering if you'd be able to re-post the pics? Would be nice to fix the thread.
                              1980 XS1100G. Work in progress.
                              1980 XS1100G. 2nd work in progress.

                              Comment

                              Working...
                              X