
Actually, it wasn't that it was not working. It was simply a lack of understanding on my part at the time. As is usually the case with this particular piece of hardware. Most people see this strange thing on their brakes and freak out, not understanding why it is there or how it works. Worst case, people just decide to remove it without learning of its benefits.
I will grant you that many folks have decided to remove the linked braking system because they prefer the manual control or the simplicity of the non-linked brakes. That, however, is not because the valve is problematic. Personally, I prefer anti-lock brakes on my car and the linked brakes on my bike. I have never found a reason to detract from the benefits of either one.
Good for you. Channel locks have their purpose, and for me, there are many specific locations on my bike where a socket WILL NOT work. This is one of them. I will grant you that my description of the process was for my LH and not an XJ. The LH does not have a socket-compatible connection on the fork caps.
-
-
I'm sure I speak for many of the more experienced riders, linked brakes on a bike are like anitlock brakes and traction control on a car. Many of us grew up without and had no problem getting around even with rear wheel drive cars. All the extra stuff which is convenient is not necessary with the possible exception of anti lock brakes. I prefer to not use front brakes when encountering loose material on the road surface. Most bikes produced don't have linked brakes although that is changing. You can still buy a motorcycle today with a single front disc and rear drum, they aren't linked.
OutLeave a comment:
-
Heres your thread when yours didn't work
Leave a comment:
-
-
-
Actually You seem to be the first person to label it that way. I like mine. Lets don't start rumors.
Since I rotate riding my 79 SF with the XJ I can appreciate the difference and would change neither . But unlike some, I have that option. If I could only keep 1 of them I wouldn't change the design of either one.Its not rocket science to put the XS system on the XJ.Leave a comment:
-
Thanks for the advice. I figured out that they rotated 360 and kept going so I was wondering if they came off with the steel caps. Tomorrow is the day now. I have located the right size socket and everything is soaking today with penetrating oil. I too have learned to not fix what isn't broke but it took me a while. I intend to photograph everything and put together a thread so someone can search next time and see pix. I'll probably post it on my website too. I photographed a Master Cylinder teardown and reassembly but haven't posted yet. It will be part of my thread for de-linking the brakes on the XJ including hooking both front rotors to the front M/C. Eliminates the problem prone proportioning valve.Leave a comment:
-
Just loosen the metal nut. It's all one unit. The plastic adjuster knob comes with it. Just be careful with the long skinny rod that comes out with it. One of mine was bent a little, but I CAREFULLY bent it back. They seem to be pretty fragile and trying to bend one back could go wrong fast. Also, notice that this rod has sort of a half-moon cross section. When you reassemble it, make sure that the rod end drops down into the corresponding half-moon slot in the fork. Otherwise you could bend it pretty bad. These manuals are not always quite clear on how to do something, they just tell you to do it. I tried to get a look at my seals, but my snap ring tool was too wimpy to pull it out, so I left well enough alone. They weren't leaking so I'll worry about that another time.Leave a comment:
-
I think Larry's got it; I need to do the same thing on my XJ (but I need to get the motor back together first), but the FJ forks I'm using on one of my other XS's had the same deal and the adjustors come out with the cap....Leave a comment:
-
-
Use a socket or a wrench to get on the metal nut part of the cap, right below the plastic dampening adjuster, that the arrow is pointing to. Do not pry on that adjuster or it will be garbage. As was mentioned, loosen the top triple clamps first. The complete cap assembly should unscrew from the tube.
LarryLeave a comment:
-
Unfortunately they're not, its a hard plastic dial with 5 positions. Apparently there are long rods coming up from the within the forks attached to them from the back. The manual says to remove them but doesn't say how, surely someone here with an XJ has pulled them. I'm going to go out and look at them again and try gently prying up, maybe they are just pressed onto the rods for the dampening adjustment. The item that the red arrow is pointing at is what I'm asking about
Thanks
John
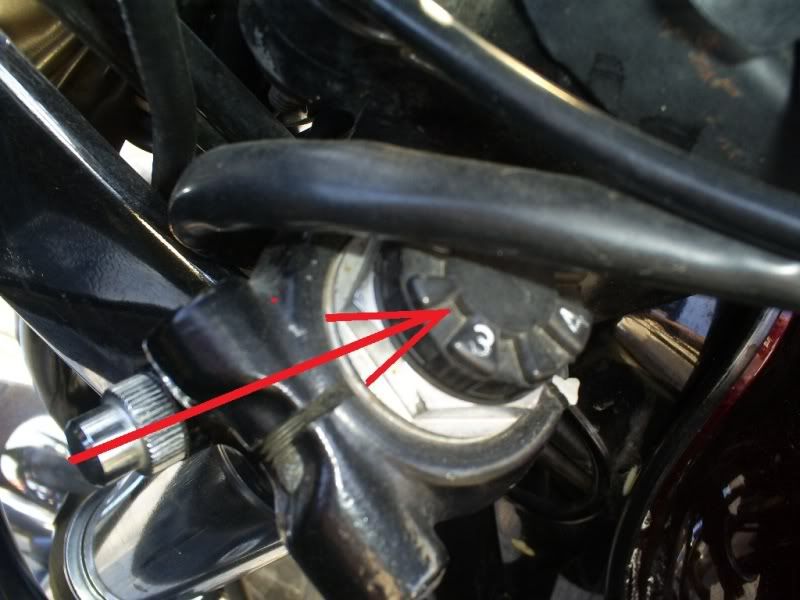 Last edited by WSL91; 03-16-2012, 07:04 AM.
Leave a comment:
-
If it is like the XS, it is just a push on rubber protective cap. Just pry it up.Leave a comment:
-




Leave a comment: