Announcement

Collapse
No announcement yet.

Anyone have butterfly shaft diagram?

Collapse
X
 
  • Filter
  • Time
  • Show
Clear All
new posts

  • Anyone have butterfly shaft diagram?

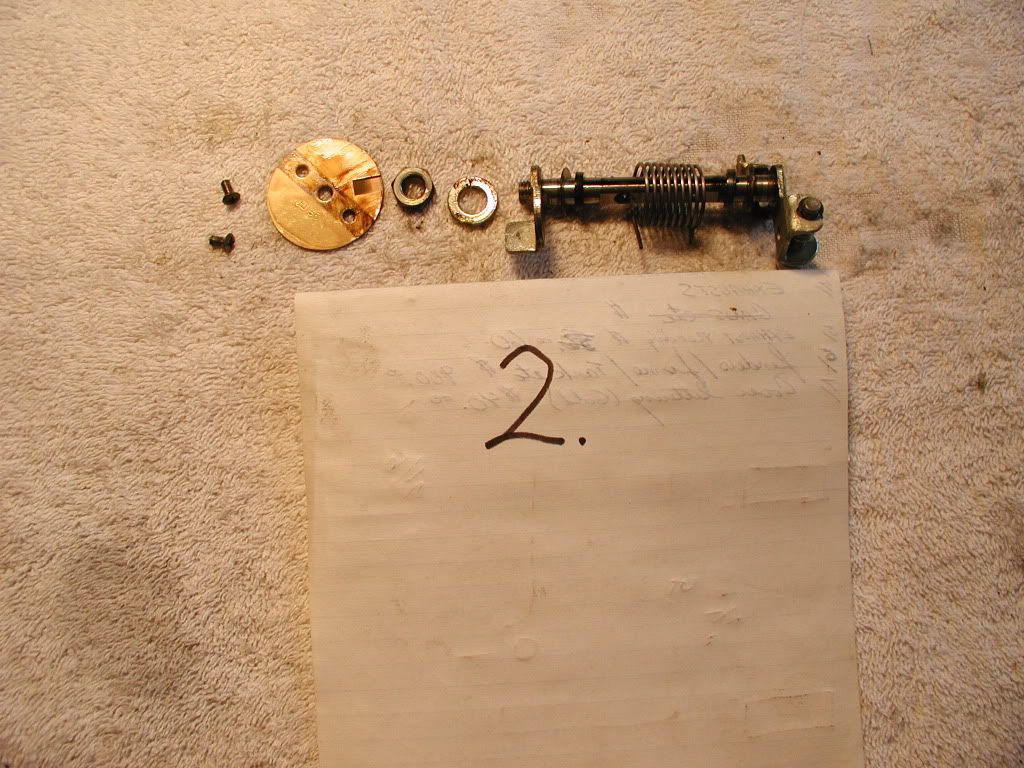
    I replaced my butterfly shaft seals with the ones from MikesXS. I was extremely careful not to mess up the valves at all. I *thought* I put everything back in the correct order however my butterfly valves do not close all the way. They have some slop in them left or right. I can get them to close completely when I manually align the valve in the slop zone. They dont stay correctly aligned though.

    I tried throwing the carbs back on the bike anyways and in very short order the bike refused go below about 2k RPM, presumably because the butterfly valves are stuck partially open.

    Does anyone have a diagram of what washers, seals, etc are involved? I am worried I left something out. A picture would be worth a thousand words. Thanks.
    '80 XS Special
    JonathanKnez@hotmail.com

  • #2
    Close the butterfies and then tighten the screws. That should center them.

    Also, Have you synced the carbs since doing the seals?
    Greg

    Everybody is a genius. But if you judge a fish by its ability to climb a tree, it will live its whole life believing that it is stupid.”

    ― Albert Einstein

    80 SG Ol' Okie;79 engine & carbs w/pods, 45 pilots, 140 mains, Custom Mac 4 into 2 exhaust, ACCT,XS850 final drive,110/90/19 front tire,TKat fork brace, XS750 140 MPH speedometer, Vetter IV fairing, aftermarket hard bags and trunk, LG high back seat, XJ rear shocks.

    The list changes.

    Comment


    • #3
      what greg says,
      slightly loosen the 2 screws,
      close the butterflys and tighten up,

      from memory theres a little slop if u move
      them from side to side.

      hope u put he seals in the right way,
      the 'çups' face the outside.
      pete


      new owner of
      08 gen2 hayabusa


      former owner
      1981 xs1100 RH (aus) (5N5)
      zrx carbs
      18mm float height
      145 main jets
      38 pilots
      slide needle shimmed .5mm washer
      fitted with v/stax and uni pod filters

      [url]http://www.youtube.com/watch?v=3pA8dwxmAVA&feature=mfu_in_order&list=UL[/url]

      Comment


      • #4
        I did get them in the right way, cups out. Thanks for the advice, I will loosen then re-tighten them.
        '80 XS Special
        JonathanKnez@hotmail.com

        Comment


        • #5
          I took the carbs off and did some investigation work. There is only one carb with a sticky butterfly valve. Its the #2 carb.


          The butterfly valve doesn't close all the way. If I remove the nut and lock washer shown on the right side of the above photo, the valve closes like it should. The valve is thrown out of alignment and wont close if the nut is on at all, even only hand tight.

          I am thinking that adding another washer to the opposite side will recenter the valve so that it closes properly even with that nut and lock washer in place. Here is a picture to show what I mean. Basically I would add a second washer (very thin) in addition to the one already shown.


          While I am confident this will work, is there supposed to be another washer here?
          '80 XS Special
          JonathanKnez@hotmail.com

          Comment


          • #6
            Will it close if you loosen the screws in the butterfly?
            Greg

            Everybody is a genius. But if you judge a fish by its ability to climb a tree, it will live its whole life believing that it is stupid.”

            ― Albert Einstein

            80 SG Ol' Okie;79 engine & carbs w/pods, 45 pilots, 140 mains, Custom Mac 4 into 2 exhaust, ACCT,XS850 final drive,110/90/19 front tire,TKat fork brace, XS750 140 MPH speedometer, Vetter IV fairing, aftermarket hard bags and trunk, LG high back seat, XJ rear shocks.

            The list changes.

            Comment


            • #7
              BTW......the only other washer that goes on there is a lock washer (very thin) that goes under the nut and is bent over to one of the flats to lock it.
              Greg

              Everybody is a genius. But if you judge a fish by its ability to climb a tree, it will live its whole life believing that it is stupid.”

              ― Albert Einstein

              80 SG Ol' Okie;79 engine & carbs w/pods, 45 pilots, 140 mains, Custom Mac 4 into 2 exhaust, ACCT,XS850 final drive,110/90/19 front tire,TKat fork brace, XS750 140 MPH speedometer, Vetter IV fairing, aftermarket hard bags and trunk, LG high back seat, XJ rear shocks.

              The list changes.

              Comment


              • #8
                Not sure but

                I have not messed with mine for some time but I think that you can put the butterfy in upside down and it will cause this type of problemmark what is the bottom now with a marker take it out and put that ent to the top and see if it clears the bind.
                To fix the problem one should not make more assumptions than the minimum needed.

                Rodan
                https://www.youtube.com/watch?v=khm6...liHntN91DHjHiS
                1980 G Silverbird
                Original Yamaha Fairfing and Bags
                1198 Overbore kit
                Grizzly 660 ACCT
                Barnett Clutch Springs
                R1 Clutch Fiber Plates
                122.5 Main Jets
                ACCT Mod
                Mac 4-2 Flare Tips
                Antivibe Bar ends
                Rear trunk add-on
                http://s1184.photobucket.com/albums/z329/viperron1/

                Comment


                • #9
                  It's in there right side up. See the machined slot there for the vac advance port? It's right where it should be.
                  Greg

                  Everybody is a genius. But if you judge a fish by its ability to climb a tree, it will live its whole life believing that it is stupid.”

                  ― Albert Einstein

                  80 SG Ol' Okie;79 engine & carbs w/pods, 45 pilots, 140 mains, Custom Mac 4 into 2 exhaust, ACCT,XS850 final drive,110/90/19 front tire,TKat fork brace, XS750 140 MPH speedometer, Vetter IV fairing, aftermarket hard bags and trunk, LG high back seat, XJ rear shocks.

                  The list changes.

                  Comment


                  • #10
                    number two

                    Not sure if this photo will be good enough for you but have a look.
                    mack
                    79 XS 1100 SF Special
                    HERMES
                    original owner
                    http://i946.photobucket.com/albums/a...ps6932d5df.jpg

                    81 XS 1100 LH MNS
                    SPICA
                    http://i946.photobucket.com/albums/ad305/mack-055/2.jpg

                    78 XS 11E
                    IOTA
                    https://youtu.be/wB5Jfbp6SUc
                    https://youtu.be/RaI3WYHSuWA


                    Have recovery trailer and shop if you breakdown in my area.
                    Frankford, Ont, Canada
                    613-398-6186

                    Comment


                    • #11
                      Thanks for the help guys. Mack, I don't see any extra washers in your picture that I am missing. I looked at the carb body again and there is some slight scoring on the inside of the body, right by where the butterfly valve and the butterfly shaft meet the carb body on one side. I am thinking I must have caused those nicks as I was removing the butterfly valve the first time. Perhaps those marks are catching up the butterfly valve so it does not center on its own as it closes. I will do some work with a very fine file and report back.
                      '80 XS Special
                      JonathanKnez@hotmail.com

                      Comment


                      • #12
                        Butterflys

                        There is always a little play from side to side with the shaft. What I do is get the shaft in and spring loaded properly then slip the butterfly in and let it close gently. You may have try several times moving the brass around a bit until it fully seats properly. It should be smooth and provide a tight seal. Then you can move the shaft from side to side to line up the screw holes. The screws should go in with very little resistance, if they are hard to get in , its still not lined up properly. Use a drop of blue lock tight on the screws and make sure to clean up any drips inside the carb body. You have to be careful not to push on the screw driver too hard during the screw removal and replacement as the shaft can be distorted a bit with too much pressure, then you'll have real problems. Luck to you.
                        mack
                        79 XS 1100 SF Special
                        HERMES
                        original owner
                        http://i946.photobucket.com/albums/a...ps6932d5df.jpg

                        81 XS 1100 LH MNS
                        SPICA
                        http://i946.photobucket.com/albums/ad305/mack-055/2.jpg

                        78 XS 11E
                        IOTA
                        https://youtu.be/wB5Jfbp6SUc
                        https://youtu.be/RaI3WYHSuWA


                        Have recovery trailer and shop if you breakdown in my area.
                        Frankford, Ont, Canada
                        613-398-6186

                        Comment


                        • #13
                          The valve is closing properly again.

                          I did file the area immediately around the butterfly shaft. That didn't make any difference. Next I reinstalled the butterfly valve into the carb body, making sure to only tighten down the screws once the valve had properly seated itself. After that was done it was still possible to pull the valve out of alignment by tightening the nut down on to the lock washer of the butterfly valve shaft then opening the throttle.

                          In the end I moved an existing thin plastic washer to the other side of the carb. Previously I had this washer underneath flat throttle arm (not the springy side), that in turn was under the lock washer and the nut. By moving this thin plastic washer to the other side, the butterfly valve shaft is correctly aligned in the carb body. Additionally, I can tighten down the nut on the lock washer and the load is transferred the flat throttle arm. Previously, with this washer in place the flat throttle arm would press on the plastic washer underneath it and put the load on the carb body, the part that the butterfly seal sits in. Now with that washer relocated, the flat throttle arm only presses on the (apparently tapered) butterfly shaft, not the carb body. This means that tightening down the nut does not pull the shaft out of alignment.

                          So I guess I just had the washer in the wrong spot before.

                          A picture is worth a 1000 words. The thin plastic washer is shown to the right of the thicker metal washer.


                          This picture shows the flat washer arm, lock washer, and nut. You can see a slight gap in between the carb body and the flat washer arm. That is where I had the thin plastic washer originally.


                          Whether this is how it was originally or not, it is working well. I have put on about 50 miles so far with no throttle issues. I am not touching it again
                          '80 XS Special
                          JonathanKnez@hotmail.com

                          Comment

                          Working...
                          X