Announcement

Collapse
No announcement yet.

leaking petcock housing

Collapse
X
 
  • Filter
  • Time
  • Show
Clear All
new posts

  • leaking petcock housing

    This is an offshoot from my original post but focused on a new problem...

    My XS11 was refitted with XS400 petcocks by a PO/PM. They seem to work just fine but the left one has developed a leak in the housing and seeps gas around the plastic/nylon part of the unit when running. No gas leak when the motor isn't running. I tried tightening the screws down, thinking I hadn't done that when I took it apart. Still leaks. Aside from a new petcock or a rebuild kit, is there any safe and effective way to stop this leak?
    Semper Fi,
    Scribe

    1981 XS11H

    Scribestone Industries:
    ~Turning food into poop since 1963 ~

  • #2
    Originally posted by scribestone View Post
    Aside from a new petcock or a rebuild kit, is there any safe and effective way to stop this leak?
    Yep, what I did was make a block off plate for one petcock (the right one in my case) and eliminate it. I use just the left one run into a T fitting and down to the 2 carb inlets.
    2H7 (79)
    3H3

    "If it ain't broke, modify it"

    Comment


    • #3
      How did you make a block off plate?
      Semper Fi,
      Scribe

      1981 XS11H

      Scribestone Industries:
      ~Turning food into poop since 1963 ~

      Comment


      • #4
        Piece of 1/8" thick aluminum from Home Depot. Used a slit down the side flattened piece of fuel line as a gasket. Just measure the tank bolt holes center to center and mark the plate and drill. Then clamp the plate down to the work bench with the flattened fuel line under it and drill thru the gasket and trim the edges. Use the original petcock bolts with the fiber washers.
        2H7 (79)
        3H3

        "If it ain't broke, modify it"

        Comment


        • #5
          Got pics? I'm a fab noob and need See Spot Fab DIY's...lol
          Semper Fi,
          Scribe

          1981 XS11H

          Scribestone Industries:
          ~Turning food into poop since 1963 ~

          Comment


          • #6
            Lol, I knew I better go take one. The plate is not visable when standing next to the bike, this pic was taken from the ground pointing up.

            Last edited by bikerphil; 09-05-2011, 12:28 PM.
            2H7 (79)
            3H3

            "If it ain't broke, modify it"

            Comment


            • #7
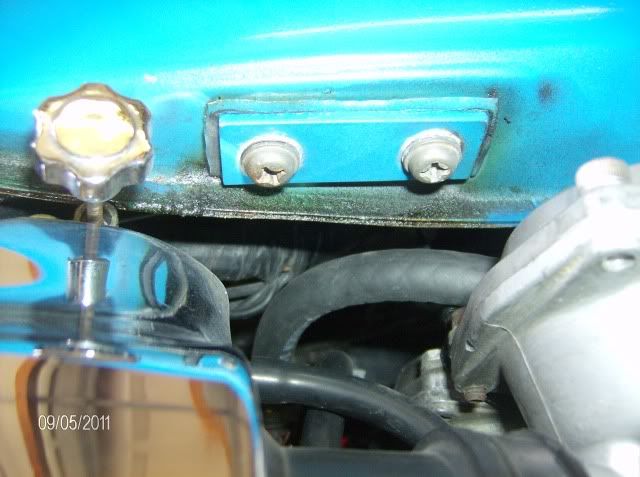
              That's what i did, except i used a piece of inner tube. Don't know how long it will last, but it's been there about 4 years now.

              Comment


              • #8
                Thanks for the pic! So I assume the fuel tank allows both sides to empty on to one side? Wasn't sure if it was partitioned some by the center hump. As I said, I'm a noob.
                Semper Fi,
                Scribe

                1981 XS11H

                Scribestone Industries:
                ~Turning food into poop since 1963 ~

                Comment


                • #9
                  Originally posted by scribestone View Post
                  Thanks for the pic! So I assume the fuel tank allows both sides to empty on to one side? Wasn't sure if it was partitioned some by the center hump. As I said, I'm a noob.
                  Yes it has a slight partition, you will lose a little access to reserve gas but it is minimal.
                  2H7 (79)
                  3H3

                  "If it ain't broke, modify it"

                  Comment


                  • #10
                    Thanks for the idea

                    Originally posted by bikerphil View Post
                    Lol, I knew I better go take one. The plate is not visable when standing next to the bike, this pic was taken from the ground pointing up.

                    I did the same thing to mine, took about 45min. Works perfect thanks for the idea! I was about to order adapter plates and new universal petcocks this idea saved me quite a bit.
                    1980 XS1100G
                    Tulsa, OK

                    Comment


                    • #11
                      No problem, glad it helped. I run both my bikes with the right side petcock blocked off, makes switching to reserve and removing the tank much easier too. Plus you only have to run one fuel filter.
                      Last edited by bikerphil; 09-07-2011, 07:02 AM.
                      2H7 (79)
                      3H3

                      "If it ain't broke, modify it"

                      Comment


                      • #12
                        OK, Bikerphil...great pic

                        You left yourself wide open for this one, dude.

                        Now tell us about the 'idle set screw relocation mod'...details, man, details!
                        Former owner, but I have NO PARTS LEFT!

                        Comment


                        • #13
                          Originally posted by DAVINCI View Post
                          You left yourself wide open for this one, dude.

                          Now tell us about the 'idle set screw relocation mod'...details, man, details!
                          Well it's pretty simple. First find some old speedometer cable, just use the inside core. With the carbs on the bench, drill a hole slightly larger than the cable in the end of the main idle adjustment screw about 5/16" deep. JB weld the end in the hole and let it cure. Put the carbs back on the bike and run the cable at a 90º angle over to the front top corner of the airbox. Find some kind of cable clamp and attach it to the airbox with a sheetmetal screw to hold the cable in the desired position. Cut off the extra cable and attach a knob of your choice with a set screw. The knob in the photo is from Radio Shack, on my other bike I used a Telecaster guitar knob. It may or may not also be necessary to use a zip tie at the midway point of the cable bend to keep it positioned neatly/correctly. Note: for the 78-79 carbs only.

                          2H7 (79)
                          3H3

                          "If it ain't broke, modify it"

                          Comment


                          • #14
                            For 80-82 carbs you would have to go down rather than up, but I think it could still be done. I think I would keep the cable in it's sleeve though, it might give more ability to position it differently.
                            Cy

                            1980 XS1100G (Brutus) w/81H Engine
                            Duplicolor Mirage Paint Job (Purple/Green)
                            Vetter Windjammer IV
                            Vetter hard bags & Trunk
                            OEM Luggage Rack
                            Jardine Spaghetti 4-2 exhaust system
                            Spade Fuse Box
                            Turn Signal Auto Cancel Mod
                            750 FD Mod
                            TC Spin on Oil Filter Adapter (temp removed)
                            XJ1100 Front Footpegs
                            XJ1100 Shocks

                            I was always taught to respect my elders, but it keeps getting harder to find one.

                            Comment


                            • #15
                              I've also noticed on my XJ1100 the right Pet Cock is located slightly forward (about 1/4") from the left one.
                              I found this out when I made a "key" out of ABS to fit over the Pet Cock handle. (1"x1/2"x2 5/8" with a 5/8" hole in the center and a 9/32" slot for the Paddle) The Left side cleared fine but the right hit the top of the carb.
                              I needed a little extra help turning the handle after a pet cock rebuild, getting old and arthritic, I guess. I keep the Key in my Pocket.
                              I've taken off the octy and run both sides to a "T" that connects to another "T" that goes to the Carb inlets. I can use either side Pet Cock seperately or both.
                              82' XJ1100 turned "bagger" with Vetter Fairing.

                              Comment

                              Working...
                              X