Announcement

Collapse
No announcement yet.

Cam caps - replacement cams & plastiguage

Collapse
X
 
  • Filter
  • Time
  • Show
Clear All
new posts

  • Cam caps - replacement cams & plastiguage

    I damaged my XJ11 cam lobes, obtained a nice, as new condition pair of cams with low mileage on them and was about to install them this morning and then was informed I must check all the journals with plastiguage to check the clearances:

    Specified clearance: .020 - 054mm (0.0008 - 0.0021") Maximum allowed: 0.160mm (0.006"). Install the cams, put a piece of plastigauge on the cam's bearing journal (all of them), and torque the caps in place (7.2 ft-lbs). Do not turn the cam while the plastigauge is in place! Then remove the caps and measure the plastigauge with their scale.

    Another live & learn...

    I have the head back in the engine and don't want to remove it unless I must. If I tighten down the cams to check it seems like the cam would rotate as the lobes get settled in as I torque down. - Since there was no scoring on the old journals and the replacement cams are the same but with 12K on them & my bike has 20K on it, I thought they would fit nicely and be a slip in fit.

    My visualization isn't working so well right now; is there any issue of bending valves when torquing down the cam caps?

    Also it says in the manual when rotating the cams to align the dots to the arrows that a valve may become bent if you turn the cam the wrong way. As the chain isn't in place yet, which way should I turn the cams? Clockwise isn't it?

    Lastly, I do have the caps that came with the replacement cams.

    I guess I need to find plastiguage. Too bad I can't just use the digi calipers and compare values from one cam to the other.

    Thoughts?
    Last edited by KA1J; 08-12-2011, 07:06 AM.
    82 XJ1100 Maxim "hurricane"- DEKA EXT18L AGM battery , NGK BPR6EIX spark plugs, Green Dyna coils, Sylvania SilverStar Ultra H4 bulb, 139 dB Stebel Nautilus air horn, Home-made K&N air filter based on an original paper filter frame, new piston rings, Barnett Clutch Springs, SS braid/Teflon brake lines, TKAT fork brace, rebuilt calipers, master cylinders, new brakes, reupholstered seat, lotsa little things and so many answered questions here.

  • #2
    Originally posted by KA1J View Post
    My visualization isn't working so well right now; is there any issue of bending valves when torquing down the cam caps?
    I am not certain, but I think these are interference engines, meaning if a piston is at the top of its stroke, and a valve is fully open in that cylinder, the two will hit. Make it simple on yourself, first, bring number one cylinder to TDC and verify your timing mark is correct, T =TDC for number one cylinder. Now, with number one at TDC, timing mark aligned at the T, when you install your cams, just be sure the dots on the cam align relatively close to the arrow on the cam cap. With this ligned up, there should be no way you could damage anything putting those cams in and out.


    Originally posted by KA1J View Post
    Also it says in the manual when rotating the cams to align the dots to the arrows that a valve may become bent if you turn the cam the wrong way. As the chain isn't in place yet, which way should I turn the cams? Clockwise isn't it?
    Not sure what they are talking about, turn the cam whichever direction it needs to go to align the dots. If you turn the cam so the dot moves further form alignment, you could hurt something.

    Originally posted by KA1J View Post
    Lastly, I do have the caps that came with the replacement cams.
    If it were me, I'd use the replacement caps. Check the plastigage, but reality is that if it is off your only solution is most likely to find a new head. There are no replacable bearings in there, so you can only machine the opening bigger, or buy a new head.
    Life is what happens while your planning everything else!

    When your work speaks for itself, don't interrupt.

    81 XS1100 Special - Humpty Dumpty
    80 XS1100 Special - Project Resurrection


    Previously owned
    93 GSX600F
    80 XS1100 Special - Ruby
    81 XS1100 Special
    81 CB750 C
    80 CB750 C
    78 XS750

    Comment


    • #3
      Dang, the local NAPA doesn't have plastigauge small enough to check the cams. Here's the damage to my old cams...


      Guess I'll just have to use the vernier calipers and see if the diameters of the two surfaces are pretty much the same and go with that.

      The replacement cams look to have about the same newness to the bearing surfaces.

      This should be easy, right?

      :/
      Last edited by KA1J; 08-12-2011, 09:03 AM.
      82 XJ1100 Maxim "hurricane"- DEKA EXT18L AGM battery , NGK BPR6EIX spark plugs, Green Dyna coils, Sylvania SilverStar Ultra H4 bulb, 139 dB Stebel Nautilus air horn, Home-made K&N air filter based on an original paper filter frame, new piston rings, Barnett Clutch Springs, SS braid/Teflon brake lines, TKAT fork brace, rebuilt calipers, master cylinders, new brakes, reupholstered seat, lotsa little things and so many answered questions here.

      Comment


      • #4
        I just had my cams out for the first time so I just lived through the reinstallation. I can tell you that the cams do no rotate while torquing the caps down. Both the intake and exhaust cams on #3 and #4 cylinders have their lobes depressing the valves slightly. When you set your cams into the bottom journals they will “settle” such that the #3 and #4 lobes keep the cam from rotating. Once you get the caps torqued, you have to align the dots with the arrows. IIRC, the exhaust cam had to be rotated towards the back of the bike and the intake towards the front of the bike. They were offset from the arrows no more than 0.125”. As long as you install them with the dot facing up you have nothing to worry about.

        For your purpose, measuring with plastigauge, you just have to torque them then take them off and read your measurement… fairly easy. Just take your time and torque the caps in the pattern the manual suggests. I started finger tight with the nuts and went 1 full turn on each stud until the final torque was reached using the pattern recommended. Then I did a once through working from one side to the other to validate all were tight…
        Personally, I would recommend using the caps that belong to the head. Reason being is, they were machined together therefore are concentric and have the same diameter. Putting in caps from another engine probably won’t hurt anything but why take the chance when your bike has so little miles?

        These engines have interference heads and you can bend the valves if both intake and exhaust valves are opened too far at the same time. You won’t have this problem unless for some reason you decide to fully rotate a cam when the other is fully depressed.

        Just an FYI, the cam sprockets do seem to have been marked for specific orientation. Take a close look at the bolting before removing them… personally, I like to put it back the way I took it apart b/c I know it works!

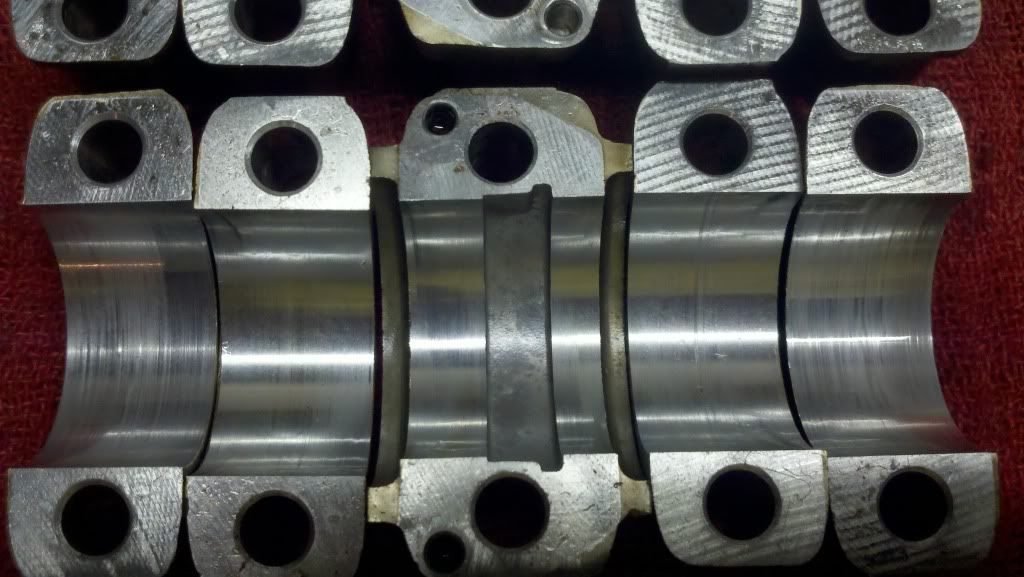
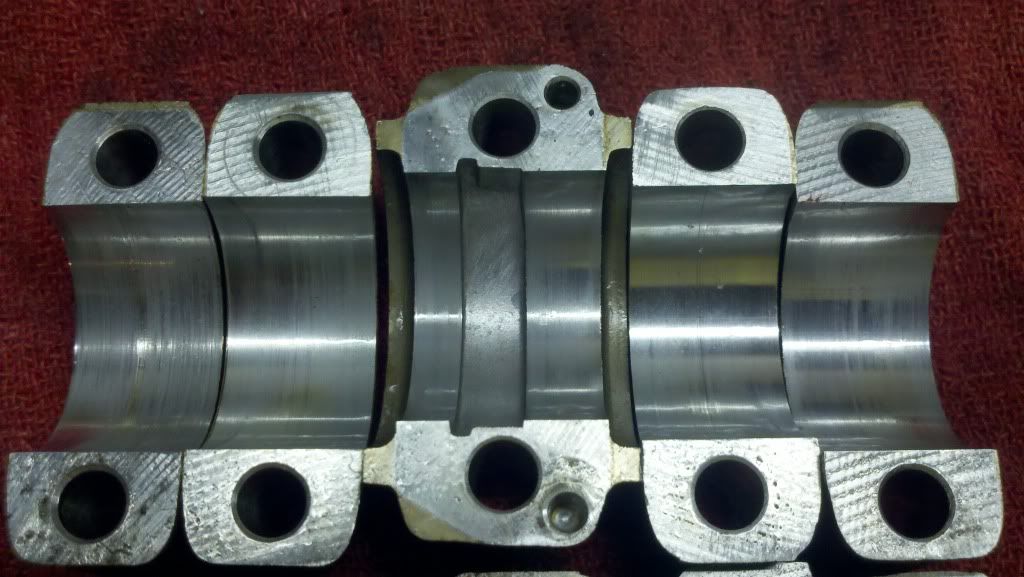
        Just for comparison, here is a picture of my intake bearing caps…


        Here are the exhaust caps…


        This engine has nearly 46K miles…
        '79 XS11 F
        Stock except K&N

        '79 XS11 SF
        Stock, no title.

        '84 Chevy K-10 "Big Blue"
        GM 350, Muncie SM465, NP208, GM 10 Bolt with 3.42gears turnin 31x10.5 Baja Claws

        "What they do have is an implacable, unrelenting presence and movement that bespeaks massive power lurking behind paint and chrome. They don't wail like a screeching ninja, the don't rumble like a harley. They just growl like a spactic, stressed out badger waiting to rip your face off and eat your soul." Trainzz~RIP~

        Comment


        • #5
          You might want to consider installing the cams all the way then remove one cap at a time to plastigage it. I would think the cam is being lifted when the lobe is pushing down on the valve. In that case your reading will not indicate the true clearance. Makes me think they only way to get a true reading is if none of the valves were in the head, otherwise one lobe will always be loading the cam and affecting the measured clearance. Of course the other option is to put them in and run it!
          '79 XS11 F
          Stock except K&N

          '79 XS11 SF
          Stock, no title.

          '84 Chevy K-10 "Big Blue"
          GM 350, Muncie SM465, NP208, GM 10 Bolt with 3.42gears turnin 31x10.5 Baja Claws

          "What they do have is an implacable, unrelenting presence and movement that bespeaks massive power lurking behind paint and chrome. They don't wail like a screeching ninja, the don't rumble like a harley. They just growl like a spactic, stressed out badger waiting to rip your face off and eat your soul." Trainzz~RIP~

          Comment


          • #6
            Marshy,

            I was thinking the exact same thing. In the manual it says to torque the caps in stages but I didn't see any ordering sequence like there is for the head bolts. doubt it would hurt to check them as you mentioned. And it would prevent flattening on the high end of the cam where the lobes pushed it up in the beginning.
            82 XJ1100 Maxim "hurricane"- DEKA EXT18L AGM battery , NGK BPR6EIX spark plugs, Green Dyna coils, Sylvania SilverStar Ultra H4 bulb, 139 dB Stebel Nautilus air horn, Home-made K&N air filter based on an original paper filter frame, new piston rings, Barnett Clutch Springs, SS braid/Teflon brake lines, TKAT fork brace, rebuilt calipers, master cylinders, new brakes, reupholstered seat, lotsa little things and so many answered questions here.

            Comment


            • #7
              Originally posted by KA1J View Post
              Marshy,

              I was thinking the exact same thing. In the manual it says to torque the caps in stages but I didn't see any ordering sequence like there is for the head bolts. doubt it would hurt to check them as you mentioned. And it would prevent flattening on the high end of the cam where the lobes pushed it up in the beginning.
              There is an order listed in the book. IIRC it is cap # 3-4-2-5-1 that is off the top of my head but pretty sure it is correct but if I am wrong someone please correct me.
              Nathan
              KD9ARL

              μολὼν λαβέ

              1978 XS1100E
              K&N Filter
              #45 pilot Jet, #137.5 Main Jet
              OEM Exhaust
              ATK Fork Brace
              LED Dash lights
              Ammeter, Oil Pressure, Oil Temp, and Volt Meters

              Green Monster Coils
              SS Brake Lines
              Vision 550 Auto Tensioner

              In any moment of decision the best thing you can do is the right thing, the next best thing is the wrong thing, and the worst thing you can do is nothing.

              Theodore Roosevelt

              Comment


              • #8
                Same issue

                I don't want to hijack this but i'm doing the very same thing on the LH. My caps and head surfaces were burnt and full of surations. I think I made a mistake by hand polishing the surfaces to clean them and make sure the metal filings causing the surations were removed before I did anything else. I'm told this could have increased the clearance and would reduce the oil pressure. I still need to lap the valves etc.as the seats are badly pitted, but don't want to go through the trouble of all that and installing the valves, springs and buckets etc. to do the plastic guage test only to find the head is shot anyway. I perked up when I saw that a more accurate reading would be obtained with leaving everything out while doing the test. My head is out of the bike. As long as the cams don't rotate and the dots are straight up, is it ok to perform the test with just the cams and caps installed. Also, should the test be performed again with the strip on the underside of the cam to check the bottom clearance, since I did polish those as well?
                mack
                79 XS 1100 SF Special
                HERMES
                original owner
                http://i946.photobucket.com/albums/a...ps6932d5df.jpg

                81 XS 1100 LH MNS
                SPICA
                http://i946.photobucket.com/albums/ad305/mack-055/2.jpg

                78 XS 11E
                IOTA
                https://youtu.be/wB5Jfbp6SUc
                https://youtu.be/RaI3WYHSuWA


                Have recovery trailer and shop if you breakdown in my area.
                Frankford, Ont, Canada
                613-398-6186

                Comment


                • #9
                  Originally posted by mack View Post
                  ...My head is out of the bike. As long as the cams don't rotate and the dots are straight up, is it ok to perform the test with just the cams and caps installed. Also, should the test be performed again with the strip on the underside of the cam to check the bottom clearance, since I did polish those as well?
                  That's the best way to perform the test; as far as testing both 'sides', you shouldn't have to unless you suspect that there may be 'low spots' in the bearing surface. It won't won't hurt to do that....
                  Fast, Cheap, Reliable... Pick any two

                  '78E original owner - resto project
                  '78E ???? owner - Modder project FJ forks, 4-piston calipers F/R, 160/80-16 rear tire
                  '82 XJ rebuild project
                  '80SG restified, red SOLD
                  '79F parts...
                  '81H more parts...

                  Other current bikes:
                  '93 XL1200 Anniversary Sportster 85RWHP
                  '86 XL883/1200 Chopper
                  '82 XL1000 w/1450cc Buell, Baker 6-speed, in-progress project
                  Cage: '13 Mustang GT/CS with a few 'custom' touches
                  Yep, can't leave nuthin' alone...

                  Comment


                  • #10
                    Originally posted by natemoen View Post
                    There is an order listed in the book. IIRC it is cap # 3-4-2-5-1 that is off the top of my head but pretty sure it is correct but if I am wrong someone please correct me.
                    I missed the order though I looked for it. I ended up torquing them all down bit by bit. Hopefully they're all OK now.
                    82 XJ1100 Maxim "hurricane"- DEKA EXT18L AGM battery , NGK BPR6EIX spark plugs, Green Dyna coils, Sylvania SilverStar Ultra H4 bulb, 139 dB Stebel Nautilus air horn, Home-made K&N air filter based on an original paper filter frame, new piston rings, Barnett Clutch Springs, SS braid/Teflon brake lines, TKAT fork brace, rebuilt calipers, master cylinders, new brakes, reupholstered seat, lotsa little things and so many answered questions here.

                    Comment


                    • #11
                      Personally I don't think the clearance is worth checking with plastigauge unless the valves, springs, and buckets are removed... I wouldn't have much confidence in the readings if they are in, the cam should be sitting in the bottom of the journal and your should be measuring the clearance between the cam and bearing cap. Checking it at the 12 and 6 o'clock points isn't considered the "standard" practice. Not saying you can't do it, just seems like a lot of work for little benefit. If you ever planned on lapping your valves and replacing the seals, now seems like a great opportunity to do that and get a good measurement with the plastigauge. To check the head side of the bearing properly would require rolling the engine upside down so the cams are resting in the caps. Doesn't sound practical to me. The other option is to blue the head side of the bearing with machining die and roll the cam in the bearing (obviously the valves and springs/buckets have yo be removed). This will tell you if you have a low spot in the bearing or if its tapered...

                      Mack, the max clearance for these bearing is 0.006". Assuming your bearings were already at the larger end of the spec from the factory, 0.002", you would have to remove 0.004" to exceed the max allowable clearance. That would be a lot of polishing! Even if all the cam bearing clearances were increased to 0.006" I highly doubt you would notice any decrease in engine oil pressure (if you had a guage)...
                      Last edited by WMarshy; 08-13-2011, 11:33 AM.
                      '79 XS11 F
                      Stock except K&N

                      '79 XS11 SF
                      Stock, no title.

                      '84 Chevy K-10 "Big Blue"
                      GM 350, Muncie SM465, NP208, GM 10 Bolt with 3.42gears turnin 31x10.5 Baja Claws

                      "What they do have is an implacable, unrelenting presence and movement that bespeaks massive power lurking behind paint and chrome. They don't wail like a screeching ninja, the don't rumble like a harley. They just growl like a spactic, stressed out badger waiting to rip your face off and eat your soul." Trainzz~RIP~

                      Comment


                      • #12
                        Thanx

                        God I love this site. With no mechanical background when I started two years ago, it's like I'm blind and your my seeing eye dog. Can't thank you enough, I've learned sooooo much and everyday brings more. Once I have this one done I'll post picures and the whole sorted story about this bike. Man I've almost thrown in the towel a couple times but you guy's keep me moving forward.
                        mack
                        79 XS 1100 SF Special
                        HERMES
                        original owner
                        http://i946.photobucket.com/albums/a...ps6932d5df.jpg

                        81 XS 1100 LH MNS
                        SPICA
                        http://i946.photobucket.com/albums/ad305/mack-055/2.jpg

                        78 XS 11E
                        IOTA
                        https://youtu.be/wB5Jfbp6SUc
                        https://youtu.be/RaI3WYHSuWA


                        Have recovery trailer and shop if you breakdown in my area.
                        Frankford, Ont, Canada
                        613-398-6186

                        Comment


                        • #13
                          Something I have learned over years of wrenching on machines of all types is that the numbers and such they put in manuals are the ideal conditions they want things to be. If you can do it, by all means do, but if its off by a very small margin, does not mean its time to scrap things.

                          In Mac's case, it would be far worse to leave the burs than to have alittle extra gap on those cam caps. So do not lose that much sleep over it, and reality is, even if you dod open it up a bit and lose a little bit of oil pressure, I am guessing you would not find out about it the hard way for a number fo years and lots of miles. And the damage would be to the head, which is what you would about need to replace to know you got it all right in the first place, you didn't cost yourself anything.

                          Just my thoughts.
                          Life is what happens while your planning everything else!

                          When your work speaks for itself, don't interrupt.

                          81 XS1100 Special - Humpty Dumpty
                          80 XS1100 Special - Project Resurrection


                          Previously owned
                          93 GSX600F
                          80 XS1100 Special - Ruby
                          81 XS1100 Special
                          81 CB750 C
                          80 CB750 C
                          78 XS750

                          Comment


                          • #14
                            Yeah, I wish... my cams were still usable but those gouges at the edges are asymmetrical & if I put them back in the head, it might cause ugly things to happen to the shims.

                            I'm going to have to be satisfied using these other cams but they did come from a bike with 12K & mine has 20K so I'd think the replacement cams would more be like new cams.

                            Hoping...
                            82 XJ1100 Maxim "hurricane"- DEKA EXT18L AGM battery , NGK BPR6EIX spark plugs, Green Dyna coils, Sylvania SilverStar Ultra H4 bulb, 139 dB Stebel Nautilus air horn, Home-made K&N air filter based on an original paper filter frame, new piston rings, Barnett Clutch Springs, SS braid/Teflon brake lines, TKAT fork brace, rebuilt calipers, master cylinders, new brakes, reupholstered seat, lotsa little things and so many answered questions here.

                            Comment


                            • #15
                              Ideally the head that these replacement cams were in would have been the best bet, just get the whole thing cams & all but apparently there had been some damage to it that did not affect the cams but made the head a no-go.

                              So as to my old head & new cams: For proper fitment, surely it would be good to have the same cams as came with the heads. And though these replacement cams look beautiful, almost pristine, I wonder if using the old cams as seen in the photos above with their edges cupped away would actually be a problem? Or should they be just fine as is seeing as very little meat was removed from the sides of the lobe tips?

                              Thoughts?
                              Last edited by KA1J; 08-14-2011, 01:37 PM.
                              82 XJ1100 Maxim "hurricane"- DEKA EXT18L AGM battery , NGK BPR6EIX spark plugs, Green Dyna coils, Sylvania SilverStar Ultra H4 bulb, 139 dB Stebel Nautilus air horn, Home-made K&N air filter based on an original paper filter frame, new piston rings, Barnett Clutch Springs, SS braid/Teflon brake lines, TKAT fork brace, rebuilt calipers, master cylinders, new brakes, reupholstered seat, lotsa little things and so many answered questions here.

                              Comment

                              Working...
                              X