Announcement

Collapse
No announcement yet.

Fork disassembly help

Collapse
X
 
  • Filter
  • Time
  • Show
Clear All
new posts

  • Fork disassembly help

    Hi guys

    I'm trying to replace the seals on my front fork. The ones on the bike leaked when I bought it, and I thought it would make a nice winter project.

    I have the forks off now, but I can't get the bottom bolt to thread out. It turns, so I assume the internal parts are slipping and preventing the bolt from threading out. Any suggestions on how I can get that bolt out?

    Thanks
    John (XSive_Speed)

    '80 XS1100G Standard
    - 4 - 1 exhaust (probably Mac)
    - UNI air filter

  • #2
    The internal shaft has a hex slot in it that needs to ne held on place. Don't remember the size though.
    Nathan
    KD9ARL

    μολὼν λαβέ

    1978 XS1100E
    K&N Filter
    #45 pilot Jet, #137.5 Main Jet
    OEM Exhaust
    ATK Fork Brace
    LED Dash lights
    Ammeter, Oil Pressure, Oil Temp, and Volt Meters

    Green Monster Coils
    SS Brake Lines
    Vision 550 Auto Tensioner

    In any moment of decision the best thing you can do is the right thing, the next best thing is the wrong thing, and the worst thing you can do is nothing.

    Theodore Roosevelt

    Comment


    • #3
      If you don't want to fabricate a 'tool', temporarily reinstall the fork spring and cap, crank the preload up (if you don't have air-assisted forks), remove the bolt, theh finish disassembly. The tension from the spring will usually prevent the damper from rotating.

      If I'm tearing a set of forks down, that's the first bolt I take out....
      Fast, Cheap, Reliable... Pick any two

      '78E original owner - resto project
      '78E ???? owner - Modder project FJ forks, 4-piston calipers F/R, 160/80-16 rear tire
      '82 XJ rebuild project
      '80SG restified, red SOLD
      '79F parts...
      '81H more parts...

      Other current bikes:
      '93 XL1200 Anniversary Sportster 85RWHP
      '86 XL883/1200 Chopper
      '82 XL1000 w/1450cc Buell, Baker 6-speed, in-progress project
      Cage: '13 Mustang GT/CS with a few 'custom' touches
      Yep, can't leave nuthin' alone...

      Comment


      • #4
        I did try that on mine Steve but it didn't work. Not saying it doesn't work for you or others, just saying it doesn't work for me and might not for him. I think I used a 3/4 inch nut jammed on to a piece of threaded rod by 2 smaller nuts on either side. Could even probably jam a wooded broom handle down there and hold it enough.
        Nathan
        KD9ARL

        μολὼν λαβέ

        1978 XS1100E
        K&N Filter
        #45 pilot Jet, #137.5 Main Jet
        OEM Exhaust
        ATK Fork Brace
        LED Dash lights
        Ammeter, Oil Pressure, Oil Temp, and Volt Meters

        Green Monster Coils
        SS Brake Lines
        Vision 550 Auto Tensioner

        In any moment of decision the best thing you can do is the right thing, the next best thing is the wrong thing, and the worst thing you can do is nothing.

        Theodore Roosevelt

        Comment


        • #5
          It's been a while but IIRC an impact gun will get it right out without needing to go in with a tool from the top.
          '81 XS1100 SH

          Melted to the ground during The Valley Fire

          Sep. 12th 2015

          RIP

          Comment


          • #6
            Originally posted by 81xsproject View Post
            It's been a while but IIRC an impact gun will get it right out without needing to go in with a tool from the top.
            Hi proj.,
            yeah, the air impact gun works for me too.
            It whizzes the bolt so fast that the fork tube's own inertia stops it from turning.
            Fred Hill, S'toon
            XS11SG with Spirit of America sidecar
            "The Flying Pumpkin"

            Comment


            • #7
              Originally posted by natemoen View Post
              I did try that on mine Steve but it didn't work...
              No, it doesn't always work (but it hasn't failed for me yet). Some newer forks don't have any sort of 'hex' or anything to prevent damper rotation, so it's this trick or an impact wrench...
              Fast, Cheap, Reliable... Pick any two

              '78E original owner - resto project
              '78E ???? owner - Modder project FJ forks, 4-piston calipers F/R, 160/80-16 rear tire
              '82 XJ rebuild project
              '80SG restified, red SOLD
              '79F parts...
              '81H more parts...

              Other current bikes:
              '93 XL1200 Anniversary Sportster 85RWHP
              '86 XL883/1200 Chopper
              '82 XL1000 w/1450cc Buell, Baker 6-speed, in-progress project
              Cage: '13 Mustang GT/CS with a few 'custom' touches
              Yep, can't leave nuthin' alone...

              Comment


              • #8
                May be time for the big guns ...

                I tried putting the spring and cap back in place, then turning the screw. Unfortunately no improvements. The screw still turns allong with the internals.

                I'll have to try the impact wrench tomorrow, but this may require bringing the compressor inside for a couple hours warm up tomorrow. My pathetic little asian made compressor is so stiff it is popping the overload breaker before it can get up to speed due to the cold weather. Oh well, live and learn.

                I'll let you know how this works.
                John (XSive_Speed)

                '80 XS1100G Standard
                - 4 - 1 exhaust (probably Mac)
                - UNI air filter

                Comment


                • #9
                  i think the size of the bolt to use is 3/4inch/ 19mm from memory
                  ive also heard of others jamming a broom handle
                  down the guts of it to jam it.

                  before disassembling, i normally give that bolt
                  a cpl of whacks with a hammer, helps break the seal,
                  also you'll probably find the bolt has been locktited,
                  loosen the bolt
                  prior to removing the spring.

                  theres been a cpl of write ups before
                  maybe try a search and see what u come up with.
                  pete


                  new owner of
                  08 gen2 hayabusa


                  former owner
                  1981 xs1100 RH (aus) (5N5)
                  zrx carbs
                  18mm float height
                  145 main jets
                  38 pilots
                  slide needle shimmed .5mm washer
                  fitted with v/stax and uni pod filters

                  [url]http://www.youtube.com/watch?v=3pA8dwxmAVA&feature=mfu_in_order&list=UL[/url]

                  Comment


                  • #10
                    I used a wooden broom handle to hold the inner pieces while I loosened the allen bolt. Has worked on several forks.
                    Pat Kelly
                    <p-lkelly@sbcglobal.net>

                    1978 XS1100E (The Force)
                    1980 XS1100LG (The Dark Side)
                    2007 Dodge Ram 2500 quad-cab long-bed (Wifes ride)
                    1999 Suburban (The Ship)
                    1994 Dodge Spirit (Son #1)
                    1968 F100 (Valentine)

                    "No one is totally useless. They can always be used as a bad example"

                    Comment


                    • #11
                      If you have Standard model forks, just make a tool like below with metric nuts and bolt, and get out your long socket extensions. The head of the bolt is 19MM...


                      Special forks don't require the tool.
                      2H7 (79)
                      3H3

                      "If it ain't broke, modify it"

                      Comment


                      • #12
                        there's a full write up about the tools here http://xs1100.com.au/forum/index.php?topic=456.0
                        but to cut a long story short,
                        11/16ths head for the Special's forks - should be the same for RH's. 17mm is too small.
                        3/4 head bolt for the standard forks
                        Trust me, you do need a tool for the Special forks
                        79 SF Special W/ Stock all original motor @ 384,000klms
                        Stock exhaust, stock airbox, XJ sump, 78E carbs, Xs1100RH seat, Bosch superhorns, 5/8ths front M/c, braided lines, sintered SBS pads, drilled discs, progressive springs, 8" 50w HID headlight 4300K, 2 x 50w HID spiral driving lights, KONI shocks, Spade fuse box
                        *Touring mode - Plexistar 2 screen, Gearsack rack & bag & saddlebags, homebuilt towbar
                        *"The Keg"- UC torana hubs, XS11 discs, Tokico 4 spot calipers

                        Comment


                        • #13
                          Forks apart, but strange things happening...

                          Originally posted by bikerphil View Post
                          If you have Standard model forks, just make a tool like below with metric nuts and bolt, and get out your long socket extensions. The head of the bolt is 19MM...
                          Thanks for the information. This tool is exactly what I needed. Now I have the forks apart.

                          Next problem - there is something funny going on inside my forks. When I took them apart, I noticed considerably fewer parts than the manual shows.


                          I seem to be missing either the cap bolt ring (5) or the cap bolt washer (6) (see above pic). Also missing are the cover upper guide (7), cover lower guide (8), and washer (9).

                          Now this gets a little stranger - As in the pic above, I have air caps on the forks, so I assumed they are air forks. Looking at the sliders, these look like non-air sliders from what I can see in the manual.

                          Left -


                          Right -


                          I also checked the spring length. Both springs measure out at about 20 3/8 in. This would be fine for non-air forks, but too short for air forks.

                          Does anybody have some ideas about what it is that I'm looking at here?

                          I'm taking a guess here, but I suspect that some PO decided they like the idea of air forks, so they just put the caps on the standard forks. In the process, they got rid of those inconvenient parts that didn't seem to work right with the air caps. 
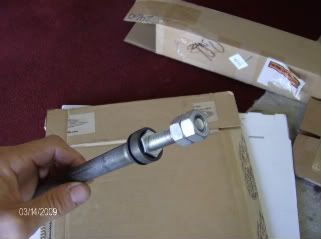
At some later time, somebody decided to do the seals and they got rid of the upper and lower guides. They weren't really doing anything anyway, right?
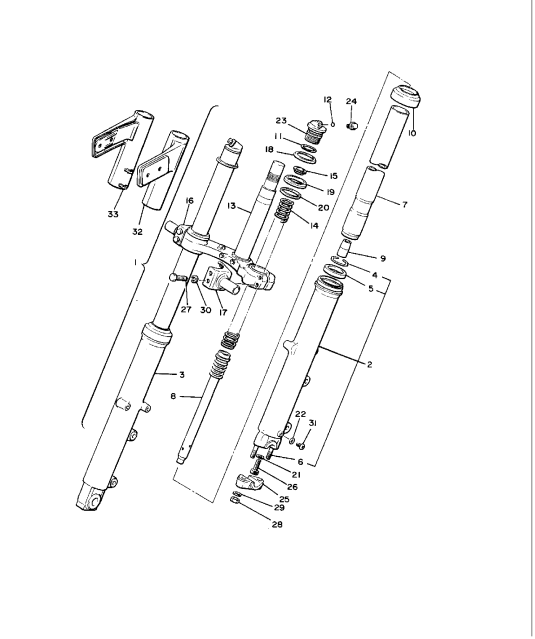
                          If anybody has a better interpretation, I would be happy to listen. As is, I think I'm looking at trying to find the missing parts on line.
                          John (XSive_Speed)

                          '80 XS1100G Standard
                          - 4 - 1 exhaust (probably Mac)
                          - UNI air filter

                          Comment


                          • #14


                            Which parts are you missing off of this diagram? The air and non-air forks use pretty much the same internals.
                            Last edited by bikerphil; 01-16-2011, 10:18 PM.
                            2H7 (79)
                            3H3

                            "If it ain't broke, modify it"

                            Comment


                            • #15
                              Looks like the only parts I am missing from this diagram are 11, 18, 19 and 20.

                              BTW: That is a much better diagram than what is in the manual.
                              John (XSive_Speed)

                              '80 XS1100G Standard
                              - 4 - 1 exhaust (probably Mac)
                              - UNI air filter

                              Comment

                              Working...
                              X