Announcement

Collapse
No announcement yet.

Help with fairing mount

Collapse
X
 
  • Filter
  • Time
  • Show
Clear All
new posts

  • Help with fairing mount

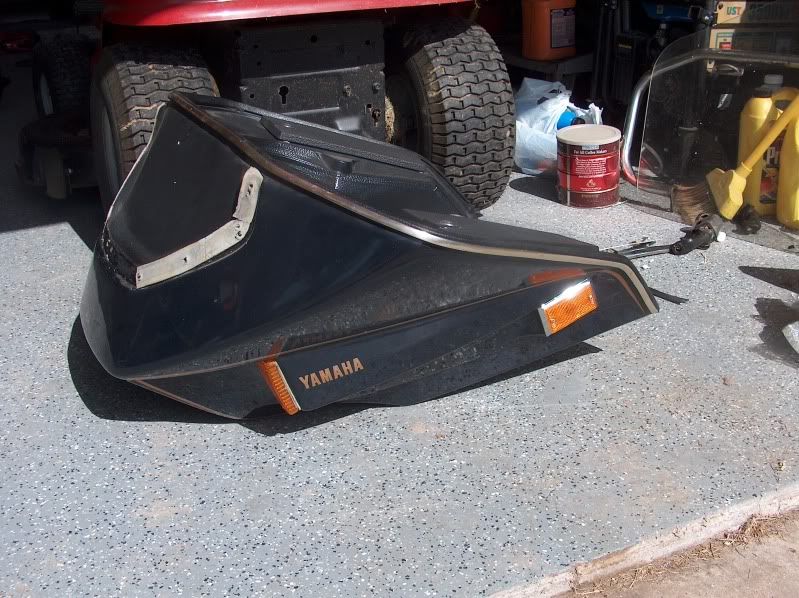
    I picked up a Yamaha fairing for Incubus today and I am a bit puzzled about the mounting hardware. First, the fairing. It is in real nice shape and it really going to dress up my ride:


    I do not know who made the fairing, Vetter or Pacifico or even Yamaha itself for that matter, but the mounts are very different from the Vetter fairing mount on have on my other XS11F. This is what the mount (s) look like:


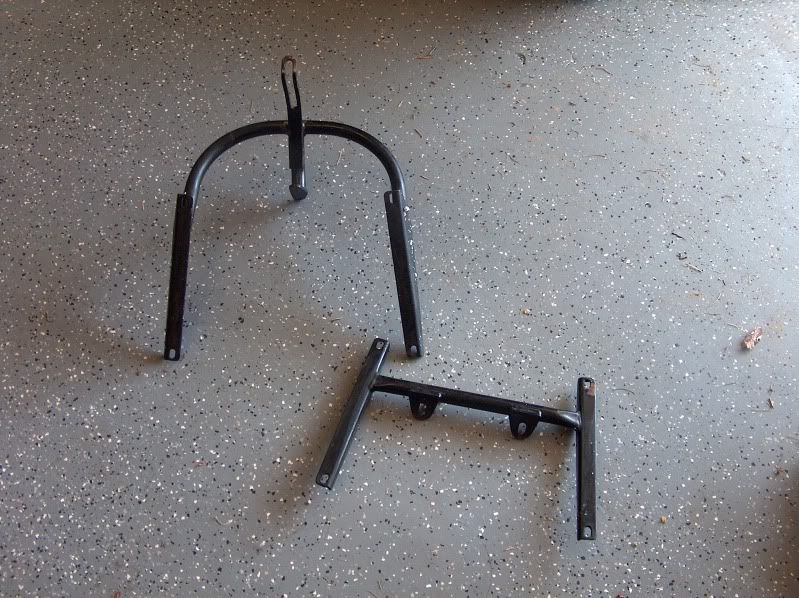
    The mounting holes on the smaller bracket line up with the holes in the down tubes of the frame that the top mounts of the Vetter attaches to. That alone, though, doesn't seem like it would be strong enough to support the fairing. I do not know how the second bracket fits into the picture, if indeed it does at all.

    Does anyone have a picture of the mounting hardware of a fairing such as this one that is mounted on a bike so I can see how the parts fit together?

    TIA.

    Patrick
    The glorious rays of the rising sun exist only to create shadows in which doom may hide.

    XS11F (Incubus, daily rider)
    1969 Yamaha DT1B
    Five other bikes whose names do not begin with "Y"

  • #2
    Patric,
    The second bracket mounts to the front of the steering stem. When you remove the headlamp AND ears, you will see two holes in a boss on the front of the stem. This mount is on TOP of the other mount, and holds the fairing in a sandwich manner. Be sure to use some 1/16" rubber between the fairing and the top and bottom mounts!
    There is supposed to be one more part to the mount. It goes from the front of the top mount to the front of the fairing. It will keep the fairing from moving up and down, and breaking. I'll try to get a photo for you later today. And that IS a Pacifico fairing, made for the '78 full dress kit. You will find your gas use will go DOWN with the fairing, and top speed will be up just a little bit. The shape is a lot better than the Vetter, IMHO.
    Ray Matteis
    KE6NHG
    XS1100 E '78 (winter project)
    XS1100 SF Bob Jones worked on it!

    Comment


    • #3
      Ah, I have that other part, Ray. I had not clue one about what it was and was thinking that it got dropped in the box by accident or something. But when you mentioned it I dug it up and see how it fits. I am anxiously awaiting the picture to see how it all goes together. The fairing goes on tomorrow.

      Or maybe even tonight to I can work in livable temperatures.

      Thanks for your help.

      Patrick
      The glorious rays of the rising sun exist only to create shadows in which doom may hide.

      XS11F (Incubus, daily rider)
      1969 Yamaha DT1B
      Five other bikes whose names do not begin with "Y"

      Comment


      • #4
        Search Catatonic Bug

        I believe you have a Pacifico Fairing.
        I recently did a lot of fairing reasearch.
        On Catatonic Bug's website he has the instructions for the Pacifico Fairing installation.
        The pictures are not too good but the instructions were a help for me to understand the installation process.
        Good Luck
        XS1100F TKAT fork brace Stock suspension. Vetter Fairing. Pingel Petcocks. Geezer voltage regulator
        http://s910.photobucket.com/albums/a...t=DSCF3026.jpg
        650SF
        http://s910.photobucket.com/albums/a...t=DSCF2647.jpg
        XS1100SG Project bike
        http://s910.photobucket.com/albums/a...t=DSCF3034.jpg

        Comment


        • #5
          On a side note, It looks like we both own the same ride on lawn mower. Is that a Poulan?

          Comment


          • #6
            It's a Craftsman, RstyDuck, and actually it's my wife's tractor. It was her anniversary present for our 25th. Her idea. She lets me ride it, but she cuts the grass with it.

            Yeah, I know, I'm a lucky guy. She likes football too.

            Patrick
            The glorious rays of the rising sun exist only to create shadows in which doom may hide.

            XS11F (Incubus, daily rider)
            1969 Yamaha DT1B
            Five other bikes whose names do not begin with "Y"

            Comment


            • #7
              Yep - definitely a Pacifico. They are a pain to install/remove (I've only watched others do it). I'm not sure if it's possible to install the brackets with the headlight ears still in place (like you can with the Windjammer), but it may make it easier if you remove them. As mentioned, the installation manual isn't wonderful, but it's the best I've been able to locate.
              1980 XS850SG - Sold
              1981 XS1100LH Midnight Special (Sold) - purchased 9/29/08
              Fully Vetterized and Dynojet Kit added, Heated Grips, Truck-Lite LED headlight, Accel Coils, Irridium plugs, TKAT Fork Brace, XS850LH Final Drive & Black SS Brake lines from Chacal.
              Here's my web page devoted to my bike! XS/XJ User's Manuals there, and the XJ1100 Service Manual and both XS1100 Service manuals (free download!).

              Whether you think you can, or you think you cannot - You're right.
              -H. Ford

              Comment


              • #8
                I have the manual open in another tab, CB. It helps, but I wish it had pictures.

                Patrick
                The glorious rays of the rising sun exist only to create shadows in which doom may hide.

                XS11F (Incubus, daily rider)
                1969 Yamaha DT1B
                Five other bikes whose names do not begin with "Y"

                Comment


                • #9
                  One last entry for archival purposes so if anyone else finds this in a search they can benefit from my experience.

                  1. You must remove the headlight ears on a '79 Standard when you put on a Pacifico fairing. If you do not the ears will bind with the steering and you will not be able to turn the handlebars more than one inch in either direction. This is actually something of an advantage because since you have to take the fork legs off you get the opportunity to check the torque on all the front end bolts before you put on the added weight of the fairing.

                  2. Unless you are going to wire the gauges through the fairing, which I did not attempt although the connection exist in the fairing pigtail, you are going to have to reroute your wiring or the gauge wires will bind with the steering and you will not be able to turn the handlebars left without stretching the gauge wires, which I thought was a real bad idea. I routed my wiring harness to the left of the steering stem.

                  3. Glue the rubber damping strips to the fairing mount. Do not believe you can slide the fairing between the mounts and have the damping strips remain where they are. They will not and you will not be able to force them between the fairing and the mount when the fairing is in.

                  4. Check the fairing wiring to make sure it is correct before you attempt to mount the fairing. The pigtail will reach the fairing and you can plug it in with the fairing alongside the bike if you find something about a foot tall to set the fairing on.

                  5. The hassle is worth it. I don't know if is the additional weight on the front end or the aerodynamics of a Pacifico fairing, but my XS has never ridden as smoothly as it does this this fairing on it.

                  Patrick
                  The glorious rays of the rising sun exist only to create shadows in which doom may hide.

                  XS11F (Incubus, daily rider)
                  1969 Yamaha DT1B
                  Five other bikes whose names do not begin with "Y"

                  Comment


                  • #10
                    Originally posted by Incubus View Post
                    1. You must remove the headlight ears on a '79 Standard when you put on a Pacifico fairing.
                    Did you try just folding them inward, overlapping each other between the forks? They should have just spun out of the way.

                    Originally posted by Incubus View Post
                    5. The hassle is worth it. I don't know if is the additional weight on the front end or the aerodynamics of a Pacifico fairing, but my XS has never ridden as smoothly as it does this this fairing on it.
                    Glad you like it! Those Pacificos are supposed to be the best fairing ever made for these bikes, so it appears you concur?
                    1980 XS850SG - Sold
                    1981 XS1100LH Midnight Special (Sold) - purchased 9/29/08
                    Fully Vetterized and Dynojet Kit added, Heated Grips, Truck-Lite LED headlight, Accel Coils, Irridium plugs, TKAT Fork Brace, XS850LH Final Drive & Black SS Brake lines from Chacal.
                    Here's my web page devoted to my bike! XS/XJ User's Manuals there, and the XJ1100 Service Manual and both XS1100 Service manuals (free download!).

                    Whether you think you can, or you think you cannot - You're right.
                    -H. Ford

                    Comment


                    • #11
                      I tried pushing the ears in, CB. I got away with that with the Vetter. But the round bar on the mount that attaches to steering stem interfered with the ears. I maybe could have pushed them harder, but unless I figured out some way to secure them so they would never move again I did not want to take the chance that they would mess with the steering at the worst possible time.

                      And yes, I love this fairing. Much better than a Vetter, IMHO.

                      Patrick
                      The glorious rays of the rising sun exist only to create shadows in which doom may hide.

                      XS11F (Incubus, daily rider)
                      1969 Yamaha DT1B
                      Five other bikes whose names do not begin with "Y"

                      Comment


                      • #12
                        Few things to add

                        I removed head light, unplugged every thing that went through the bucket.
                        Removed the triple tree and pulled off the ears and bucket togther.
                        I adjusted the steering head while I was at it.

                        Rick
                        XS1100F TKAT fork brace Stock suspension. Vetter Fairing. Pingel Petcocks. Geezer voltage regulator
                        http://s910.photobucket.com/albums/a...t=DSCF3026.jpg
                        650SF
                        http://s910.photobucket.com/albums/a...t=DSCF2647.jpg
                        XS1100SG Project bike
                        http://s910.photobucket.com/albums/a...t=DSCF3034.jpg

                        Comment


                        • #13
                          Fasten the top mount hard. The lower mount has slots in it to allow for space used by rubber strips and lowers, if you have 'em. I use a phillips screwdriver to line up all the holes. Put bolts in them, nuts on. Tighten all bolts. Then, go back and tighten up the bolts on the cross bar. Everything will be all snug and supported well top and bottom. Be sure you don't cross thread the two bolts on the stem. DAMHIK.
                          1980 XS 11 Special: The King of Kong, 9th wonder of the world. Pacifico fairing, chopped shield, Yamaha hard bags, Diamond seat, T-Kat fork brace, XJ top end, YICS Eliminator, '80 carbs from Spyder Cycle Works, K&N Air filter, Fuse block, stainless steel valves & reg/rect from Oregon MC Parts. Raptor CCT, XJ air shocks, 850 FD, Sportster mufflers, Standard handle bar, Tusk Bar Risers, SS braided brake lines. Cat Eye speedometer. HID projector beam headlight, LED running lights.

                          Comment

                          Working...
                          X