Announcement

Collapse
No announcement yet.

Brake question.

Collapse
X
 
  • Filter
  • Time
  • Show
Clear All
new posts

  • Brake question.

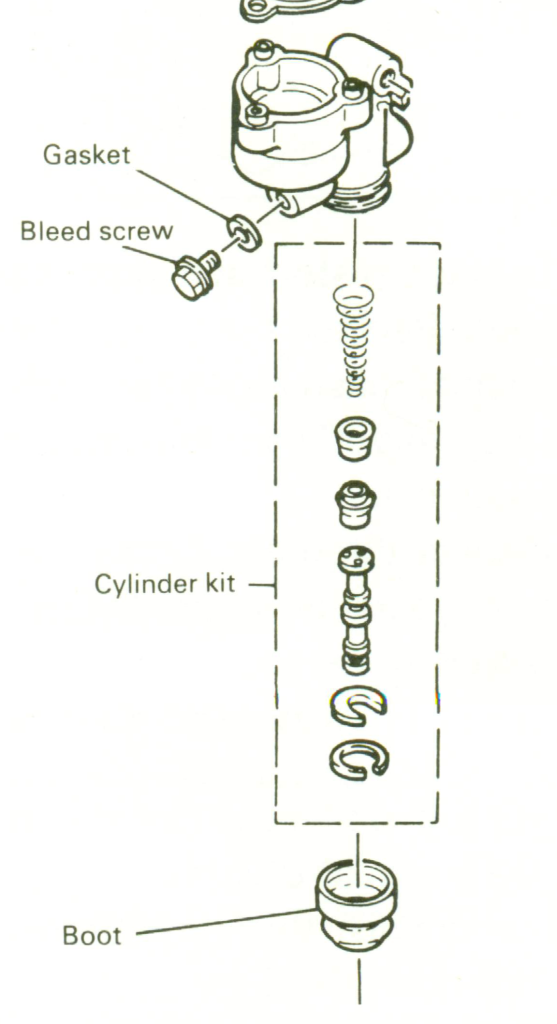
    I am in the process of rebuilding the rear brakes on an 81 xs1100s. After rebuilding the rear master cylinder I can't seem to get the fluid past the rubber cups down to the wheel cylinder. I can feel air pressure so I know the master is pumping. Is there a procedure to get the fluid past the cup into the lines?

  • #2
    Did you bench bleed the master cylinder? You should not be able to hold your finger over the banjo bolt hole hard enough to stop the flow of fluid. If you can, you have a leak in the seals.
    1980 XS850SG - Sold
    1981 XS1100LH Midnight Special (Sold) - purchased 9/29/08
    Fully Vetterized and Dynojet Kit added, Heated Grips, Truck-Lite LED headlight, Accel Coils, Irridium plugs, TKAT Fork Brace, XS850LH Final Drive & Black SS Brake lines from Chacal.
    Here's my web page devoted to my bike! XS/XJ User's Manuals there, and the XJ1100 Service Manual and both XS1100 Service manuals (free download!).

    Whether you think you can, or you think you cannot - You're right.
    -H. Ford

    Comment


    • #3
      XS brakes are notorious PITA's to bleed. A power bleeder has always worked well for me. I just fill the reservoir and leave the top off, and start applying vacuum at the bleeder valve. As the level in the reservoir drops I add a bit more fluid, and keep pumping it until I get a pretty steady stream of fluid as observed through a clear plastic/rubber/whatever-it's-made-out-of line. Then I close the bleeder and remove the power bleeder, and finish by pumping up the brakes and quickly cracking the bleeder so as to let air out but not back in. When the brakes feel firm, I top off the master cylinder and close it up. I run it around for a few days and then refill the reservoir. Never had a problem doing it that way. If you don't have a power bleeder, you can get one at Harbor Freight for $25.
      I think I have a loose screw behind the handlebars.

      '79 XS11 Standard, Jardine 4/1, Dyna DC1-1 Coils, 145 mains, 45 pilots, plastic floats - 25.7mm, XV920 fuel valves, inline fuel filters, speed bleeders, Mikes XS pods, spade-type fuse block, fork brace, progressive fork springs/shocks, manual petcocks, 750 FD, Venture cam chain tensioner, SS brake lines

      Comment


      • #4
        I have bench tested the cylinder with the same results. No flow past the second cup. So maybe a power bleeder could force the fluid past the cup and into the lines???

        Comment


        • #5
          Originally posted by Tbell View Post
          I have bench tested the cylinder with the same results. No flow past the second cup. So maybe a power bleeder could force the fluid past the cup and into the lines???
          If you cant get it to work off the bike dont bother putting on the bike till you can get the fluid to flow in the MC itself. Is it put back together correctly? its possible one of the seals rolled when you slid it into the MC cylinder.
          Nathan
          KD9ARL

          μολὼν λαβέ

          1978 XS1100E
          K&N Filter
          #45 pilot Jet, #137.5 Main Jet
          OEM Exhaust
          ATK Fork Brace
          LED Dash lights
          Ammeter, Oil Pressure, Oil Temp, and Volt Meters

          Green Monster Coils
          SS Brake Lines
          Vision 550 Auto Tensioner

          In any moment of decision the best thing you can do is the right thing, the next best thing is the wrong thing, and the worst thing you can do is nothing.

          Theodore Roosevelt

          Comment


          • #6
            In your original post you said you had an '81 S - do you mean an 81SH? Reason I ask is that the '81LH has the front and rears linked. Did you assemble as per this diagram? If you did, I'd try the vacuum pump. Also, did you replace or re-anneal the crush washer on the banjo fittings? Might have an air leak, but I don't know that it would keep it from pumping fluid. Ivan posted an excellent process for re-annealing the washers. You just heat them up with a propane torch until they just glow red (don't leave the heat on them too long or they'll melt) and immediately drop them in water. Since using his process I have not had any leaky banjo's. JAT

            I think I have a loose screw behind the handlebars.

            '79 XS11 Standard, Jardine 4/1, Dyna DC1-1 Coils, 145 mains, 45 pilots, plastic floats - 25.7mm, XV920 fuel valves, inline fuel filters, speed bleeders, Mikes XS pods, spade-type fuse block, fork brace, progressive fork springs/shocks, manual petcocks, 750 FD, Venture cam chain tensioner, SS brake lines

            Comment


            • #7
              If you can't locate a vacuum brake bleeder easily, you can use a lower unit pump for an outboard boat motor, and pump brake fluid from the bleeder nipple into the master cylinder. This fills the brake line from the bottom up, and worked pretty well for me. I think a vacuum bleeder would be a better way to go though, as the lower unit pump had a nasty habit of allowing air into the line (it's basically a soap pump that would thread onto a bottle of brake fluid. I had to bleed a lot after the initial filling with the lower unit pump.

              Good luck!
              '80 SG with motor from a '82 XJ

              Comment


              • #8
                The bench test was after the fact. I was very careful with the installation of the seals, no fold over. However, not so sure about the sequence of parts install. The diagram in the manual isn't exactly like this master and not very clear as to what goes where. In this sequence on the piston: There is a flat washer, rubber seal, a metal ( funnel shaped device for lack of a better description) that fits over the rubber seal and lastly is the spring. ??? I should have taken a photo but I didn't. Oh well! Does that sound correct?

                Just to be clear, I'm not getting any fluid past the seal into the lines. I fill the container and get nothing out. The lines and the wheel cylinder are totally dry.

                Comment


                • #9
                  That sounds a bit strange to me...

                  You should have a spring in the hole first.
                  Then, the rubber "cup" seal sits on the small end of the spring.
                  Then the piston presses against the underside of the rubber "cup".
                  The piston has a seal around it, in a groove.
                  A "C" shaped retaining washer goes in next, held in by a circlip.

                  At least that's how mine looks...
                  1980 XS850SG - Sold
                  1981 XS1100LH Midnight Special (Sold) - purchased 9/29/08
                  Fully Vetterized and Dynojet Kit added, Heated Grips, Truck-Lite LED headlight, Accel Coils, Irridium plugs, TKAT Fork Brace, XS850LH Final Drive & Black SS Brake lines from Chacal.
                  Here's my web page devoted to my bike! XS/XJ User's Manuals there, and the XJ1100 Service Manual and both XS1100 Service manuals (free download!).

                  Whether you think you can, or you think you cannot - You're right.
                  -H. Ford

                  Comment


                  • #10
                    Okay! That diagram is what I was referring to. I can't positively identify all those parts. I have the same number of parts but not sure which are which.
                    In my last reply I listed the parts reverse from what is stated here, sorry.

                    From the master out to the lines: Piston with built in seal, flat washer that seats over the end of the piston with small holes in the end, rubber seal, sleeve ?(I will call it a sleeve) that fits over the end of the seal, spring (small end) fits over the sleeve and large end of the spring fits into the housing first.
                    Looking at the diagram can you name the parts? Am I correct with the sequence?

                    Edit: Yes it is an XS1100SH.

                    Comment


                    • #11
                      Looking at a rear master cylinder rebuild kit it looks to me like the 'little funnel thing' goes between the spring and the rubber cup. It looks like a retainer for the spring. I don't see the small flat washer in the diagram but I'm guessing that goes between the funnel and the rubber cup. Here's a larger diagram, but it's for an 'E' model but maybe it will help. It appears that the SH has a couple extra parts - the flat washer and the funnel. Funny thing is, the Yamaha fiche shows the same part number for the rebuild kits for both the 'E' and the 'SH'.

                      Last edited by dbeardslee; 07-06-2010, 12:26 PM.
                      I think I have a loose screw behind the handlebars.

                      '79 XS11 Standard, Jardine 4/1, Dyna DC1-1 Coils, 145 mains, 45 pilots, plastic floats - 25.7mm, XV920 fuel valves, inline fuel filters, speed bleeders, Mikes XS pods, spade-type fuse block, fork brace, progressive fork springs/shocks, manual petcocks, 750 FD, Venture cam chain tensioner, SS brake lines

                      Comment


                      • #12
                        The link to the master rebuild kit shows "exactly the parts" that are in mine including the flat washer which goes on the post at the end of the piston. It covers the holes in the piston. That is the only part that didn't come off when I took things apart. The parts diagram is not for this master cylinder.

                        I just bought a power bleeder from Harbor Freight so I hope it will work. Thanks for all the suggestions.

                        Now I need one carb float valve. The plunger is stuck in the down position and won't let go. Everything else in the carbs is in good condition. Hope I don't have to purchase a whole kit just for that one valve.???

                        Tom

                        Comment

                        Working...
                        X