Announcement

Collapse
No announcement yet.

Bloody h*&^^**&^@!@@@@!!!!

Collapse
X
 
  • Filter
  • Time
  • Show
Clear All
new posts

  • #16
    Hi Clint,
    I recomend a new head gasket as with any luck you will not be pulling it off again for many years. Parts & More have a whole set which includes the valve seals and exhaust gaskets which you will need. When I needed this someone posted a tip: The XJ gasket set is cheaper by about $8 and you just trim off the extra bit of gasket for the YICS which you do not have on a standard.
    Maxim Phil
    1981 XS1100 H Venturer ( Addie)
    1983 XJ 650 Maxim
    2004 Kawasaki Concours. ( Black Bear)

    Comment


    • #17
      When you pull the head, if your head gasket comes off clean, I have re-used them many many times before with no problems whatsoever. BUT... sometimes you pull the head and they will delaminate. Part will stick to the head and part will stick to the cylinders and it will seperate in a couple pieces. I would suggest a new one in that instance, but otherwise.. unless it just makes you feel better for some reason to have a new one... you really don't need one.

      If money isn't an issue.. then go with the new gasket set at Partsnmore.com. This will have everything you need.. and as stated, the XJ kit is cheaper than the XS kit for some reason when they are the same kit basically. This kit will have your valve seals, new exhaust gaskets, head gasket, and valve cover gasket. Purchasing these seperately will cost much more than the kit, but the only thing you will probably NEED to replace is the valve cover gasket.


      Tod
      Try your hardest to be the kind of person your dog thinks you are.

      You can live to be 100, as long as you give up everything that would make you want to live to be 100!

      Current bikes:
      '06 Suzuki DR650
      *'82 XJ1100 with the 1179 kit. "Mad Maxim"
      '82 XJ1100 Completely stock fixer-upper
      '82 XJ1100 Bagger fixer-upper
      '82 XJ1100 Motor/frame and lots of boxes of parts
      '82 XJ1100 Parts bike
      '81 XS1100 Special
      '81 YZ250
      '80 XS850 Special
      '80 XR100
      *Crashed/Totalled, still own

      Comment


      • #18
        If you MUST re-use the head gasket, I would suggest using some sort of metallic spray on the gasket to smooth out the surface irregularities. Aluminum paint works, or Permatex makes this:


        Personally, I would not re-use such a critical gasket, JMHO. If it failed you're looking at another 2-3 hours to replace it.

        Comment


        • #19
          Since these are air cooled motors, not having to keep antfreeze passages water tight, the only real critical part is the metal rings that go around the cylinder bores. If these aren't burnt at all, you don't need any metalic spray, or other goop. The only thing it's doing is stopping the oil from running out of the cam chain gallery and stopping compression gasses at that ring. The rest of it is basically just a shim to keep the head level.

          Like I said, I've re-used them many many times on these bikes.. and have never bought a new head gasket for my air cooled dirt bikes I've rebuilt dozens and dozens of times over the years.... and have NEVER once had a head gasket problem.

          This being said.. if you don't feel comfortable re-using one.. don't. I'm simply saying it isn't needed as long as it's still in good shape and not delaminating.


          Tod
          Try your hardest to be the kind of person your dog thinks you are.

          You can live to be 100, as long as you give up everything that would make you want to live to be 100!

          Current bikes:
          '06 Suzuki DR650
          *'82 XJ1100 with the 1179 kit. "Mad Maxim"
          '82 XJ1100 Completely stock fixer-upper
          '82 XJ1100 Bagger fixer-upper
          '82 XJ1100 Motor/frame and lots of boxes of parts
          '82 XJ1100 Parts bike
          '81 XS1100 Special
          '81 YZ250
          '80 XS850 Special
          '80 XR100
          *Crashed/Totalled, still own

          Comment


          • #20
            You may have not bent any (Doubtfull.. but possible) or just one
            If you remove the valves, put them in a drill press, and just click the power on and off quickly so it turns very slowly while you watch the valve head, you'll see instantly if they're bent. JAT
            I think I have a loose screw behind the handlebars.

            '79 XS11 Standard, Jardine 4/1, Dyna DC1-1 Coils, 145 mains, 45 pilots, plastic floats - 25.7mm, XV920 fuel valves, inline fuel filters, speed bleeders, Mikes XS pods, spade-type fuse block, fork brace, progressive fork springs/shocks, manual petcocks, 750 FD, Venture cam chain tensioner, SS brake lines

            Comment


            • #21
              Well, the head is off. I definitely have three bent valves, 2 exhaust and 1 intake. I WAS going to pull each valve and chuck it in the drill press and dial gauge them, but I quickly discovered there is no WAY my current valve compressor will work on this head. Not even close...

              So, next question is this: What is a good valve spring compressor? I don't want to spend a ton of money on the tool, but I DO have a tendency to buy good tools when I buy tools.

              The head gasket will have to be replaced. It was torn up a bit around to two bottom bolts and I just don't feel comfortable reusing it. Plus, I think I have one hanging on he wall of my shop anyway (along with valve seals and other misc gaskets).

              Other question: Any recommendations on where to get the valves for a decent price?

              Thanks (once more!) for all the help!
              -- Clint
              1979 XS1100F - bought for $500 in 1989

              Comment


              • #22
                You can take a piece of pvc with a window cut in it, and a big c-clamp and remove the valves. PVC tool goes on the valve stem side, one end of the c-clamp (the fixed end) on the valve head, one on the pvc tool (the adjustable end), tighten and remove/install the keepers through the window. Looks like this -


                On the head gasket - if you've got the new style gasket, and you see a big rubber thing around the cam chain tunnel when pull the head, get rid of the rubber thing. The new gaskets are designed to work without it, and if you put them both in you'll have trouble.
                Last edited by dbeardslee; 02-10-2010, 06:45 PM.
                I think I have a loose screw behind the handlebars.

                '79 XS11 Standard, Jardine 4/1, Dyna DC1-1 Coils, 145 mains, 45 pilots, plastic floats - 25.7mm, XV920 fuel valves, inline fuel filters, speed bleeders, Mikes XS pods, spade-type fuse block, fork brace, progressive fork springs/shocks, manual petcocks, 750 FD, Venture cam chain tensioner, SS brake lines

                Comment


                • #23
                  Nice! Cheap (aka: Free as I have TONS of PVC "stuff" that I have accumulated over the years and LOTS of C-clamps in the shop!), it looks like it will work as well as any commercial version. AND it is a DIY solution! You couldn't ask for more!

                  Thanks for the heads up on the new head gasket as well!

                  Originally posted by dbeardslee View Post
                  You can take a piece of pvc with a window cut in it, and a big c-clamp and remove the valves. PVC tool goes on the valve stem side, one end of the c-clamp (the fixed end) on the valve head, one on the pvc tool (the adjustable end), tighten and remove/install the keepers through the window. Looks like this -


                  On the head gasket - if you've got the new style gasket, and you see a big rubber thing around the cam chain tunnel when pull the head, get rid of the rubber thing. The new gaskets are designed to work without it, and if you put them both in you'll have trouble.
                  -- Clint
                  1979 XS1100F - bought for $500 in 1989

                  Comment


                  • #24
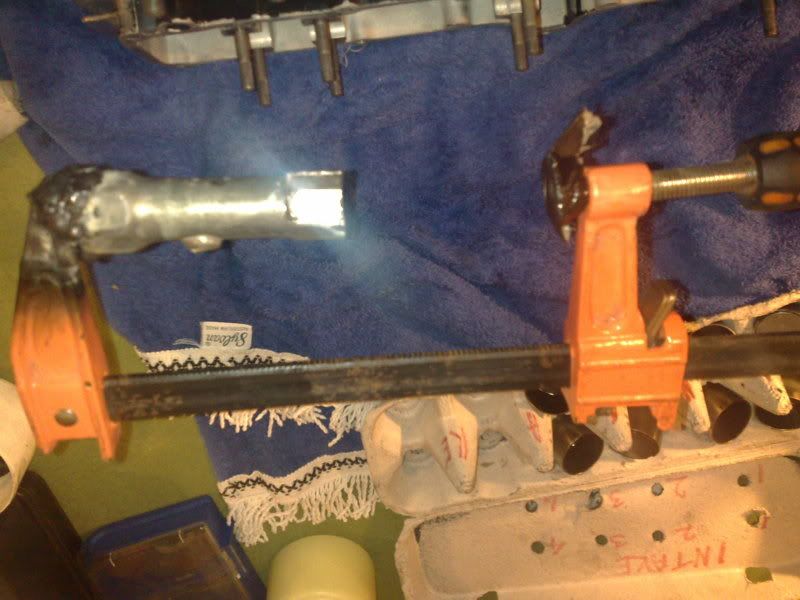
                    heres a valve compressor i made,
                    works really well.

                    a lawnmower plug socket welded to a g clamp with a piece cut out


                    ive also reused head gaskets before and have never had a problem
                    but as stated before as long as it hasnt stuck to anything.

                    also coating a new head gasket with a smear of oil will prevent
                    it from sticking in the future.

                    dont forget to check the valve guides for damage.
                    Last edited by petejw; 02-10-2010, 09:11 PM.
                    pete


                    new owner of
                    08 gen2 hayabusa


                    former owner
                    1981 xs1100 RH (aus) (5N5)
                    zrx carbs
                    18mm float height
                    145 main jets
                    38 pilots
                    slide needle shimmed .5mm washer
                    fitted with v/stax and uni pod filters

                    [url]http://www.youtube.com/watch?v=3pA8dwxmAVA&feature=mfu_in_order&list=UL[/url]

                    Comment


                    • #25
                      Originally posted by clcorbin View Post
                      Any recommendations on where to get the valves for a decent price?
                      Crc2online.com usually has them for about $20 apiece, but they are currently out of stock. Yamaha wants $50 apiece for them as well as Bike Bandit. Sudco carries the Vesrah brand replacement valves which are very good quality, but you have to call them, no online store. Maybe a member has a few extra "early type" valves they are willing to part with. BTW, the XS750 and XS850 valves are the same as the 78-79 early type XS11 head. HTH
                      2H7 (79) owned since '89
                      3H3 owned since '06

                      "If it ain't broke, modify it"

                      ☮

                      Comment


                      • #26
                        Well, good news and bad news. I made a cheap spring compressor using a short length of 3/4" PVC and pulled all the valves (yes, I kept everything separated by hole with zip lock bags!). After giving each of them a spin in the drill press at 200 rpm, 6 are very much straight. Not so much on intake 2 and exhaust 4. Defintely bent.

                        I measured each valve (straight sample!) and came up with an intake valve at 95.6mm x 36.0 mm and exhaust at 94.6 mm x 31.0 mm. Does this sound about right? My understanding was that when the exhaust valves were replaced some time ago, the valves they my brother bought had the groove in the right location, but they had to have the tip cut down almost 1/4" to get them to the right length (supposedly universal to several different motorcycles, but each had a different tip length), so they might have cut them a bit shorter than factory spec. Of course, that WOULD explain my my exhaust shims where thicker than I expected, so that's not a bad thing I guess.

                        At this point, I am going to order a pair of valves and then go back out and clean the good valves and put things back together. I already have a head gasket, new intake/exhaust valve seals, etc. so the only gasket I need to order is a valve cover gasket.

                        I am NOT looking forward to getting the new timing chain wrapped around the crank! I REALLY don't want to pull the engine, so I am hopping I can come up with someway to get that chain where it needs to be with the head off and the engine in the frame.

                        Any suggestions and helpful hints will be appreciated!
                        -- Clint
                        1979 XS1100F - bought for $500 in 1989

                        Comment


                        • #27
                          It looks like crc2online is still out of stock on the valves. I didn't find any on ebay either, so I am a bit stuck at this point. Does anyone have any early valves that they would be willing to part with?
                          -- Clint
                          1979 XS1100F - bought for $500 in 1989

                          Comment


                          • #28
                            If no takers in here, you could go to the parts needed section (If you haven't already) and you could also go here and register.. and put a posting about needing a couple valves.


                            http://www.yamaha-triples.org/

                            I wouldn't say it was for the 1100.. just ask if anyone has any valves to part with.

                            As for the cam chain, there's really nothing to it. Drop one end of the chain down into the front side of the motor where it has some extra down at the bottom. Get a cheap telescoping magnet and a long screwdriver. Stick the magnet to the end of the screwdriver, and together feed the magnet down to the opposite side (Back side of the motor) of the crank the chain is on. The screwdriver keeps the magnet from grabbing everything else metal along the way. Once you have the chain grabbed, ease it up slowly while feeding a little more down at the same time on the front side. You'll have both ends of the chain in your hand in under a minute.


                            Tod
                            Try your hardest to be the kind of person your dog thinks you are.

                            You can live to be 100, as long as you give up everything that would make you want to live to be 100!

                            Current bikes:
                            '06 Suzuki DR650
                            *'82 XJ1100 with the 1179 kit. "Mad Maxim"
                            '82 XJ1100 Completely stock fixer-upper
                            '82 XJ1100 Bagger fixer-upper
                            '82 XJ1100 Motor/frame and lots of boxes of parts
                            '82 XJ1100 Parts bike
                            '81 XS1100 Special
                            '81 YZ250
                            '80 XS850 Special
                            '80 XR100
                            *Crashed/Totalled, still own

                            Comment


                            • #29
                              once the head is off, its much easier
                              to wrap the chain around.
                              if the old chain is still wrapped around the crank,
                              just attach the new to chain to the old, (wire, a link, cable tie)
                              and feed it thru by pulling the old chain out.
                              if the old chain has come away from the crank, use a wire coat
                              hanger bent at the bottom, drop the chain down by the crank
                              and use the coat hanger to hook onto the chain and pull it thru.

                              after you have assembled it all, get a strong torch and stick it
                              down the camchain valley so you can see that
                              the chain is wrapped around the crankshaft cog properly.
                              pete


                              new owner of
                              08 gen2 hayabusa


                              former owner
                              1981 xs1100 RH (aus) (5N5)
                              zrx carbs
                              18mm float height
                              145 main jets
                              38 pilots
                              slide needle shimmed .5mm washer
                              fitted with v/stax and uni pod filters

                              [url]http://www.youtube.com/watch?v=3pA8dwxmAVA&feature=mfu_in_order&list=UL[/url]

                              Comment


                              • #30
                                Thanks Tod. That was sort of the ideas I was thinking about. I have two of the intake valves back together. I'm chucking each valve back in the drill press then using a wire brush in a die grinder to clean all the carbon and junk off of each valve. Then it gets a quick lapping to make sure the seat and face are nice and clean before everything gets cleaned up and reassembled with new valve stem seals.

                                Getting those retainers back in is a MUCH bigger pain in the butt than doing it on the heads for my pickup! Not much room to work between the PVC and having the valve down in the well like it is.

                                Oh well! It can be done with a bit of practice. Eventually, I hope to get the cussing down to minimum as well.
                                -- Clint
                                1979 XS1100F - bought for $500 in 1989

                                Comment

                                Working...
                                X