Announcement

Collapse
No announcement yet.

Aluminum Polishing Tips

Collapse
X
 
  • Filter
  • Time
  • Show
Clear All
new posts

  • Aluminum Polishing Tips

    From numerous posts, I see that a lot of people are still recommending using chemical stripping as the first step in restoring their aluminum. While this works, IMHO there's a better way and it will cut out many of the steps in the process compared to what's being recommended. If you don't have power tools (and preferably air tools), don't bother reading any further as this won't be much help to you. But for those of you who do, read on...

    Chemical stripping is stinky/messy and may need multiple applications to get all the old coating off. And it does nothing to prep the metal for polishing, so you'll still have to deal with any oxidization, nicks, and scratches.

    To do all the strippng and most of the pre-polish prep in one shot, use 2" 'surface conditioning discs' AKA 'Scotchbrite'. These can be found most anywhere in various brands, but buying bulk lowers the price considerably. I've found that these guys http://www.keenabrasives.com have very good prices and quality. Not advertising, just happy with their service/prices/products.

    For restoring parts that were originally polished, I'll use 'blue' (fine) pads on an angle-head air die grinder (easily found for $30 or less). An electric drill will work also, just be a bit clumsy and slower. These will remove all coating and all but the worst of the oxidization/pitting, leaving a ready-to-buff finish in one step if you have a reasonably-sized buffing motor (say, over 1/2 hp and 3600 rpm). Smaller/slower motor? Do one more step with 'grey' (very fine) pads and reduce your buffing time by 1/3.

    Got some pitting and/or deep scratches/nicks? If it's on a 'outside' surface, I'll remove/blend these with a 400 grit 5" aluminum oxide disc on an air sander; a 5" electric grinder will work just as well. If you have a 'wavy' surface, this will also smooth/flatten it nicely. Again, with a decent sized buffer you'll have a ready-to-buff surface. Can't get the 5" disc in there? Then switch to coarse 'maroon' discs to get rid of the problem, following with the finer discs. You can get these discs as small as 3/4" diameter, so there shouldn't be many areas you can't get to. These methods also work very well to strip/smooth die-cast parts that were never polished, such as handcontrols, brake parts, etc. Not removing the paint beforehand gives you a 'guide coat' so when the paint is gone, you know the part is ready. Doing rough sand-cast parts? Then start with some 320 grit 2" discs, switching to the pads after you get all the casting flaws gone.

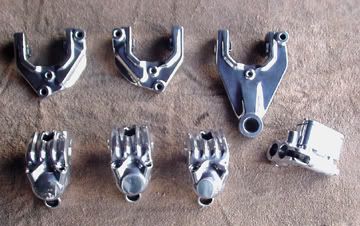
    For buffing, I'll do just two steps; start with a sewn cotton buff using tripoli compound, then finish with a loose buff and white rouge. This will give me a near-chrome finish. Results? Look here:
    http://s777.photobucket.com/albums/y...Brakeparts.jpg

    This all seems complicated, but it's not. I can restore most typical condition average-sized parts in under 2 hours, start to finish, so it can be a huge timesaver. Larger or 'complicated' parts will take longer, smaller less. Never-polished parts will take longer, depending on how much work is involved in the prep to get them smooth. And sure, there's a dollar outlay involved, but it's not that much more than using chemicals and sandpaper if you have air/power tools. And the pads are useful for other things too; stripping paint and rust (the pads work great for cleaning rusty brake rotors), cleaning gasket surfaces, and decarbonizing heads/pistons.

    Try it, you'll like it!

    '78E original owner
    Fast, Cheap, Reliable... Pick any two

    '78E original owner - resto project
    '78E ???? owner - Modder project FJ forks, 4-piston calipers F/R, 160/80-16 rear tire
    '82 XJ rebuild project
    '80SG restified, red SOLD
    '79F parts...
    '81H more parts...

    Other current bikes:
    '93 XL1200 Anniversary Sportster 85RWHP
    '86 XL883/1200 Chopper
    '82 XL1000 w/1450cc Buell, Baker 6-speed, in-progress project
    Cage: '13 Mustang GT/CS with a few 'custom' touches
    Yep, can't leave nuthin' alone...

  • #2
    Well, I see I've done my usual job of screwing up the photo link, so let me try this one more time.....

    <a href="http://s777.photobucket.com/albums/yy57/crazysteve01/?action=view&current=PolishedBrakeparts.jpg" target="_blank"><img src="http://i777.photobucket.com/albums/yy57/crazysteve01/PolishedBrakeparts.jpg" border="0" alt="XS11"></a>
    Fast, Cheap, Reliable... Pick any two

    '78E original owner - resto project
    '78E ???? owner - Modder project FJ forks, 4-piston calipers F/R, 160/80-16 rear tire
    '82 XJ rebuild project
    '80SG restified, red SOLD
    '79F parts...
    '81H more parts...

    Other current bikes:
    '93 XL1200 Anniversary Sportster 85RWHP
    '86 XL883/1200 Chopper
    '82 XL1000 w/1450cc Buell, Baker 6-speed, in-progress project
    Cage: '13 Mustang GT/CS with a few 'custom' touches
    Yep, can't leave nuthin' alone...

    Comment


    • #3
      Nope, that didn't work either...

      If you search for the thread 'shiney stuff' the pics will come up.

      Sorry....
      Fast, Cheap, Reliable... Pick any two

      '78E original owner - resto project
      '78E ???? owner - Modder project FJ forks, 4-piston calipers F/R, 160/80-16 rear tire
      '82 XJ rebuild project
      '80SG restified, red SOLD
      '79F parts...
      '81H more parts...

      Other current bikes:
      '93 XL1200 Anniversary Sportster 85RWHP
      '86 XL883/1200 Chopper
      '82 XL1000 w/1450cc Buell, Baker 6-speed, in-progress project
      Cage: '13 Mustang GT/CS with a few 'custom' touches
      Yep, can't leave nuthin' alone...

      Comment


      • #4
        Ken Talbot

        Comment


        • #5
          Thanks Ken!

          I am such a klutz when it comes to cutting and pasting...
          Fast, Cheap, Reliable... Pick any two

          '78E original owner - resto project
          '78E ???? owner - Modder project FJ forks, 4-piston calipers F/R, 160/80-16 rear tire
          '82 XJ rebuild project
          '80SG restified, red SOLD
          '79F parts...
          '81H more parts...

          Other current bikes:
          '93 XL1200 Anniversary Sportster 85RWHP
          '86 XL883/1200 Chopper
          '82 XL1000 w/1450cc Buell, Baker 6-speed, in-progress project
          Cage: '13 Mustang GT/CS with a few 'custom' touches
          Yep, can't leave nuthin' alone...

          Comment


          • #6
            Do you have a few pics with them installed?


            mro

            Comment


            • #7
              I wish! No, I just finished polishing my final drive last week, now I'm in powdercoating mode. Rear swingarm, lower tree, both stands, misc brackets and small bits, and both wheels. My blast cabinet is down until I can replace the window in it; it's so frosted I can't see in anymore.

              I'm still a ways off....

              '78E original owner
              Fast, Cheap, Reliable... Pick any two

              '78E original owner - resto project
              '78E ???? owner - Modder project FJ forks, 4-piston calipers F/R, 160/80-16 rear tire
              '82 XJ rebuild project
              '80SG restified, red SOLD
              '79F parts...
              '81H more parts...

              Other current bikes:
              '93 XL1200 Anniversary Sportster 85RWHP
              '86 XL883/1200 Chopper
              '82 XL1000 w/1450cc Buell, Baker 6-speed, in-progress project
              Cage: '13 Mustang GT/CS with a few 'custom' touches
              Yep, can't leave nuthin' alone...

              Comment


              • #8
                Hi Steve, That's a great tip and link. I usually use Permatex gasket remover to melt the old clearcoat off followed by a fresh red Scotchbrite pad then a used red Scotchbrite pad, by hand then to the buffer. This application was used on my '80G which was always garaged kept with no oxidation at all and worked fine. For my '77 650D, which I found in a yard under a tarp, I'll definately use your tips as it is heavily oxidized, no cc left. The blue and the gray discs look like the ticket. I picked up a right angle die grinder late last year and just rebuilt my big compressor so, I'll be placing an order in the near future. Shine On! Thanks
                1980 XS1100G "Dolly G" Full Dresser (with a coat of many colors )
                1979 XS1100SF (stock-euro mods planned)
                1984 XV700L Virago (to be hot-modded)
                1983 XJ750MK Midnight Maxim (semi-restored DD)
                1977 XS650D ( patiently awaiting resto)

                Sometimes it takes a whole tank of gas before you can think straight.

                Comment


                • #9
                  I am a newb at polishing...

                  Ok so since this thread is aluminum polishing tips I figure I will try and post an issue here. I have never done polishing metal before...

                  I just ordered this kit and got it in the mail today. I am using a dremel like tool, adjustable speed and all. I figured I would practice on my carb tops before I went to class. Now I had already soda blasted the tops, (and thought I had hand sanded, but now I realize that I only did the outside two and I was just working on an inside one...) so I decided to use the brown compound just thinking it would not be a big deal and just wanted to get the jist of all this polishing...

                  Well when I put the wheel to it, it started turning the metal black and the wheel black!! It washed off the metal, but i haven't tried to take it off the wheel. I then used the white polish with a tough small cone bit and at first it was really polishing it up nicely in the corners then quickly turned black and then by the time I washed the black off it was all smudgy.

                  So obviously something is wrong. When I go to the bigger metal pieces, and these carb tops... what process should I follow? I would rather not buy more pads as scocthbrite or anything unless they are a buck a pop, but then again I don't really want to go by a gallon of brake fluid to soak everything in, but I guess I may have to. Do you have to take the clearcoat off??

                  Thanks
                  1979 XS1100SF (4-1 Kerker, XS Pods, 145 mains, 45 pilots, drag bars, blacked out)

                  Comment


                  • #10
                    Clear coat

                    Yep.. Clear coat has to be removed!!You are wasting your time if you have not removed the clear coat. I like to use aircraft stripper. Make sure you use the proper personal protective equipment, this is some nasty s!@t!!
                    78 XS1100E Standard
                    Coca Cola Red
                    Hooker Headers

                    http://i408.photobucket.com/albums/p...m/DSC00580.jpg

                    1979 XS1100 Special
                    http://i408.photobucket.com/albums/p...m/DSC00612.jpg

                    1980 XS Standard
                    http://i408.photobucket.com/albums/p...m/DSC01137.jpg

                    2006 Roadstar Warrior
                    http://i408.photobucket.com/albums/p...um/warrior.jpg

                    Comment


                    • #11
                      Yup.

                      Looks like nothing is as simply as pull outta the box and play anymore! I may go look for aircraft stripper at the store.

                      Thanks Foreda
                      Last edited by CA; 02-09-2010, 02:46 PM. Reason: Realized it can be had at WalMart!
                      1979 XS1100SF (4-1 Kerker, XS Pods, 145 mains, 45 pilots, drag bars, blacked out)

                      Comment


                      • #12
                        Originally posted by CA View Post
                        ....Well when I put the wheel to it, it started turning the metal black and the wheel black!! It washed off the metal, but i haven't tried to take it off the wheel. I then used the white polish with a tough small cone bit and at first it was really polishing it up nicely in the corners then quickly turned black and then by the time I washed the black off it was all smudgy....
                        Entirely normal. By the time you get done polishing, everything except the polished piece will be black (including you!). No matter what color compound you use, the buff will turn black.

                        But I have to warn you that a dremel tool is much too light to do anything more than detail work unless you prep the parts extremely well. If you try to buff whole parts with it you'll probably burn it up without doing the prep; that's if you don't get totally frustrated and quit first. If this is all you have available for buffing, you'll need to wet-sand every piece, starting with 600 grit and working your way up to 2000 or even finer before you try buffing.

                        This thread is about an alternative to chemical strippers to remove any clearcoat and saving time on the pre-buffing prep. For a more thorough explanation on polishing aluminum, go to the 'maintainance' section of the forum, go down to 'finish' and click on the 'polishing tips'.

                        '78E original owner
                        Fast, Cheap, Reliable... Pick any two

                        '78E original owner - resto project
                        '78E ???? owner - Modder project FJ forks, 4-piston calipers F/R, 160/80-16 rear tire
                        '82 XJ rebuild project
                        '80SG restified, red SOLD
                        '79F parts...
                        '81H more parts...

                        Other current bikes:
                        '93 XL1200 Anniversary Sportster 85RWHP
                        '86 XL883/1200 Chopper
                        '82 XL1000 w/1450cc Buell, Baker 6-speed, in-progress project
                        Cage: '13 Mustang GT/CS with a few 'custom' touches
                        Yep, can't leave nuthin' alone...

                        Comment


                        • #13
                          totally agree with steve,
                          the dremel is fine for intricate work,
                          but for the larger pieces, get your self a bench grinder
                          and buffing pads to suit.

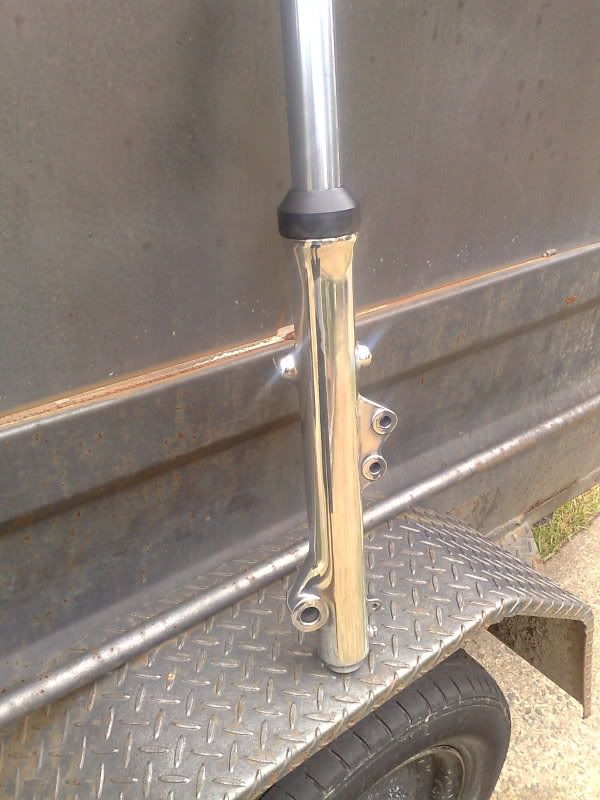
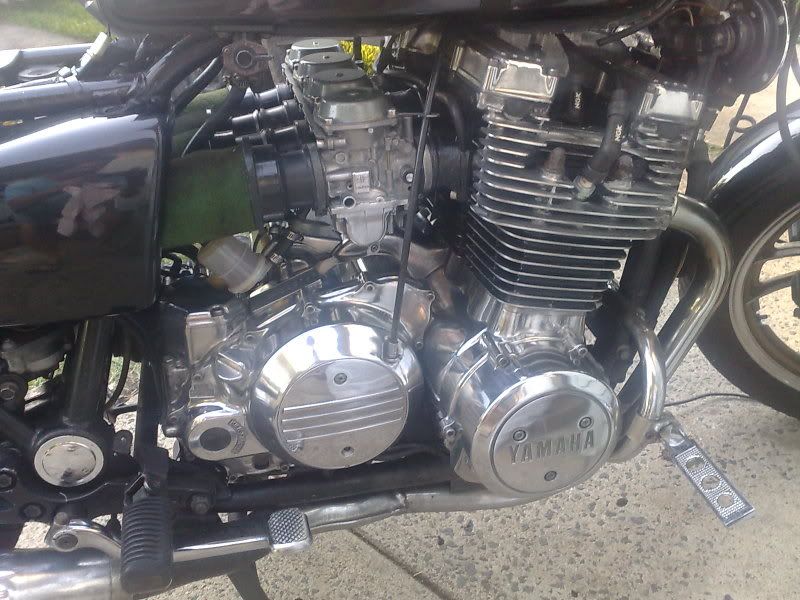
                          heres a cpl of pics with what ive done


                          well worth the time and effort.
                          pete


                          new owner of
                          08 gen2 hayabusa


                          former owner
                          1981 xs1100 RH (aus) (5N5)
                          zrx carbs
                          18mm float height
                          145 main jets
                          38 pilots
                          slide needle shimmed .5mm washer
                          fitted with v/stax and uni pod filters

                          [url]http://www.youtube.com/watch?v=3pA8dwxmAVA&feature=mfu_in_order&list=UL[/url]

                          Comment


                          • #14
                            so then

                            r u recoating it or will the polish keeop it nice
                            There is a VERY fine line between "hobby" and "mental Illness"
                            I don't own a classic I RIDE one

                            Brad Norton
                            Kearney, Ne

                            Photojournalist
                            Hobbies-Family
                            rock and tree climbing, rescue ropes, firefighter, Boy Scouts leader, metal detecting and camping

                            age 49

                            1980 XS1100SG Special- My very first bike!!!

                            Comment


                            • #15
                              no need to clear coat it,
                              it dulls and yellows,

                              its not hard to keep clean once its done
                              properly, quick degrease and wash, blow dry with compressed air
                              to get the water off and either give it a wipe over
                              with a micro fibre cloth, or a quick polish with mothers or something similar.
                              pete


                              new owner of
                              08 gen2 hayabusa


                              former owner
                              1981 xs1100 RH (aus) (5N5)
                              zrx carbs
                              18mm float height
                              145 main jets
                              38 pilots
                              slide needle shimmed .5mm washer
                              fitted with v/stax and uni pod filters

                              [url]http://www.youtube.com/watch?v=3pA8dwxmAVA&feature=mfu_in_order&list=UL[/url]

                              Comment

                              Working...
                              X