Announcement

Collapse
No announcement yet.

Sooooo close!!!

Collapse
X
 
  • Filter
  • Time
  • Show
Clear All
new posts

  • Sooooo close!!!

    What a pain! I am THIS close to having my 79F back on the road again. The bike is pretty much buttoned up with the exception of the gas tank and seat. I sat the tank on backwards so I could hook up the fuel lines and set the pilot mixture, idle speed and sync the carbs. After adding about 1 1/2 gallons of gas to the tank, I gave it a though check out to make sure there where no leaks. The peacocks were fine and the new fuel lines where sealed up tight.

    Unfortunately, abut 2 inches behind the left peacock on the very bottom of the tank, there was a small pin hole leak! I can't say I'm surprised (if I had known how easy and effective electrolysis was, I would have done it 20 years ago!), but I am disappointed that I have one more thing to repair before I can FINALLY ride this bike again.

    Sigh.

    So, the next question is (take a WILD guess!) this: What is the best way to fix this leak? The tank is structurally sound, other than this one pin hole. This summer, I plan on redoing the tank completely with electrolysis inside AND out followed with the proper body work and a new paint job. For now, I would like to get it fixed quickly and (hopefully) painlessly so I can get to riding.

    My gut instinct is to get some JB Weld, flush the tank with water a few times, then sand the spot down to bare metal and Weld it up. My dad used some JB Weld to make an "emergency" repair to the oil pan on our old van when he managed to punch a hole in during a hunting trip when I was a kid. 8 years later (when we sold the van), it was STILL oil tight.

    Does anyone see any issues with JB Weld for fix that will only have to last 6 months or so? Better ideas? Thanks again for the help! You guys are a life saver!
    -- Clint
    1979 XS1100F - bought for $500 in 1989

  • #2
    Additional option: What about brazing the hole closed? I do have a torch (small, but I've brazed with it before) and several brazing rods. I would assume this would be pretty much a permanent repair, but I am kind of concerned about a) putting a torch to a gas tank and b) how much of the existing paint will be damaged by the heat? I don't plan on repainting it until summer, so I would like to keep it looking good as possible until then.
    -- Clint
    1979 XS1100F - bought for $500 in 1989

    Comment


    • #3
      I would seal the tank with an epoxy sealer http://www.caswellplating.com/aids/epoxygas.htm
      This stuff works great, I have it in 2 tanks that were rusty. I should use it in my MNS tank but it is still rust-free.
      This stuff is very viscous (thick) so will seal the inside of the holes if you simply tape over them on the outside.
      Pat Kelly
      <p-lkelly@sbcglobal.net>

      1978 XS1100E (The Force)
      1980 XS1100LG (The Dark Side)
      2007 Dodge Ram 2500 quad-cab long-bed (Wifes ride)
      1999 Suburban (The Ship)
      1994 Dodge Spirit (Son #1)
      1968 F100 (Valentine)

      "No one is totally useless. They can always be used as a bad example"

      Comment


      • #4
        Pat,

        Thanks for the link. I bookmarked it as it does sound like something I would like to do this summer of stripping the whole tank down to bare metal for repair/repaint. But I am fairly sure that electrolysis will NOT play nice with the epoxy, so I better find a different temporary solution.
        -- Clint
        1979 XS1100F - bought for $500 in 1989

        Comment


        • #5
          Just a pinhole? Don't want to de-fume the tank so you can safely use a flame? What worked on my tank that grew a pinhole in that exact same place was this.
          Dump the gas out. Sand the area real shiny. Put a centrepunch in the dent and give the punch a fair rap with a medium-sized hammer.
          This puts a nice dent around the pinhole that you can fill with soft solder. Use lots of flux and a ~120 Watt electric soldering iron. Same dent-the-pinhole trick works if you use JBweld or epoxy.
          Fred Hill, S'toon
          XS11SG with Spirit of America sidecar
          "The Flying Pumpkin"

          Comment


          • #6
            If all you're trying to acheive is a temporary fix most auto parts stores carry a gas tank repair putty that can even be applied with gas in the tank. I have used it in the past with good results. Of course this was on cars where you couldn't see the tank or the patch, so it may not look to pretty on your bike tank where you can see it. Rick
            Rev.Rick

            What I ride now: 1980 XS1100 Special

            What I used to Ride: 1980 XS850, 1984 Honda V65 Sabre, 1974 Honda CB750 ss, Yamaha YZ 480 (bored YZ400), Kawasaki 500 triple

            Amazing Grace, how sweet the sound that saved a wretch like me! John Newton (1725-1807)

            Comment


            • #7
              I wouldn't use JB weld for too long. It will hold up for a while though. They also sell a fuel tank epoxy that holds up to fuel quite well.
              '81 XS1100 SH

              Melted to the ground during The Valley Fire

              Sep. 12th 2015

              RIP

              Comment


              • #8
                Originally posted by 81xsproject View Post
                I wouldn't use JB weld for too long. It will hold up for a while though. They also sell a fuel tank epoxy that holds up to fuel quite well.
                I have to agree. Caswell's tank sealer is the way to go. Do NOT bondo the hole of any size and use the Caswells stuff. The two things are not compatible and can cause your intake valves to foul terribly. I know this from experience. Also, the inside of the tank must be very clean and dry from the gasoline and any additives prior to the application.
                Skids (Sid Hansen)

                Down to one 1978 E. Stock air box with K&N filter, 81H pipes and carbs, 8500 feet elevation.

                Comment


                • #9
                  JB Weld (NOT JB Qwik Weld) will work OK on a pinhole. I've got a couple small holes patched with it that's held up for two years now with no leaks. Large holes are a different story. The gas tank repair putty works better for a quick fix, and holds up to gas better. The Caswell Plating liner kit is, IMHO, the best tank liner you can get, but you have to be careful with it - it sets up like iron. I think the best way to do it is to close the major holes (fuel meter and petcocks) with duct tape, and spray the bolts with WD-40 and screw them all the way in. The CP liner won't stick to the WDed bolts so they can be easily removed. If you do it right you'll have little phenol novolac epoxy 'towers' inside the tank that will really seal those bolt holes. If you opt not to use this method, make sure you clean all that stuff out of the threads on the bolt holes before it cures. On my first tank I didn't and let it harden in the threads. I thought "no big deal, I'll just tap the holes out." - famous last words. I wound up breaking a tap in a hole and scrapped the tank trying to get it out . Also, Caswell tells you the kit has enough material to do 2 five-gallon tanks. I don't believe it, and use an entire kit on a single tank. Pouring it into the tank is really a two person job, and you need a funnel with a piece of tubing stuck on the end (the tubing is to direct the flow of material). When you pour it in have someone else hold the funnel and pour while you direct the flow over the tunnel. For some reason it's really hard to get it to flow over the tunnel once the material is in the tank. Take your time 'flowing' it around in the tank, and make sure you are doing it in the appropriate temperature range. Too cold and it won't flow, too hot and it won't stick, just right (around 60-70 degrees) and you'll wind up with a first class bulletproof liner.
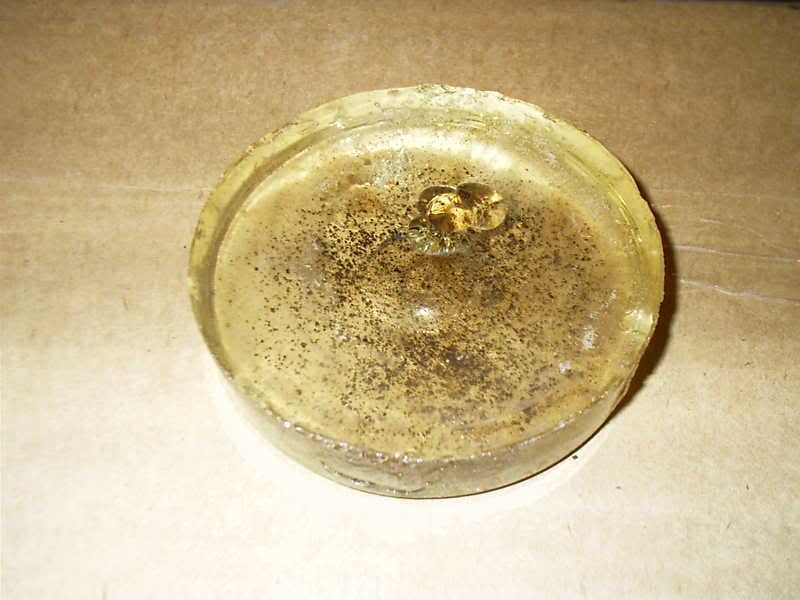
                  After an hour or so you'll need to open the holes (fuel meter and petcock) and let the excess out. I just set the tank on a plastic foot stool, put a couple plastic cups under the petcock holes, remove the tape from the petcock holes and let it drain. You'll wind up with a couple 'coasters' that look like this -

                  Last edited by dbeardslee; 01-22-2010, 12:48 PM.
                  I think I have a loose screw behind the handlebars.

                  '79 XS11 Standard, Jardine 4/1, Dyna DC1-1 Coils, 145 mains, 45 pilots, plastic floats - 25.7mm, XV920 fuel valves, inline fuel filters, speed bleeders, Mikes XS pods, spade-type fuse block, fork brace, progressive fork springs/shocks, manual petcocks, 750 FD, Venture cam chain tensioner, SS brake lines

                  Comment


                  • #10
                    Fred has the correct idea. I've soldered up more than one fuel tank in my time. The thing is, it will NOT leak if done correctly, and last the life of the tank. IF you have a large watt iron, it will be a small spot on the bottom of the tank, and you can just hit it with a spray can to keep it looking nice.
                    I would use the liner AFTER you clean it up next year, IF you have a lot of pin holes. If you only see a small spot, I would solder that up and NOT line the tank. That's just me, as I don't like to do anything that it doesn't really need.
                    Ray Matteis
                    KE6NHG
                    XS1100 E '78 (winter project)
                    XS1100 SF Bob Jones worked on it!

                    Comment


                    • #11
                      The thing I like about lining a tank is that it will stop deterioration/rust inside the tank. It's basically a tank inside a tank. If you just clean it up, you run the chance of problems reappearing in other locations. I totally agree with Ray - the liner should be the last thing you do to the tank, particularly if you're planning to use heat - unless you're planning to paint. Then the liner should go in before the paint goes on.

                      One other little issue on the standard tanks - the drain tube that runs inside the tank can also deteriorate. I had one rust through on mine, and whenever the gas level was above the hole it would drain the tank to the level of the hole. If you're drain hole is plugged I wouldn't recommend running wires and such through it - that's how I opened the hole in mine to begin with. That required fabricating another drain tube, which is a PITA. I've found that electrolysis can clear obstructions in the drain tube without damaging the tube. You can also just plug the end of the drain tube, but personally I don't want a tank with a non-functional drain tube. If you overfill it the gas will just lay around the filler neck - until you start moving. Then the wind will send it directly to your crotch. Maybe it's not an issue on your tank, but I thought I would mention it.

                      After you've got the tunnel coated with CP, and before you have poured it all into the tank, you might try standing the tank on it's tail, and make every attempt to get the material to flow over that tube to provide some protection there. JAT
                      I think I have a loose screw behind the handlebars.

                      '79 XS11 Standard, Jardine 4/1, Dyna DC1-1 Coils, 145 mains, 45 pilots, plastic floats - 25.7mm, XV920 fuel valves, inline fuel filters, speed bleeders, Mikes XS pods, spade-type fuse block, fork brace, progressive fork springs/shocks, manual petcocks, 750 FD, Venture cam chain tensioner, SS brake lines

                      Comment


                      • #12
                        Probably more on the way

                        Not to rain on anyone's parade, but I had just "one" hole in a fixer tank until I started pushing around the area lightly, with a screwdriver and voila, instantly creating more holes in all the soft metal. I would guess that there will be more holes soon. Try pushing lightly around the area with a screwdriver and if it feels soft,,,its time to use the Caswell's. Everyone would hate to see a flaming Xs1100 rider from a quick opening hole with gas leaking on the exhaust or electrical wires. 3Phase, xs member, told me of a Harley tank that leaked on a couple and they both were burnt to a crisp from the same, only a little hole fixed leak. Maybe fix the one hole but be careful from riding it too much,,Good Luck,,, Mike in rainy, Sun Diego
                        mike
                        1982 xj1100 maxim
                        1981 venture bagger
                        1999 Kawi Nomad 1500 greenie
                        1959 wife

                        Comment


                        • #13
                          Good point! NOT going up in flames is a definite priority. That is one reason I intend to sand the paint away from the pin hole before I repair it. I will be certain of the surrounding metal before I fix the thing.

                          Because I don't have a large iron (I think a 35W iron is the biggest I have, not counting my digital electronics iron), I will probably go with the gas tank repair JB Weld product. It only has to last for about 5 or so months before it is getting the full strip/repair/pain treatment.
                          -- Clint
                          1979 XS1100F - bought for $500 in 1989

                          Comment


                          • #14
                            Permatex makes the tank repair epoxy putty. You can get it in almost any autoparts store.
                            I think I have a loose screw behind the handlebars.

                            '79 XS11 Standard, Jardine 4/1, Dyna DC1-1 Coils, 145 mains, 45 pilots, plastic floats - 25.7mm, XV920 fuel valves, inline fuel filters, speed bleeders, Mikes XS pods, spade-type fuse block, fork brace, progressive fork springs/shocks, manual petcocks, 750 FD, Venture cam chain tensioner, SS brake lines

                            Comment


                            • #15
                              Nice write up on the tank liner and the process!
                              -- Clint
                              1979 XS1100F - bought for $500 in 1989

                              Comment

                              Working...
                              X