Announcement

Collapse
No announcement yet.

Crimping the 90 degree fuseblock connectors, what's the Trick?

Collapse
X
 
  • Filter
  • Time
  • Show
Clear All
new posts

  • Crimping the 90 degree fuseblock connectors, what's the Trick?

    Hey there folks,

    I was recently contacted by a fellow XSive that got one of the new fuseblocks with the insulated 90 degree connectors set. But he's having trouble crimping the connector onto the wires without destroying/mangling up the connector? I just tried it myself, and that plastic insulation is guerilla tough!! My el cheapo wire crimper tool with 3 crimping sizes would not give me enough leverage to adequately crimp the wire SNUGLY into the connector! I tried trimming off the insulation to reveal the bare metal, but it still didn't seem to work right!? :Confused:

    I've seen several examples of folks who have gotten and used these new connectors, what is trick in getting them properly crimped? Did you use some large channel locks instead!?

    If these connectors are too difficult to work with, then I might NOT provide them afterall, but would like to see/hear some feedback on how folks installed them! Thanks for both me and the "other" xsive...kept anonymous.
    T.C.
    T. C. Gresham
    81SH "Godzilla" . . .1179cc super-rat.
    79SF "The Teacher" . . .basket case!
    History shows again and again,
    How nature points out the folly of men!

  • #2
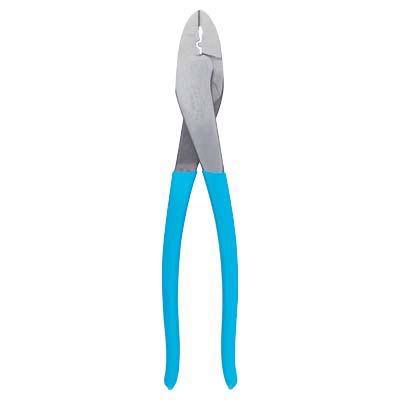
    Need big channel locks

    Hey T.C. thanks for the boxes. I used big channel locks and squeezed the connectors at an angle to gain some leverage on the metal. It works but does require a lot of power,,,it helps to grab the channel locks at the end, bottom, to also gain more leverage. It also is good to strip off 1 inch of insulation and double the wire to fit more snugly into the connector and then squeeze the metal. I did not have any trouble breaking the connectors but, yes, channel locks or big pliers is the trick, along with doubling the wire, if it is the smaller gauge. The Main fuse is a heavier 30 amp wire so I just stripped one half inch and it slid it fine.......The plastic connectors worked fine for me, thanks, Mike in Sun Diego
    mike
    1982 xj1100 maxim
    1981 venture bagger
    1999 Kawi Nomad 1500 greenie
    1959 wife

    Comment


    • #3
      I don't have TC's connectors, but I just rewired my fuseblock with Radio Shack crimp-on flag-connectors. I used a medium size channel lock to crimp them, but part of the battle is using the right size flags. I used three 14-18 gauge connectors, and five 18-22 gauge - Radio Shack part # 64-3088 comes with three of each so two packs will do it. That way the wire fills up the 'hole' more completely and the end result is a better crimp. I also got rid of the PO's previous splices for individual spade connectors and crimped the factory wires to the connectors - I got several tenths of a volt more juice at the TCI for my trouble. One other little FYI on this mod also - put several 1/4" washers between the bottom of the fuse block and the mounting plate to bring it out a little. This will give a little more room to route the wires, and keeps them from rubbing on the relatively sharp metal edge where they pass through the mounting plate.
      Last edited by dbeardslee; 06-09-2009, 07:05 AM.
      I think I have a loose screw behind the handlebars.

      '79 XS11 Standard, Jardine 4/1, Dyna DC1-1 Coils, 145 mains, 45 pilots, plastic floats - 25.7mm, XV920 fuel valves, inline fuel filters, speed bleeders, Mikes XS pods, spade-type fuse block, fork brace, progressive fork springs/shocks, manual petcocks, 750 FD, Venture cam chain tensioner, SS brake lines

      Comment


      • #4
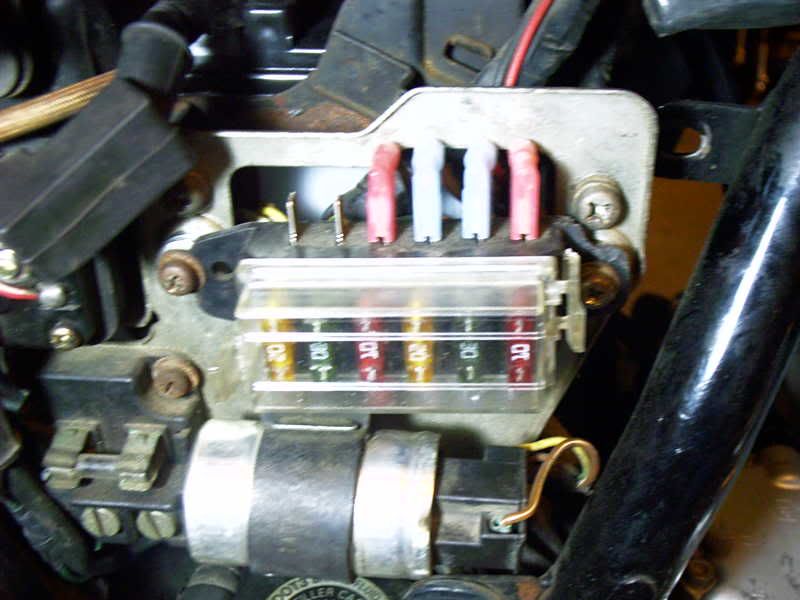
        I don't know if this photo will be of any help but this is how the Yamaha mechanic installed mine.


        Good luck with yours,

        Don
        currently own;
        1980 Yamaha XS1100 SG
        2009 Yamaha Star Raider

        Comment


        • #5
          I also used the ones from radio shack without any trouble.I also got a good crimping tool that i bought years ago when i became an electrician.good luck with your fuse blocks....Thanks again T.C for the fuse block they work so good
          1978 xs1100 e

          Comment


          • #6
            Channel-Lock Crimper

            Before I got the Channel-lock crimper I used needle-nose vice grips to crimp the 90 degree connectors on my MikesXS coils . I think the OEM type channel-lock crimper would be better but I didnt have it then . I have always wondered if this would hold up and stand the test of time as they didnt seem to hold the wire very well . Any job I've done with the Channel-Lock crimper has been bullet-proof even though it is easy to crush and break the connector with these powerful pliers .
            XJ1100K
            Avon rubber
            MikesXS black coils
            Iridium plugs w/ 1k caps
            MikesXS front master
            Paragon SS brake lines (unlinked)
            Loud Horns (Stebel/Fiamm)
            Progressive fork springs
            CIBIE headlight reflector
            YICS Eliminator

            Comment


            • #7
              I have one the has a red dot, yellow dot, and blue dot. Dont remember where I got them, but they look just like these. After about 30 crimps your hand will get tired.

              http://www.ferrulesdirect.com/terminal/1006/FD1006N.htm
              Getty

              1980 SG

              Comment


              • #8
                Channel-Lock Crimper

                XJ1100K
                Avon rubber
                MikesXS black coils
                Iridium plugs w/ 1k caps
                MikesXS front master
                Paragon SS brake lines (unlinked)
                Loud Horns (Stebel/Fiamm)
                Progressive fork springs
                CIBIE headlight reflector
                YICS Eliminator

                Comment


                • #9
                  Hi TC,
                  us old farts don't believe in crimp connectors. (OK the expensive ones on aircraft work fine with the $50 crimping tool but not the el-cheapo connectors and sheetmetal crimpers from Harbor Freight) First put a shrink sleeve on the wire then strip the plastic off the connector and solder it on then slide the sleeve over the soldered joint and take the heat gun to it.
                  Fred Hill, S'toon
                  XS11SG with Spirit of America sidecar
                  "The Flying Pumpkin"

                  Comment


                  • #10
                    Thank you, Fred. I was wondering how long this was going to go. That's exactly how I do it. Every 'crimp' connector gets soldered & wrapped.

                    Comment


                    • #11
                      Here's what mine looks like. I thought about solder, but every stock connection I've replaced so far was only crimped to the wire. I figured those lasted 30 years, so I kept it simple.

                      I think I have a loose screw behind the handlebars.

                      '79 XS11 Standard, Jardine 4/1, Dyna DC1-1 Coils, 145 mains, 45 pilots, plastic floats - 25.7mm, XV920 fuel valves, inline fuel filters, speed bleeders, Mikes XS pods, spade-type fuse block, fork brace, progressive fork springs/shocks, manual petcocks, 750 FD, Venture cam chain tensioner, SS brake lines

                      Comment


                      • #12
                        I'm with Fred and Randy on this. Soldering the joint never hurt a thing, and it can only help so why not. My 90 degree connectors did not have the fancy plastic over them so I cut a piece of shrink wrap to go over the verticle part, shrunk that on, then cut another piece over the wire, solder the wire into the sleeve, slid the shrink wrap up with a slit in it to slide over the verticle part of the connector and heated it. Then wrapped it with electrical tape for good measure. Not that pretty looking perhaps due to the e-tape but worked for me anyway.
                        Life is what happens while your planning everything else!

                        When your work speaks for itself, don't interrupt.

                        81 XS1100 Special - Humpty Dumpty
                        80 XS1100 Special - Project Resurrection


                        Previously owned
                        93 GSX600F
                        80 XS1100 Special - Ruby
                        81 XS1100 Special
                        81 CB750 C
                        80 CB750 C
                        78 XS750

                        Comment


                        • #13
                          I have to go with the "the originals are crimp on, so why not use them now" crowd. I've got crimp on connectors on my 400 that I crimped on over 20 years ago that still work like new. I have also had ones that didn't work 10 minutes after I did them. It's all about the crimper. I used to have a really good professional quality crimper (it was like $25 or so) and it seemed to always work, but one of my kids borrowed it and I never saw it again. Now I have a cheap one that works if I do everything just right, but with the few that I do now, I can't make myself buy another good one.
                          Cy

                          1980 XS1100G (Brutus) w/81H Engine
                          Duplicolor Mirage Paint Job (Purple/Green)
                          Vetter Windjammer IV
                          Vetter hard bags & Trunk
                          OEM Luggage Rack
                          Jardine Spaghetti 4-2 exhaust system
                          Spade Fuse Box
                          Turn Signal Auto Cancel Mod
                          750 FD Mod
                          TC Spin on Oil Filter Adapter (temp removed)
                          XJ1100 Front Footpegs
                          XJ1100 Shocks

                          I was always taught to respect my elders, but it keeps getting harder to find one.

                          Comment


                          • #14
                            I solder every permanent connection.
                            Crimped connections will oxidize unless they are gas tight.
                            XS1100SF
                            XS1100F

                            Comment


                            • #15
                              With the insulated flag connectors I think you'd run into problems trying to solder them unless you cut the insulation on the connector. The insulation on the wire actually goes past the plastic on the connector, so how would you get down there to where the connection is to solder it? I don't know which type flags (insulated or non) TC supplies with the blocks, but I assume they're the insulated variety. Then again I remember how you spell assume .
                              I think I have a loose screw behind the handlebars.

                              '79 XS11 Standard, Jardine 4/1, Dyna DC1-1 Coils, 145 mains, 45 pilots, plastic floats - 25.7mm, XV920 fuel valves, inline fuel filters, speed bleeders, Mikes XS pods, spade-type fuse block, fork brace, progressive fork springs/shocks, manual petcocks, 750 FD, Venture cam chain tensioner, SS brake lines

                              Comment

                              Working...
                              X