Announcement

Collapse
No announcement yet.

Ultimate pickup coil wire fix

Collapse
X
 
  • Filter
  • Time
  • Show
Clear All
new posts

  • Ultimate pickup coil wire fix

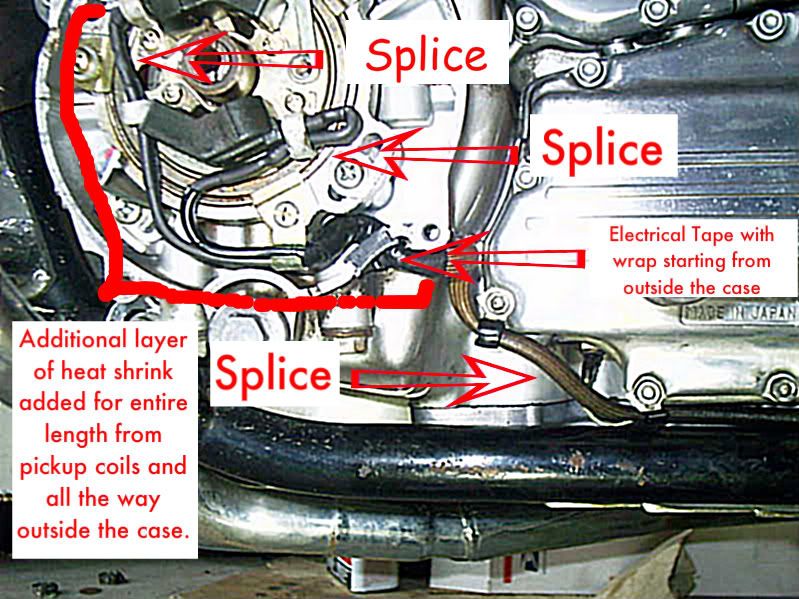
    So I just finished tracking down an intermittent problem with my pickup coil wires. They had been fixed at least twice before, and it was a real PITA trying to diagnose the problem. When I fixed the wires, I did it so I won't have to do it again. I took the pickup coil assembly completely out, marked the location of the wires and cut them all. Then with the piece in front of me where I could really work on it well, I unsoldered the short connections to the pickup coils and resoldered long test lead wires in four different colors. Then I put a long piece (3" or so) of heat shrink over the connections. Then I took a larger piece of heat shrink and encased both wires for each pickup coil all the way outside the case. I peeled the fabric sheathing back from the wires under the transmission case and secured it with a twist tie to hold it in place. Then I cut the wires before the original yamaha splice, slid some more heat shrink onto the wires, grafted in my new wires cut to the appropriate length, and applied heat shrink. Then I pulled the fabric sheathing back up over the wires, and wrapped it with electrical tape starting on the outside and working in.

    The thing I like about this setup is that I don't have four thin wires bending all over the place under the timing cover - I've got two with very heavy insulation over them. This should provide protection should they ever get up against the timing wheel or rub internally. My solder connections are all immobilized with the clips, so the only thing that moves is the test lead wires. Even that has such thick insulation on it that it won't allow the wires to make sharp bends which could break the wires internally. Besides, it just looks pretty. Here's a pic -

    I think I have a loose screw behind the handlebars.

    '79 XS11 Standard, Jardine 4/1, Dyna DC1-1 Coils, 145 mains, 45 pilots, plastic floats - 25.7mm, XV920 fuel valves, inline fuel filters, speed bleeders, Mikes XS pods, spade-type fuse block, fork brace, progressive fork springs/shocks, manual petcocks, 750 FD, Venture cam chain tensioner, SS brake lines

  • #2
    Nice work.I just finished the carbs on my 78E and I think I may need to look at the pickup coil wires now.I will have to copy a pic of that so I can take it out in the garage for reference.Thanks .This is what I love about this site,someone is always coming up with a better way to do things.
    Ride safe.Rick
    80 SG XS1100
    14 Victory Cross Country

    Comment


    • #3
      It all looks very tidy, but my first thought is that if the wires are too rigid, the vac advance will not be able to overcome the rigid wires. My second thought is that if all the flex motion is constrained to a shorter, confined section of wire, it will shorten the life vs have the flex spread out over more wire. Not trying to nay say all your hard work. I didn't think about it until I was done, but I used much thicker test lead line. Once I was done and thought about it I was worried that it would be too stiff, but it seemed to work okay. One thing I have thought of since is that video game controller wire would be a much cheaper source of flex wire that test leads.
      '81 XS1100 SH

      Melted to the ground during The Valley Fire

      Sep. 12th 2015

      RIP

      Comment


      • #4
        You don't think that the stiffness of the extra insulation might effect the rotation of the backing plate?

        Looks good...I'm just posing the question out of curiosity...not criticising.
        Guy

        '78E

        Quidquid latine dictum sit, altum videtur

        Comment


        • #5
          You gotta be fast here or someone will beat you to the post!
          Guy

          '78E

          Quidquid latine dictum sit, altum videtur

          Comment


          • #6
            It looks stiffer in the picture than it is - It's about the thickness and stiffness of a lamp cord. I used relatively light weight heat shrink, and I made sure I adjusted the length with the advance in mind. I had to retime anyway after taking the assembly off and the advance was working fine. It keeps the wires away from the timing wheel too. I've seen two bikes in the past two weeks with pickup coil wires contacting the timing wheel and it rubbed through the wires on both of them. The multiple layers of heat shrink should also provide better protection from air and moisture. Two of the wires I took off had problems right at the solder connection. I made sure I immobilized those parts of the wire as it seems to be the weak link.
            Last edited by dbeardslee; 05-25-2009, 09:26 PM.
            I think I have a loose screw behind the handlebars.

            '79 XS11 Standard, Jardine 4/1, Dyna DC1-1 Coils, 145 mains, 45 pilots, plastic floats - 25.7mm, XV920 fuel valves, inline fuel filters, speed bleeders, Mikes XS pods, spade-type fuse block, fork brace, progressive fork springs/shocks, manual petcocks, 750 FD, Venture cam chain tensioner, SS brake lines

            Comment


            • #7
              Having just done mine in a similar fashion this weekend I had the same thoughts. I used shrink wrap over the soldered joins and then out of the case to for extra protection. Watching the mechanism work it was actually pretty darn clean. I thought it might stress the old wires rather than the new. I was mostly concerned it might stress the joins. I think it will be just fine. BUT if I have a problem I know where I'll go right away!
              Bothell, WA
              1980 XS1100SG

              Comment


              • #8
                I've checked it several times in the last couple days, and this fix is working great. The advance moves the coils in a counter-clockwise direction, so you can see by the picture how the wires move. My advice with the heatshrink is to make sure you keep both wires side by side - don't let them twist around each other - so when you shrink the tubing you wind up with wires that are flat rather than round. Again, like a lamp cord.

                When I mounted the wires on the ATU, I had not yet soldered them into the harness. I put them in place and moved the advance with my fingers to make sure of the movement of the wires. When I had them where I wanted them, then I crimped the clamps on them, and then I cut them to length and soldered them into the harness. I have a high level of confidence in this fix, and it looks like it will last a long time - we'll see .

                Jessie - I like the idea of the game controller wire - should be the perfect stuff. I used medium sized test lead wire on mine, but the game controller stuff sounds even better. Where can you buy it? I hope you don't have to buy the whole controller and cut it off. Then again, I've got a nephew who's always leaving his toys around, so... .
                Last edited by dbeardslee; 05-27-2009, 06:00 AM.
                I think I have a loose screw behind the handlebars.

                '79 XS11 Standard, Jardine 4/1, Dyna DC1-1 Coils, 145 mains, 45 pilots, plastic floats - 25.7mm, XV920 fuel valves, inline fuel filters, speed bleeders, Mikes XS pods, spade-type fuse block, fork brace, progressive fork springs/shocks, manual petcocks, 750 FD, Venture cam chain tensioner, SS brake lines

                Comment


                • #9
                  Having a brother who is big on video games and a 12 yr old son, I have seen my share of controllers. I am certain that nayone who plays these thigns much has an old controller they no longer use because it no longer works. I've never checked if the issue is in the wire or the buttons or where, but I know they fail. For that reason alone, I would hesitate to trust that wire on ym bike. JMHO.
                  Life is what happens while your planning everything else!

                  When your work speaks for itself, don't interrupt.

                  81 XS1100 Special - Humpty Dumpty
                  80 XS1100 Special - Project Resurrection


                  Previously owned
                  93 GSX600F
                  80 XS1100 Special - Ruby
                  81 XS1100 Special
                  81 CB750 C
                  80 CB750 C
                  78 XS750

                  Comment


                  • #10
                    Don - You wouldn't happen to have one of those old controllers around, would you? I'd like to see the wire - wasn't planning to use the whole controller, so if it's broke, that's OK . You'd think with the way most kids treat toys they would make them out of pretty tough stuff. Then again, they do have repeat business to consider. I figure it's worth taking a look at.
                    I think I have a loose screw behind the handlebars.

                    '79 XS11 Standard, Jardine 4/1, Dyna DC1-1 Coils, 145 mains, 45 pilots, plastic floats - 25.7mm, XV920 fuel valves, inline fuel filters, speed bleeders, Mikes XS pods, spade-type fuse block, fork brace, progressive fork springs/shocks, manual petcocks, 750 FD, Venture cam chain tensioner, SS brake lines

                    Comment


                    • #11
                      I have quite a collection of old electronics and their associated wires stashed in the basement. I'll check and see if I'm sitting on something that might have some good donor wires.
                      I know this, because Tyler knows this.

                      1980 SG
                      3J6 003509
                      Kerker 4-1 (sans baffles)
                      Fuse Block Upgrade
                      Mike's XS Green Coils
                      Pods w/Homemade Velocity Stacks

                      Comment


                      • #12
                        JAT, but those wires from the game controllers probably won't take the heat.

                        Comment

                        Working...
                        X