Announcement

Collapse
No announcement yet.

Quick, cheap, easy badge refinishing

Collapse
X
 
  • Filter
  • Time
  • Show
Clear All
new posts

  • Quick, cheap, easy badge refinishing

    So in my ongoing quest to find new things to monkey around with on Betsy, I decided her badges need a little attention. I have an XS Eleven badge with one of the posts broken off, so I thought it would be a good one to practice on. One shot and I nailed it on the first try. Here's the story.

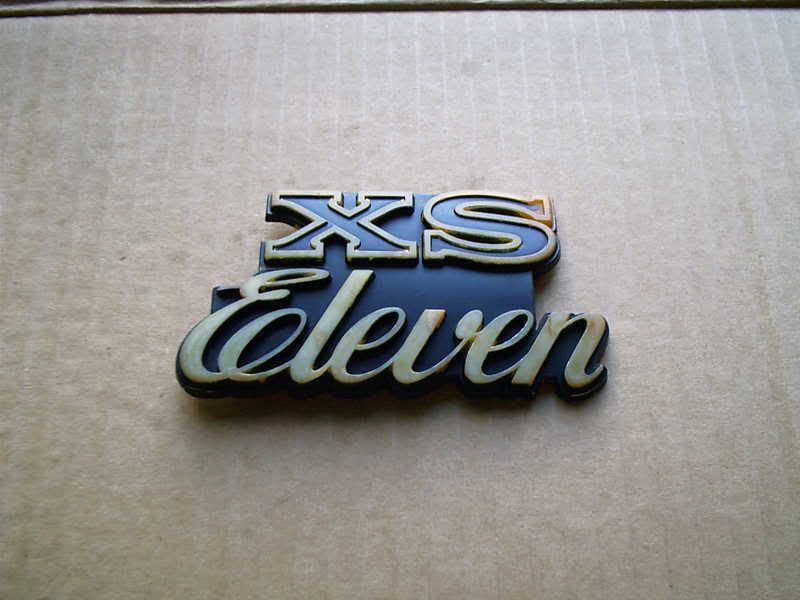
    First, here's the condition of the badge after sanding off all the old gold, and scrubbing and degreasing with Simple Green:
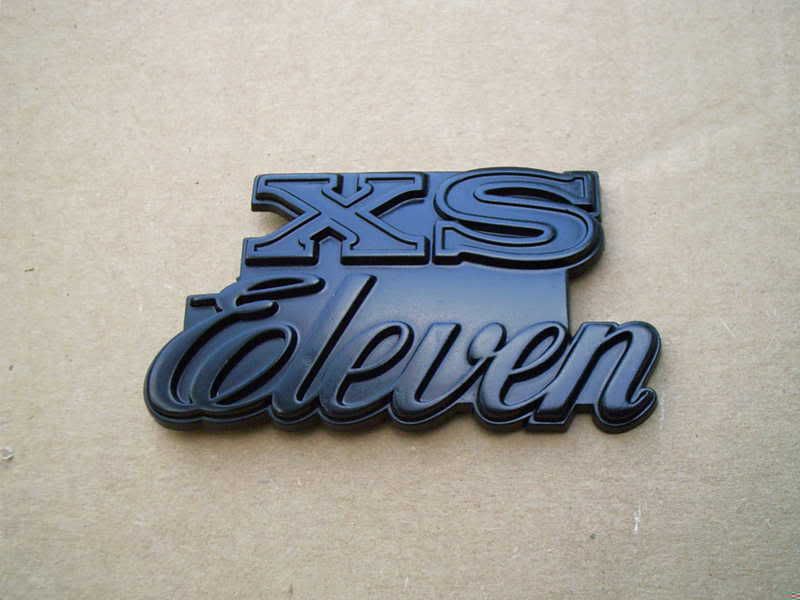
    Next I spray painted the whole thing with Rust-oleum Universal Satin All-Surface Paint (plastic is listed specifically on the can as a surface that this material is compatible with):
    I let it dry for 24 hours, and using a small foam brush applied Liquid Leaf Renaissance Gold (available for $5.99 at Ace Hardware) to the raised portions of the letters. You want to be careful not to get too much paint on the foam, or it will drip down between the letters. This is after one coat of Liquid Leaf:
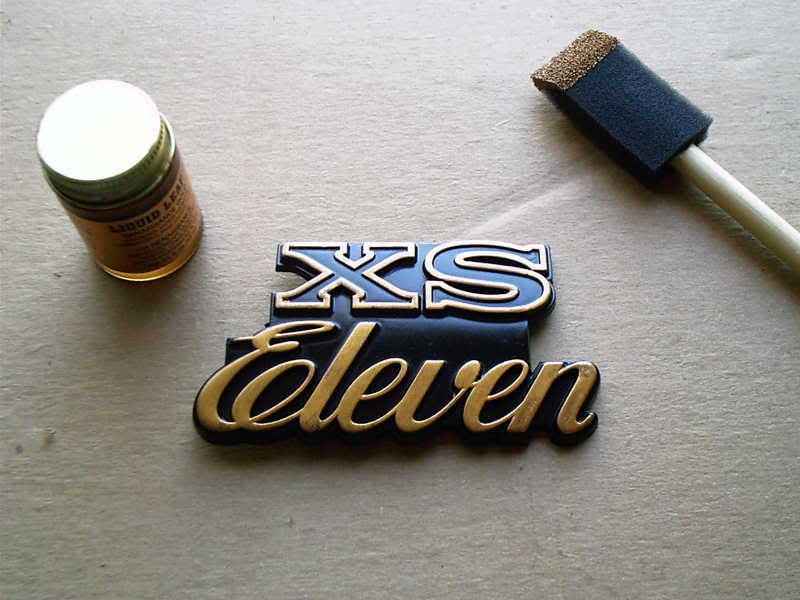

    Note that this is only one coat of Liquid Leaf. A second coat is in order, but I was so pleased with the results from the foam brush that I had to post. You could probably get it to cover in one coat, but as this was only a test piece I didn't worry too much about minor imperfections. It is as, after all, a proof-of-concept, but I will put a second coat of Liquid Leaf and finish with a clear coat to seal it before I try any of my 'good' pieces. Total time expended so far was about 20 minutes. Materials cost less than $20 (Simple Green, Rust-oleum, Liquid Leaf, Xylene to clean-up the Liquid Leaf, and a small foam brush).
    Last edited by dbeardslee; 09-28-2008, 11:16 AM.
    I think I have a loose screw behind the handlebars.

    '79 XS11 Standard, Jardine 4/1, Dyna DC1-1 Coils, 145 mains, 45 pilots, plastic floats - 25.7mm, XV920 fuel valves, inline fuel filters, speed bleeders, Mikes XS pods, spade-type fuse block, fork brace, progressive fork springs/shocks, manual petcocks, 750 FD, Venture cam chain tensioner, SS brake lines

  • #2
    Nice work, gotta love them plastic paints.


    Any info on the UV resistance of that stuff?
    Last edited by ClarkGriswald; 09-28-2008, 12:24 PM.
    XS1100 F/G (79 Bike/80 Motor)
    Grab a tetanus shot and jump on!!!

    Comment


    • #3
      looks good

      I"ll try that to. Is that gold leaf in the paint section at ACE?

      Comment


      • #4
        Clark - I checked the can and it doesn't mention uv. It's Rust-oleum though, so it should be fine. My main concern was getting a paint that is formulated to adhere to plastic. I wasn't so concerned about the Liquid Leaf, as it only has to adhere to the Rust-oleum.

        dbwill - If I was a real estate agent I would list the location of the Liquid Leaf in Ace as 'Paint Section Near'. It was in the same isle as the small rattle cans of krylon. More or less in the paint section. There was some craft stuff in that isle too, but your local Ace may be layed out differently.

        Be thee aware, if you use the Liquid Leaf you need to put a clear coat sealer over the top. Liquid Leaf has copper in it, so if it isn't sealed it will tarnish.

        The big news out of this operation was, for me, how well a foam brush works to apply the lettering. If you put too much paint on the brush and do get some small drips in corners, or where ever, not to worry. Spray a little of the black into a cup and use a small artist's brush to touch up. A lot of different materials would probably work, but doing the lettering with the foam brush is what makes it quick and easy.

        For my next trick I'm going to try one of my tank badges that are bent and have chunks missing and see what I can do with a heat gun, JB Weld, a dremel tool, a file, and the above process. I plan to first heat the piece to bend it back into it's original shape, then v-notch any cracks and JB Weld. Once I have the piece back in it's original shape with all cracks covered I am going to try using JB Weld to fabricate the missing parts. Wish me luck.
        Last edited by dbeardslee; 09-28-2008, 02:32 PM.
        I think I have a loose screw behind the handlebars.

        '79 XS11 Standard, Jardine 4/1, Dyna DC1-1 Coils, 145 mains, 45 pilots, plastic floats - 25.7mm, XV920 fuel valves, inline fuel filters, speed bleeders, Mikes XS pods, spade-type fuse block, fork brace, progressive fork springs/shocks, manual petcocks, 750 FD, Venture cam chain tensioner, SS brake lines

        Comment


        • #5
          Man that looks cool i have to try that to my midnight special.Looks like a new one and a whole lot cheaper too.
          Edward / Tn

          Comment


          • #6
            Well done Doug, you said it looked good, and you were right. Hey sorry I had to bail early on our little excursion into the rural roads of southwest Ohio, but it appears that either my mother in law has had a serious panic attack or a TIA (AKA a mini stroke). looks like everything is going to be alright, but she's being checked out thoroughly just to be safe. She's been under a massive amount of stress lately, she broke her wrist in June, had to have surgery to fix it, has nerve damage, had to put my father in law in a nursing home a couple weeks ago, it's been a real peach around here lately. We (the wife, kids and I) have been trying to help with whatever we can, but it's still been really tough on her. Anyway, I really enjoyed the ride, short though it was, we'll have to get together and ride again. Oh and the badge looks righteous man, fine job all the way around. I drop a dime after a bit, be good, have a nice day and ride safe
            I am the Lorax, I speak for the Trees

            '80 XS1100 SG (It's Evil, Wicked, Mean & Nasty)

            '79 XS1100 F R (IL Barrachino)

            '00 Suzuki Intruder 1400 (La Soccola)

            '77 KZ400s (La Putana)

            Comment


            • #7
              Well done! That looks a lot less tedious than the way I did it when I refinished my emblems .
              Ken Talbot

              Comment


              • #8
                kf4bxd said:
                Looks like a new one and a whole lot cheaper too.
                Somebody said it - poverty is the mother of invention .

                I put the second coat of Liquid Leaf on, and touched up a few small areas. I'm going to give it 24 hours to dry before clearing it. Here's a few things I should pass along.

                1. Make sure that the lettering is sanded down to the plastic. Sand lightly - it's soft stuff. Make sure the surface is clean and degreased - and afterwards don't touch the surface of the work until the entire job is done and cured.
                2. The initial spray coat can be recoated after an hour or so. I got it in one coat but it's a spray, so unless you're a good sprayer two lighter coats would probably be best.
                3. Allow 24 hours for spray coats to cure.
                4. When using the Liquid Leaf, what worked well for me was to shake vigorously, and immediately pour a small amount in the cap. Use the cap to load your foam brush.
                5. It doesn't take much of this stuff to cover so don't get too much on the foam brush. Just dip it in the paint and squeegee it off good on the edge of the cap.
                6. Use short strokes, VERY LIGHT PRESSURE, and brush such that the foam is always across at least two letter parts, if you follow that. The beauty of the foam brush is that it isn't as prone to dipping down between the cracks like a regular brush would. By straddling the 'cracks' with it, you make it less likely that an edge of the brush will dip down and hit something you don't want gold.
                7. Allow the first coat to dry 24 hours before applying the second coat.
                8. After the second coat has been applied, and it's satisfactory, wait one hour.
                9. In a small medicine cup, point the nozzle into the cup and use a small piece of cardboard to cover as much of the cup as you can. This will keep the overspray down, as well as keeping you from looking like Al Jolson. Pull the trigger and give it maybe a five second burst in the cup.
                10. Use the smallest artist paint brush you can find, dip it in the cup, squeegee it good on the side of the cup (doesn't take much of this stuff either), and touch up any drips. This is a problem primarily on inside corners. Point the tip of the brush towards the corner holding it close to the piece that you are working on and kind of slide the tip into the corner. It just has to touch it a few times to change the color. Don't go nuts on touch-up. Most people aren't going to stick their nose right on your badges, so if it looks good from a foot or two away, it's good. The more you touch-up, the more likely you are to get into the gold, which is MUCH more noticeable and harder to fix.
                11. Wait another 24 hours and clear coat the whole thing.

                P.S. We must have been typing at the same time.

                Lorax - Glad all is well, and I really enjoyed our ride. Dad used to always say 'once you reach bottom, the only way you can go is up.' Of course he also used to say 'things are never so bad that they can't get worse.' This might sound weird in polite society, but given the preceding lines, lets hope your at the bottom .

                Ken - You were my inspiration. You're probably a lot more patient with a tiny little brush than I am too. I've got a small pile of these things sitting in the garage, so I was highly motivated to find a shortcut.
                Last edited by dbeardslee; 09-28-2008, 05:33 PM.
                I think I have a loose screw behind the handlebars.

                '79 XS11 Standard, Jardine 4/1, Dyna DC1-1 Coils, 145 mains, 45 pilots, plastic floats - 25.7mm, XV920 fuel valves, inline fuel filters, speed bleeders, Mikes XS pods, spade-type fuse block, fork brace, progressive fork springs/shocks, manual petcocks, 750 FD, Venture cam chain tensioner, SS brake lines

                Comment


                • #9
                  Very nice job db. That looks great, I'm going to try it. If I can do, you can safely say anyone can.
                  1979XS1100SF
                  K&N's and drilled airbox
                  Jardine 4in1
                  Dunlop Elite 3's
                  JBM slide diaphragms
                  142.5 main jets
                  45 pilot jets
                  T.C.'s fusebox & SOFA
                  750/850 FD mod.
                  XV 920 Needle Mod.
                  Mike's XS plastic floats set at 26mm
                  Venture Cam Chain Tensioner

                  Comment


                  • #10
                    Hey, thanks for the thoughts Doug, appreciate it a bunch. again, hopefully, we can get another ride scheduled before the season ends, hell, maybe we can get some others to come along for the ride. there does appear to be a fair number of us here in SW OH. could be fun. have a nice day and ride safe
                    I am the Lorax, I speak for the Trees

                    '80 XS1100 SG (It's Evil, Wicked, Mean & Nasty)

                    '79 XS1100 F R (IL Barrachino)

                    '00 Suzuki Intruder 1400 (La Soccola)

                    '77 KZ400s (La Putana)

                    Comment


                    • #11
                      One additional note on spraying. Never point the nozzle directly at the work and pull the trigger. Pull the trigger with it pointing to one side, pull across the target, and release the trigger on the other side. Some sprayers have a nasty habit of developing a little drip, right at the end of the nozzle. When you first pull the trigger that drip can go flying, and if it hits your work it doesn't look good. You could also have a little air in the line that may cause it to spit when you first trigger it. Always keep it moving. If you stop for a second with the trigger engaged, you're gonna get drips. For those of you who already knew this (probably most of you), just consider this a message from the Department of Redundency Department .

                      Lorax - Again we were typing at the same time. When last we left the caped avenger, it seems like there were six or seven of us here in the same area. I know there's six for sure, and I know five of you. I still want to crash the Harley party at Aces and Eights with a bunch of XS's, but they're about through for the year. Still plenty of good riding weather left though, and your good company on the road. Maybe the Cincinnati area owners (and anyone else who happens to be in the neighborhood) should start thinking about a little fall color run.
                      Last edited by dbeardslee; 09-28-2008, 07:24 PM.
                      I think I have a loose screw behind the handlebars.

                      '79 XS11 Standard, Jardine 4/1, Dyna DC1-1 Coils, 145 mains, 45 pilots, plastic floats - 25.7mm, XV920 fuel valves, inline fuel filters, speed bleeders, Mikes XS pods, spade-type fuse block, fork brace, progressive fork springs/shocks, manual petcocks, 750 FD, Venture cam chain tensioner, SS brake lines

                      Comment


                      • #12
                        I'm definitely down with the sickness my brother, drop a few dimes, it could be a blast. either party crashing or just out for a blast through trees, I'm there. a good time should definitely had by all. have a nice day and ride safe
                        I am the Lorax, I speak for the Trees

                        '80 XS1100 SG (It's Evil, Wicked, Mean & Nasty)

                        '79 XS1100 F R (IL Barrachino)

                        '00 Suzuki Intruder 1400 (La Soccola)

                        '77 KZ400s (La Putana)

                        Comment


                        • #13
                          Lorax - I'll start the cogitation process.
                          I think I have a loose screw behind the handlebars.

                          '79 XS11 Standard, Jardine 4/1, Dyna DC1-1 Coils, 145 mains, 45 pilots, plastic floats - 25.7mm, XV920 fuel valves, inline fuel filters, speed bleeders, Mikes XS pods, spade-type fuse block, fork brace, progressive fork springs/shocks, manual petcocks, 750 FD, Venture cam chain tensioner, SS brake lines

                          Comment


                          • #14
                            http://www.xs11.com/forum/showthread...threadid=14008
                            1985 Yamaha VMX12n "Max X" - Stock
                            1982 Honda XL500r "Big Red" - Stump Puller. Unknown mileage.
                            1974-78 Honda XL350 hybrid - The thumper that revs. Unknown miles.
                            1974 Suzuki TC/TS125 hybrid. Trials with trail gear. Invaluable. Unknown miles.
                            1971 Honda CL350. For Dad. Newtronic Electronic Ign. Reliable. Unknown miles.

                            Formerly:
                            1982 XS650
                            1980 XS1100g
                            1979 XS1100sf
                            1978 XS1100e donor

                            Comment


                            • #15
                              ae7f - Sounds like someone had the same basic idea last year. Sounds like the main concern was the color fading. Time will tell. I try not to park in the sun if I can keep from it, as it's also bad for the vinyl, so hopefully that will help.

                              I picked up the rust-oleum for two reasons. It was compatible with the surface, and rust-oleum makes a lot of paints for outdoor applications so I figured it was worth a shot. The Liquid Leaf gets its color from copper, so assuming it's properly sealed, that shouldn't change color.

                              I just finished putting on the last clear coat. I just used a craft and hobby enamel, so if anything fails it'll probably be the clear. An automotive clear would probably be a better choice.

                              It's easy enough to find out if the materials are up to the task. I just finished a part that I don't really need right this second. I can put it someplace where it will get lots of sun and monitor it's deterioration, or lack there of.

                              BTW - what did you wind up doing with your badges?
                              Last edited by dbeardslee; 09-28-2008, 09:41 PM.
                              I think I have a loose screw behind the handlebars.

                              '79 XS11 Standard, Jardine 4/1, Dyna DC1-1 Coils, 145 mains, 45 pilots, plastic floats - 25.7mm, XV920 fuel valves, inline fuel filters, speed bleeders, Mikes XS pods, spade-type fuse block, fork brace, progressive fork springs/shocks, manual petcocks, 750 FD, Venture cam chain tensioner, SS brake lines

                              Comment

                              Working...
                              X