A cautionary tale about keeping that cam chain maintained:
Cam Chain Tensioner maintenance
Collapse
X
-
Exactly why I unloaded the 'automatic' adjuster awhile back after I found evidence that the plunger was being compressed back into the body under the reverse chain tension that occurs when closing the throtle at high RPM.
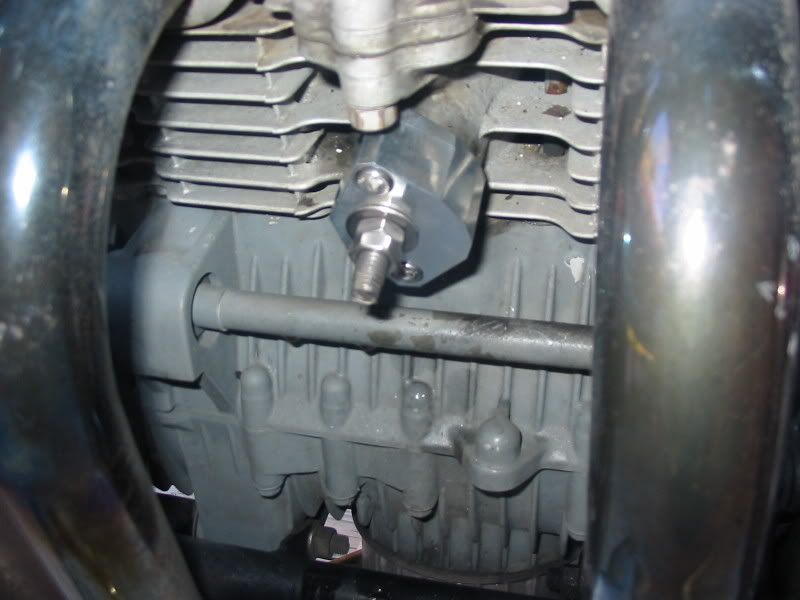
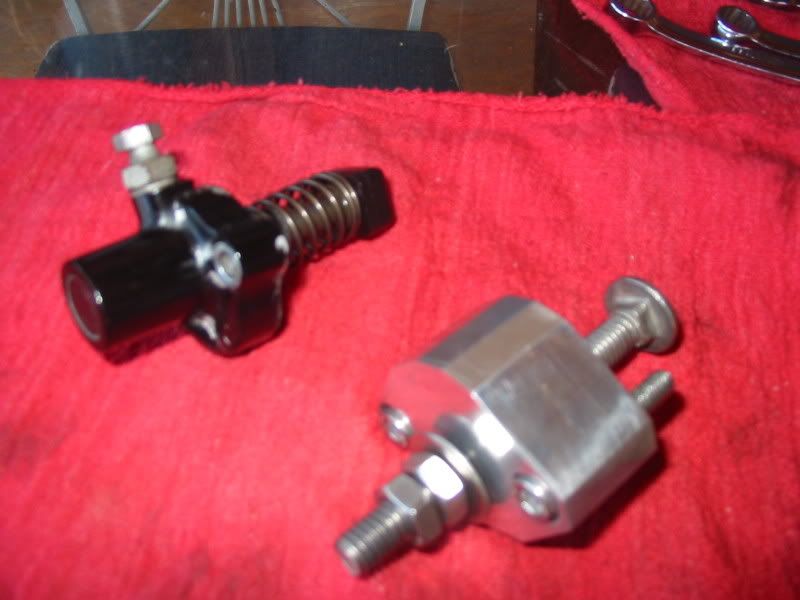
I took a piece of 1" thick aluminum and cut out a body that would bolt on in place of the stock tensioner. I drilled holes for the mounting bolts and then tapped a hole for a 5/16" carriage bolt to act in place of the plunger. I ground the head of the carriage bolt flat to ride against the chain slide. An O-ring, flat washer and two jam nuts completed the thing.
I removed the valve cover so I could see the cam chain and I used the manual tensioner to adjust the chain until it had about 1/8" of play midway between the cam sprokets.
Chain noise is now minimal and it performs perfectly. Took about an hour to make and cost about $6.00 for the parts.Mike Giroir
79 XS-1100 Special
Once you un-can a can of worms, the only way to re-can them is with a bigger can. -
Thought I would try to put up a couple of pics. I am sure some of the machinist types can produce a better piece but I am limited to a drill press and a vise.

 Mike Giroir
79 XS-1100 Special
Once you un-can a can of worms, the only way to re-can them is with a bigger can.Comment
-
great idea
This is a great cure for one of the weak links of this engine. Can you make more???? Probably would be a hot seller for this great group of 1100 engines,,,,anyway I could use one if your time and effort are availabe and the need to become rich- maybe Yamaha would also be interested. I also have had the nagging noise of the cam chain and it is annoying.........so let us humble xj/xs owners know, great modification, Mike in Sun Diegomike
1982 xj1100 maxim
1981 venture bagger
1999 Kawi Nomad 1500 greenie
1959 wifeComment
-
"Nice job, TADracer!"
Pretty good for just a drill press and a vise."Damn it Jim, I'm a doctor, not a mechanic!' ('Bones' McCoy)Comment
-
Hey Mike,
Great idea, and looks simpler than the handlebar setbacks!
Hmmmm, I've got some spare 1" thick aluminum to play with!
Hey Malber, depending on how snug a tapping job was done on the main piece, and how snug/stiff the carriage bolt spins inside the piece, would determine whether a person could "feel" the tension being created by the head of the bolt pushing against the tension chain guide so you would know where to stop and lock it down!?
T.C.T. C. Gresham
81SH "Godzilla" . . .1179cc super-rat.
79SF "The Teacher" . . .basket case!
History shows again and again,
How nature points out the folly of men!Comment
-
Hi Guys,
Great work, and ideal for racing, However, it is very easy to end up with the chain too tight with this arrangement, and too tight is no better than too slack; I will be keeping my stock tensioner well maintained, and letting it do the job it was designed for.
AlanBIf it ain't broke, modify it!Comment
-
I had thought of something similar last time I cleaned mine up and adjusted the tension, only I had thought about just using the existing housing, and threading the internal bore where the adjusting piston sits. I didn't give it too much thought, nor did I take it apart to study it, bit it seems to me that it may work.
Nice work, by the way. I don't see any way of turning the adjusting bolt after loosening the lock nuts...did you cut a alot in the end of the adjusting bolt, so you could turn it with a screw driver?Comment
-
Thanks for the compliments everyone.
The problem I was having was that the cam chain seemed to get slack faster than normal chain stretch. So I took the stock adjuster apart and noticed there was a few seperate 'slide' marks on the flat part of the plunger caused by the pinch screw when the reverse tension of the chain tries to push the plunger back into the tensioner body when you close the throtle at high RPM. High RPM could be at nothing more than highway speeds. Knowing how delicate the stock tensioner is I did not feel good about tightening the pinch screw more to try and gain more clamping power on the plunger shaft. So I decided to try a manual tensioner and I have not needed to adjust the chain in many months.
I think the idea is not to tighten up so much that you put undue stress on the chain but more the idea is to provide a more positive adjustment than can be maintained better than relying on the spring loaded plunger and pinch screw on the stock unit.
Supposedly there are a few different methods for checking the tension and one of them involves doing it with the motor running (sounds dangerous to me). So, before I took the old tensioner off I did an adjustment per the normal procedure, ran the motor a minute and then removed the valve cover. There was about 1/8" of chain deflection between the sprockets so when I installed the new one I adjusted to that tension for a start.
All you need to do is lightly screw the bolt in with a screwdriver until you feel it snug up against the chain guide. Then back off 1/2 turn. I used a 5/16-16 carriage bolt so 1/2 turn equates to 1/32".
So all I can say from my own experience with my part is that the cam chain seems to hold adjustment better, it runs quieter and there is absolutely no oil leak from around the rubber plug in the front of the stock tensioner.Mike Giroir
79 XS-1100 Special
Once you un-can a can of worms, the only way to re-can them is with a bigger can.Comment
Comment