Lovin this stuff. As I get started on my new project.
Frame Reinforcement
Collapse
X
-
Hey Schming,
Thanks, Alan B posted earlier about the 5k7 frame, but I couldn't find any images on google. Those braces are interesting. Quite small in size, but I'm sure effective, and look like they don't interefere with the other equipment/components on/in the frame. Once I get into my project, I'll be posting photos also.
Hey Brant, you mentioned about using some angle iron. After looking at these images, do you think just the flat braces are sufficient? If not, would you still use the angle iron? The 5K7 doesn't show much in the way of bracing around the swing arm bearing mount area vs. what was shown in Rob's mockup images in the other thread.
I've already braced my swingarm itself with some square tubing. I think some flex/stress is exerted on the frame at the swingarm mounts, and so it makes sense to me to bolster that area also.
Steve, I like the idea of a second fork tube brace like you mentioned, will look at what it would take to fabricate some clamps for them out of aluminum plate similar to the TKAT unit.
T.C.T. C. Gresham
81SH "Godzilla" . . .1179cc super-rat.
79SF "The Teacher" . . .basket case!
History shows again and again,
How nature points out the folly of men!Comment
-
Actually T.C., angle iron cut to contact all areas is the better choice, depending on access area. Depending on access area for welding all contact locations, box steel tubing is the best support. Again, depending on access welding of all contact points. Either way of what used, the ends need left unwelded for stress relief points.Hey Schming,
Thanks, Alan B posted earlier about the 5k7 frame, but I couldn't find any images on google. Those braces are interesting. Quite small in size, but I'm sure effective, and look like they don't interefere with the other equipment/components on/in the frame. Once I get into my project, I'll be posting photos also.
Hey Brant, you mentioned about using some angle iron. After looking at these images, do you think just the flat braces are sufficient? If not, would you still use the angle iron? The 5K7 doesn't show much in the way of bracing around the swing arm bearing mount area vs. what was shown in Rob's mockup images in the other thread.
I've already braced my swingarm itself with some square tubing. I think some flex/stress is exerted on the frame at the swingarm mounts, and so it makes sense to me to bolster that area also.
Steve, I like the idea of a second fork tube brace like you mentioned, will look at what it would take to fabricate some clamps for them out of aluminum plate similar to the TKAT unit.
T.C.Last edited by motoman; 11-07-2015, 05:36 PM.81H Venturer1100 "The Bentley" (on steroids) 97 Yamaha YZ250(age reducer) 92 Honda ST1100 "Twisty"(touring rocket) Age is relative to the number of seconds counted 'airing' out an 85ft. table-top.Comment
-
Hey Brant,
Okay, I understand how much stiffer angle iron sections are. In one of these photos, I can see a space left in the corner between the angle junction of the frame, and the brace. Is that what you mean by leaving a space??
In the other phtotos of the braces along the TOP of the frame, it looks like the braces are welded all the way along the juntion between the brace and frame pieces??
T.C.
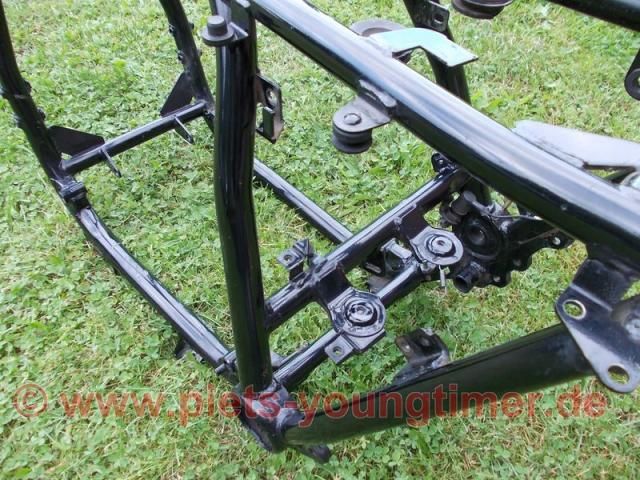
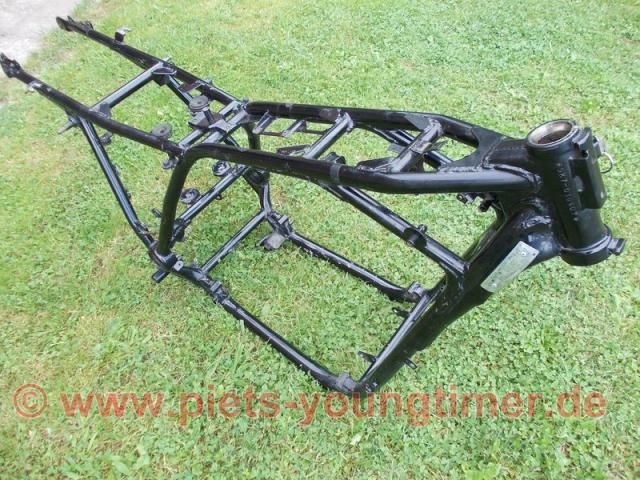 T. C. Gresham
81SH "Godzilla" . . .1179cc super-rat.
79SF "The Teacher" . . .basket case!
History shows again and again,
How nature points out the folly of men!Comment
-
Wasn't quite what I was meaning T.C., but those small open areas make for stress relief locations anyways . Just watch for any relocated weak areas which will be noticed by any paint lines cracking or buckling.
Last edited by motoman; 11-07-2015, 10:11 PM.81H Venturer1100 "The Bentley" (on steroids) 97 Yamaha YZ250(age reducer) 92 Honda ST1100 "Twisty"(touring rocket) Age is relative to the number of seconds counted 'airing' out an 85ft. table-top.
. Just watch for any relocated weak areas which will be noticed by any paint lines cracking or buckling.
Last edited by motoman; 11-07-2015, 10:11 PM.81H Venturer1100 "The Bentley" (on steroids) 97 Yamaha YZ250(age reducer) 92 Honda ST1100 "Twisty"(touring rocket) Age is relative to the number of seconds counted 'airing' out an 85ft. table-top.Comment
-
Hey Folks,
Resurrecting this older thread for a little more discussion. I was first going to ask about how thick the plate sections should be, but then I re-read Rob's first post about using 1/8" thick plate, and he hasn't posted to this thread since, so I can only assume that is what he ended up using for his plated reinforced sections.
I will also take Brant/Motoman's advice and see where I can put the angle iron sections in vs. just plate.
I have a question. There's this several inch long protrusion on the front frame neck, has a couple of threaded nuts in it. What is it for???? I know the flat piece on the front bottom is the steering movement STOP to prevent the TT's and fork tubes from hitting the tank on full turn position.
I know I'll be adding a modest amount of sprung weight with all of this bracing, just wondering if that front piece isn't needed, that I could CUT if off!?
I don't recall anything being bolted to it??
BTW, I've found an eBay seller selling Polyurethane cylinders, 1.5" diameter, 6" long, have ordered a couple for $9.00 each. Here's his description.
So...I hope this is hard enough to withstand the pressure stress of being the motormounts, will let everyone know how they turn out when I get around to making them.The shore hardness is 72D and the tensile strength is 3600+ PSI. I was told by my resin supplier that is the equivalent of an old telephone
handset.
T.C.T. C. Gresham
81SH "Godzilla" . . .1179cc super-rat.
79SF "The Teacher" . . .basket case!
History shows again and again,
How nature points out the folly of men!Comment
-
T.C., The protruding bit on the front of the steering neck is where the fork lock engages. The front threaded holes aren't used for anything as per factory, but make great mounting points for fairing brackets, etc.79 SF Special W/ Stock all original motor @ 384,000klms
Stock exhaust, stock airbox, XJ sump, 78E carbs, Xs1100RH seat, Bosch superhorns, 5/8ths front M/c, braided lines, sintered SBS pads, drilled discs, progressive springs, 8" 50w HID headlight 4300K, 2 x 50w HID spiral driving lights, KONI shocks, Spade fuse box
*Touring mode - Plexistar 2 screen, Gearsack rack & bag & saddlebags, homebuilt towbar
*"The Keg"- UC torana hubs, XS11 discs, Tokico 4 spot calipersComment
-
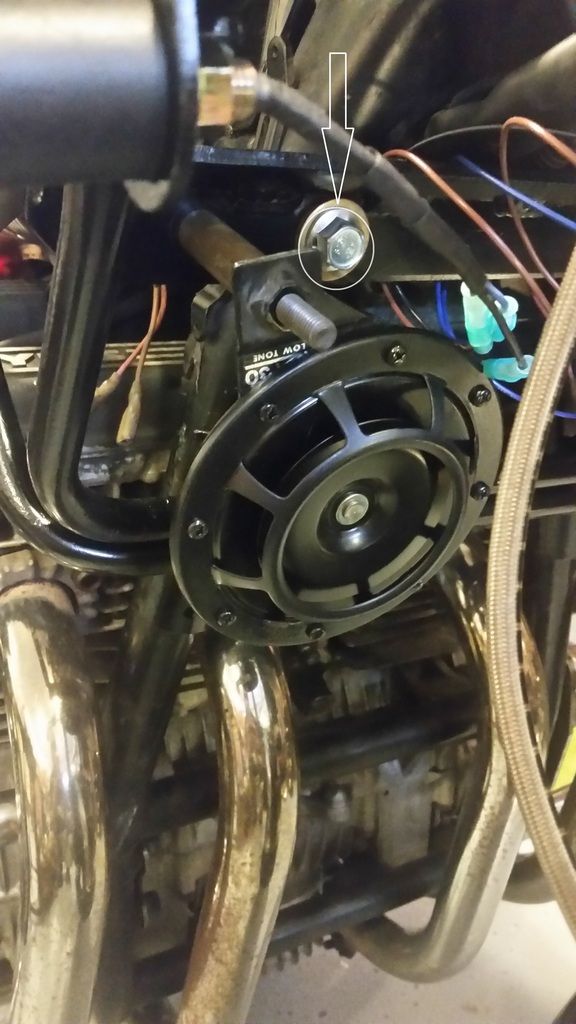
The arrow points to where the Vetter bracket is mounted on the right side. I had to use a thread chasing tap to actually use the threaded mounting hole.
 82 XJ1100 - sold
96 Honda Magna 750 - Girlfriend's bike
2000 ZRX1100 - sold
2003 FJR1300 - Silver rocketComment
-
T.C. , I just measured the gusset plates on Steptoe's bike and the material is only 4mm thick - counting the powdercoating.
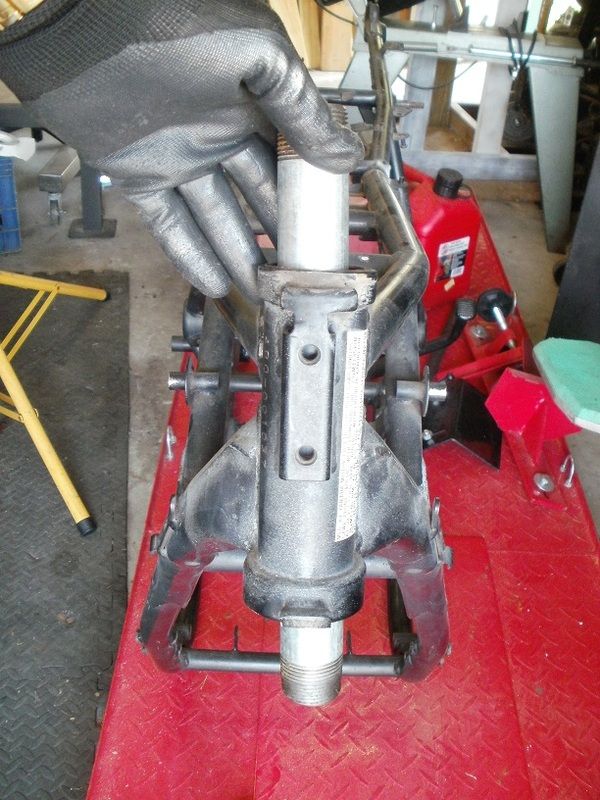
^ Half century, the vertical bracket on the front of the headstem tube is the one T.C.'s referring to79 SF Special W/ Stock all original motor @ 384,000klms
Stock exhaust, stock airbox, XJ sump, 78E carbs, Xs1100RH seat, Bosch superhorns, 5/8ths front M/c, braided lines, sintered SBS pads, drilled discs, progressive springs, 8" 50w HID headlight 4300K, 2 x 50w HID spiral driving lights, KONI shocks, Spade fuse box
*Touring mode - Plexistar 2 screen, Gearsack rack & bag & saddlebags, homebuilt towbar
*"The Keg"- UC torana hubs, XS11 discs, Tokico 4 spot calipersComment
-
Hey EveReady,
Yeah, 4mm is about 0.157", 3/16"=0.1875 , 1/8" is only 0.125", actually 5/32" = 0.15625.
After reviewing some of the other images in this thread, especially the large plate area on the front yoke area, and then lots of reading about welding stress relief and techniques to counteract it, dependent on type of weld joint...fillett, butt, lap, etc., I think the large plate area is actually too much and can put a lot of tension stress around the edges of that large plate welded area!?
Using thicker plate will provide the support, and having it positioned INSIDE the edges and between the tubes will allow for welds to be placed on both sides of the plate which will even the stress/tension of the joint the best. I actually had a 3' long 3" wide section of 3/16 plate, and so I've been cutting and fitting it to the different sections and locations of the frame. And I expect to be able to make welds on both sides of the plate to the frame tubing, just have to plan which ones go on first to allow me the access to the other side relatively easily.
Brant/Motoman, I tried to see about using the 1" angle iron for the braces, but felt I wouldn't be able to get a good weld on both sides of the angle iron junction to the frame in the diagonal positions wanted/needed, so decided to use the plate instead.
I'll post photos and such when I get it done. Spent most of this Father's Day afternoon working on the bike, since I'm not a FATHER and I don't have one anymore. Mostly cleaning the paint/rust off of the frame at the junctions where I'll be placing the bracing joints. Also removed some of the little brackets for stuff like the Helmet hanger/lock, as well as the side cover mounts...they didn't work that great with mine with the XJ tank anyways. I'll be making some out of some aluminum plate material and will then add my own mounting brackets later. Also removed the OEM gas tank lock down threaded shaft, will be making new ones to work with the XJ tank better, and still allow room for the Harley Seat and mounting!
Also, since that front steering neck bracket is so well mounted/welded to the neck, it seems like it might provide a little extra strength to the tube, and taking/cutting it off might weaken it, so I figure I'll just leave it there!
T.C.T. C. Gresham
81SH "Godzilla" . . .1179cc super-rat.
79SF "The Teacher" . . .basket case!
History shows again and again,
How nature points out the folly of men!Comment
-
Just remember also, for any vertical or near vertical welding, after tacked in place, do the welding up-hill NOT downhill. I understand, unless very experienced welding, weld penetration down-hill is not near as penetrating to base metal as welding uphill verticallyHey EveReady,
Yeah, 4mm is about 0.157", 3/16"=0.1875 , 1/8" is only 0.125", actually 5/32" = 0.15625.
After reviewing some of the other images in this thread, especially the large plate area on the front yoke area, and then lots of reading about welding stress relief and techniques to counteract it, dependent on type of weld joint...fillett, butt, lap, etc., I think the large plate area is actually too much and can put a lot of tension stress around the edges of that large plate welded area!?
Using thicker plate will provide the support, and having it positioned INSIDE the edges and between the tubes will allow for welds to be placed on both sides of the plate which will even the stress/tension of the joint the best. I actually had a 3' long 3" wide section of 3/16 plate, and so I've been cutting and fitting it to the different sections and locations of the frame. And I expect to be able to make welds on both sides of the plate to the frame tubing, just have to plan which ones go on first to allow me the access to the other side relatively easily.
Brant/Motoman, I tried to see about using the 1" angle iron for the braces, but felt I wouldn't be able to get a good weld on both sides of the angle iron junction to the frame in the diagonal positions wanted/needed, so decided to use the plate instead.
I'll post photos and such when I get it done. Spent most of this Father's Day afternoon working on the bike, since I'm not a FATHER and I don't have one anymore. Mostly cleaning the paint/rust off of the frame at the junctions where I'll be placing the bracing joints. Also removed some of the little brackets for stuff like the Helmet hanger/lock, as well as the side cover mounts...they didn't work that great with mine with the XJ tank anyways. I'll be making some out of some aluminum plate material and will then add my own mounting brackets later. Also removed the OEM gas tank lock down threaded shaft, will be making new ones to work with the XJ tank better, and still allow room for the Harley Seat and mounting!
Also, since that front steering neck bracket is so well mounted/welded to the neck, it seems like it might provide a little extra strength to the tube, and taking/cutting it off might weaken it, so I figure I'll just leave it there!
T.C. . Any weld back in carner.....start in corner and go to open end with weld.
81H Venturer1100 "The Bentley" (on steroids) 97 Yamaha YZ250(age reducer) 92 Honda ST1100 "Twisty"(touring rocket) Age is relative to the number of seconds counted 'airing' out an 85ft. table-top.
. Any weld back in carner.....start in corner and go to open end with weld.
81H Venturer1100 "The Bentley" (on steroids) 97 Yamaha YZ250(age reducer) 92 Honda ST1100 "Twisty"(touring rocket) Age is relative to the number of seconds counted 'airing' out an 85ft. table-top.Comment
-
Hoping you would see this and reply/comment. I'll be using my wire feeder for tacking the pieces in place, but then plan on using my TIG to do the actual real welding. It's been a while since I did some TIG, so will get some scrap pieces and practice with them first. I also have a nifty new PEDAL controller so hope to be able to better control the power and puddle than previously when I could just set the power on the panel! I used the TIG when I "played" with the exhaust headers I put together for George/GLoweVA so I do have some memory of technique with that!Just remember also, for any vertical or near vertical welding, after tacked in place, do the welding up-hill NOT downhill. I understand, unless very experienced welding, weld penetration down-hill is not near as penetrating to base metal as welding uphill vertically . Any weld back in carner.....start in corner and go to open end with weld.
And since the frame is just bare, I can place it on my table and rotate all around so that I can keep the parts and seams I'm working on laying relatively flat vs. up/down hill.
Any other suggestions/tips??
T.C.T. C. Gresham
81SH "Godzilla" . . .1179cc super-rat.
79SF "The Teacher" . . .basket case!
History shows again and again,
How nature points out the folly of men!Comment
-
Already placed in the Godzilla rebuild thread.
Hey there guys,
Okay, just to show that I'm actually working on this thing, and not just blowing smoke, here are the photos of my progress in frame reinforcement/welding!
These are the separate pieces that I had cut and shaped for fitting the frame locations.
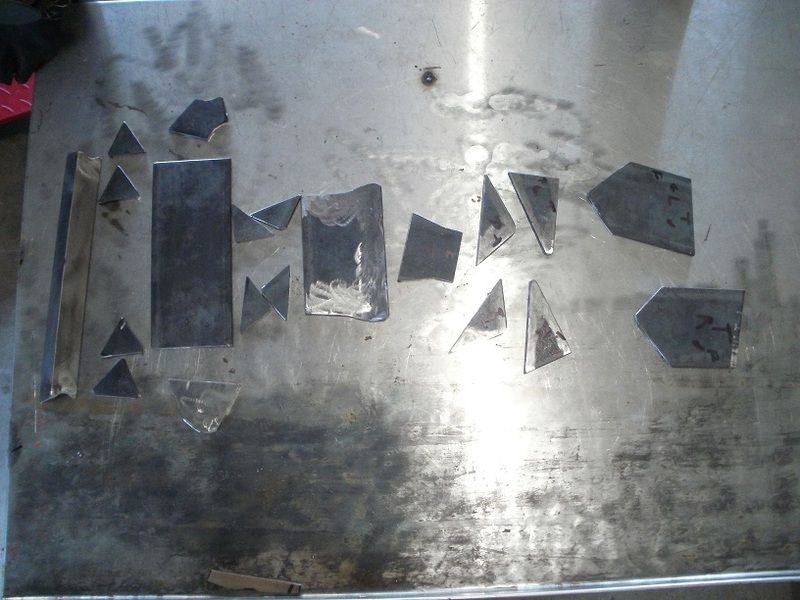
I talked about this in the other Frame Reinforcement thread, but I'll reiterate it here. After doing a bunch of ONLINE research in weld stress relief with regards to different types of weld joints, butt, lap, tee, etc. and with the round frame tubing, I felt placing welds on both sides of the tee joint where the plate contacts the frame would be the best plan. The other images showed a very large piece of plate that essentially contacted the steering neck, upper and lower tubes all the way back to the junction. But the plate was lap welded to the frame.
I decided to use thicker 3/16" plate, place them in the middle of the frame tubes between the tubes to allow me to apply welds to both sides of the plate. I may be wrong, we'll see later!? I also have a DC invertor Tig welder, big bottle of ARGON gas, lots of filler rod, so I thought I would first tack weld with my wire feeder, and then fill in the rest with the TIG to keep the slag down. These next few shots are of the front frame neck area where I did just that. The right I did first, got some porosity, did some more research, turned down my amps, cleaned my filler rod with brake cleaner, recleaned the metal surfaces with wire brush/drill, and verified that I was using the Tungsten Red tip, and put a smaller diameter cup on the tig handle.
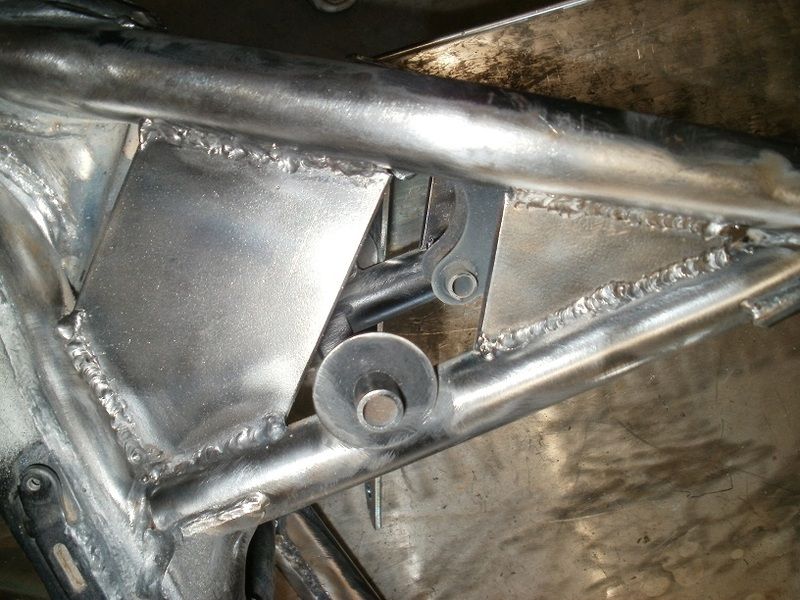
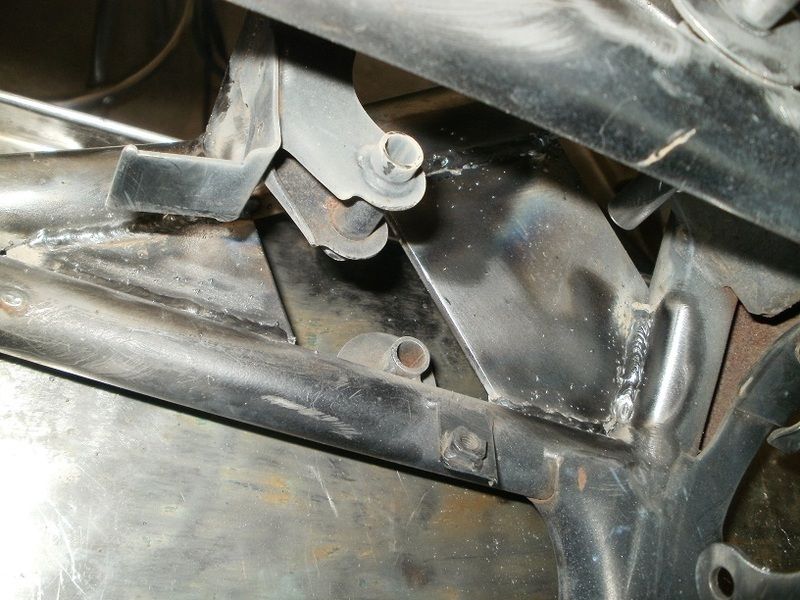
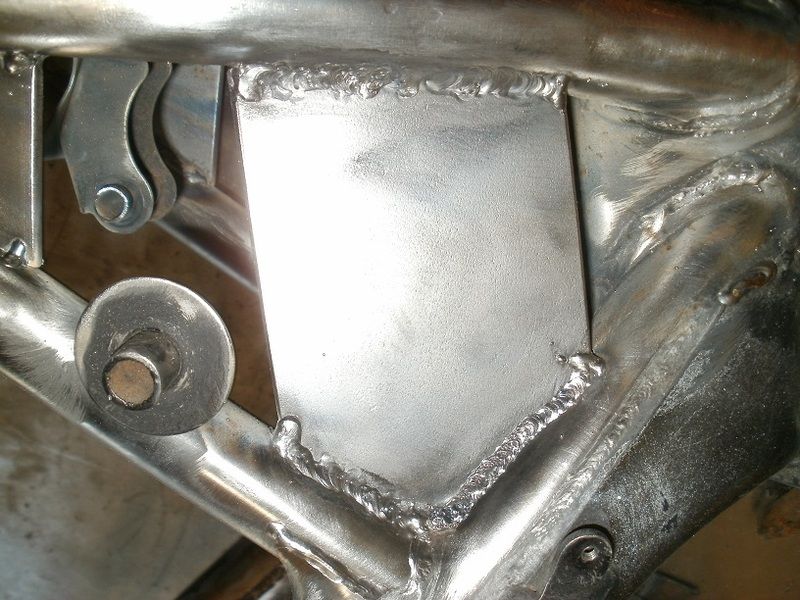
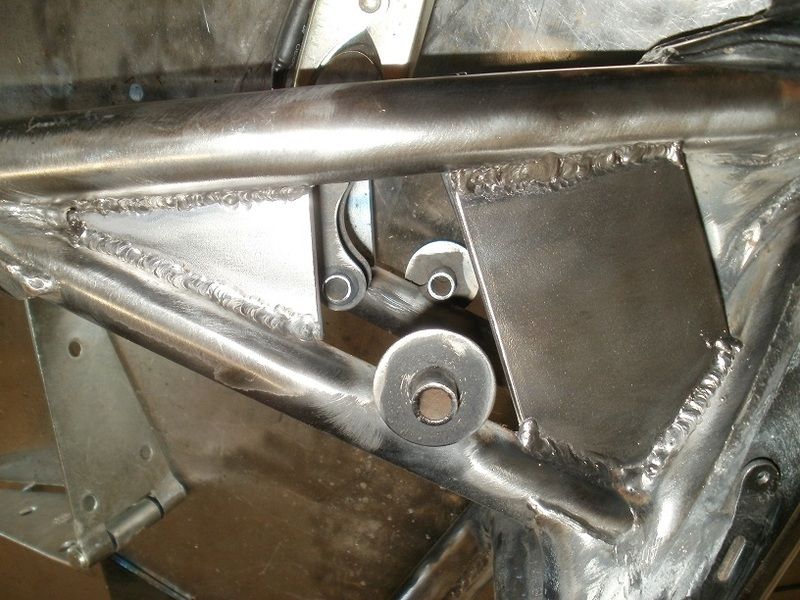
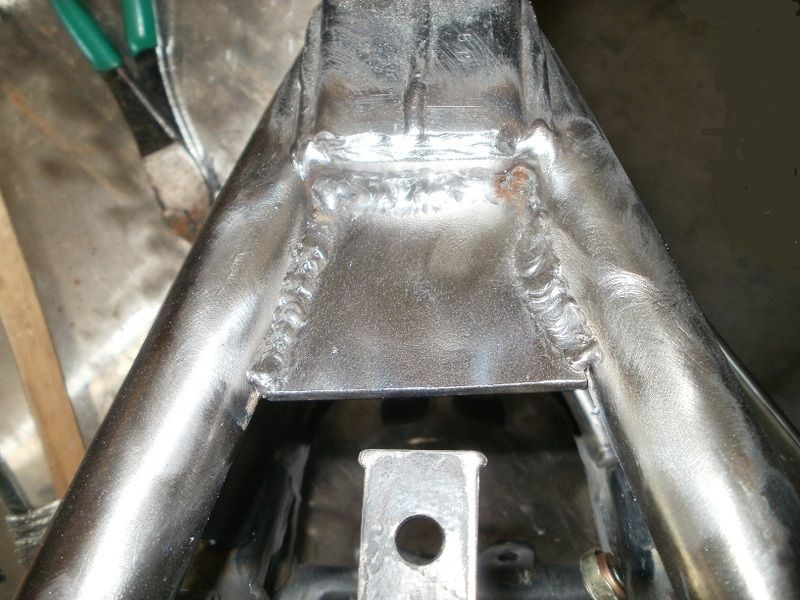
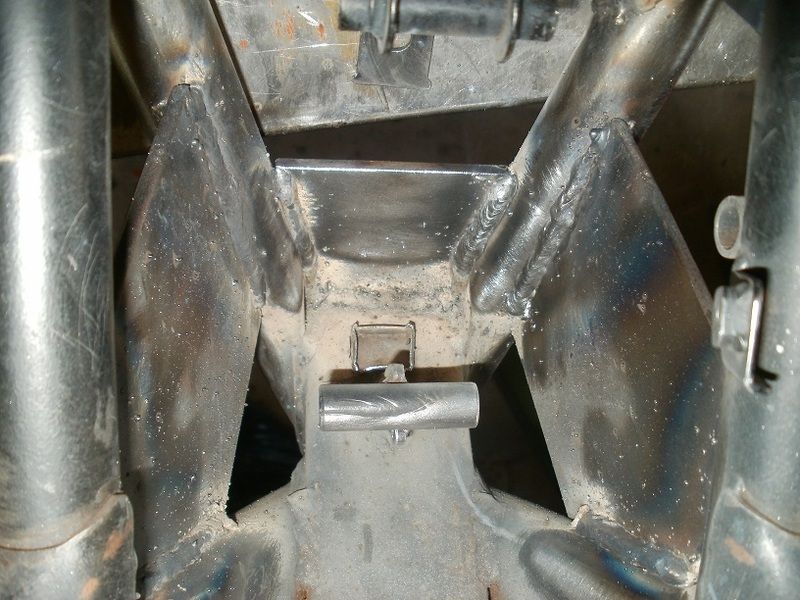
But after some success, I then attempted some other sections, and once again started experiencing porosity. I was also surprised at how LONG it takes to perform TIG welding!
  SO...I decided to just use the wire feeder, plus it was the only way to get to the inner sections of the plate weld seams.
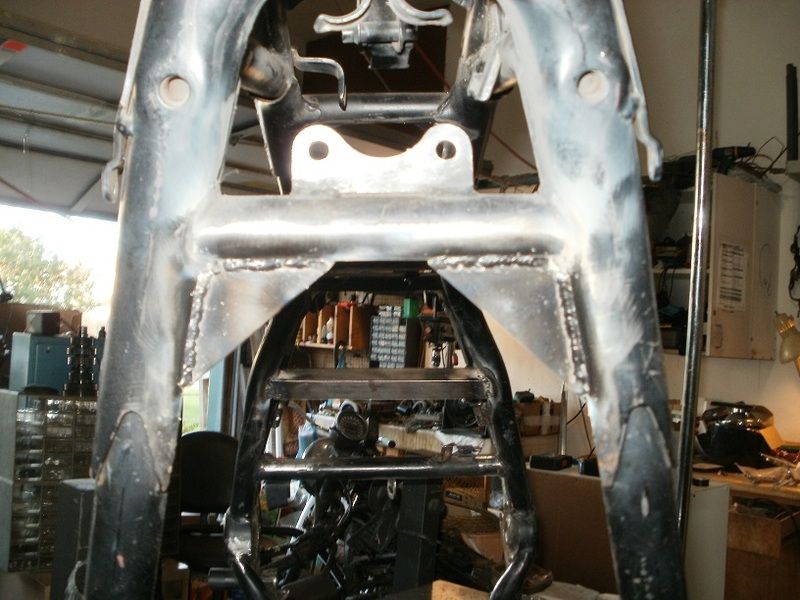
Here's the side panel triangle space, please ignore the background crap, my garage is quite cluttered at the moment!
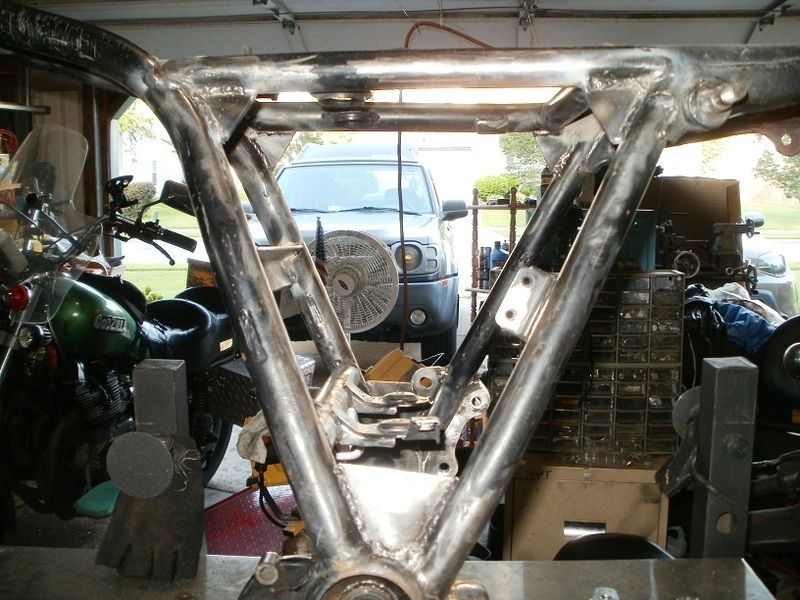
Here are the top sections, note I removed the Reg/Rect mounts since I'm running my other mini race alt with built-in reg/rect.
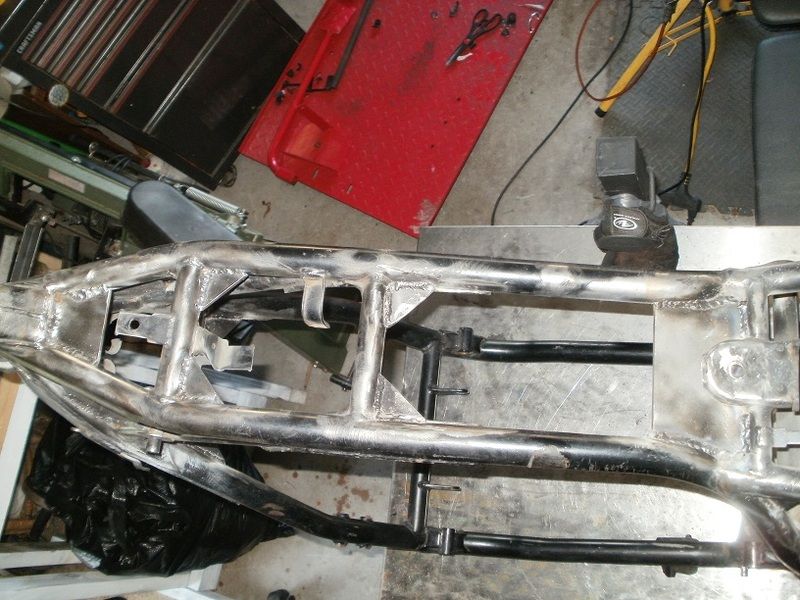
Here's the section under the seat/fender support rails.
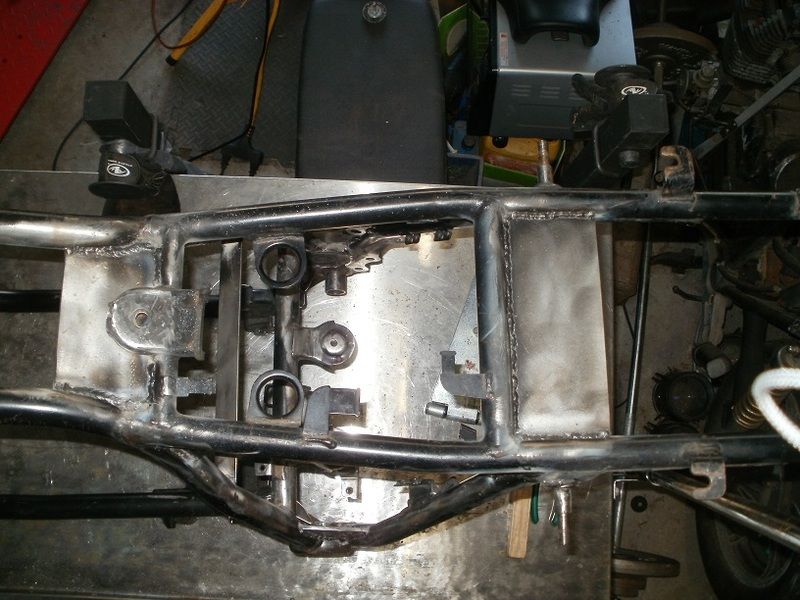
This the the section under the seat just in front of the battery compartment...finally found a place where I could use that Angle Iron Brant suggested! I felt this would provide decent stiffness/support without as much weight compared to a 3" wide solide plate section. I know it's not perfectly straight/level, but it won't be seen from this angle when the bike's all together.
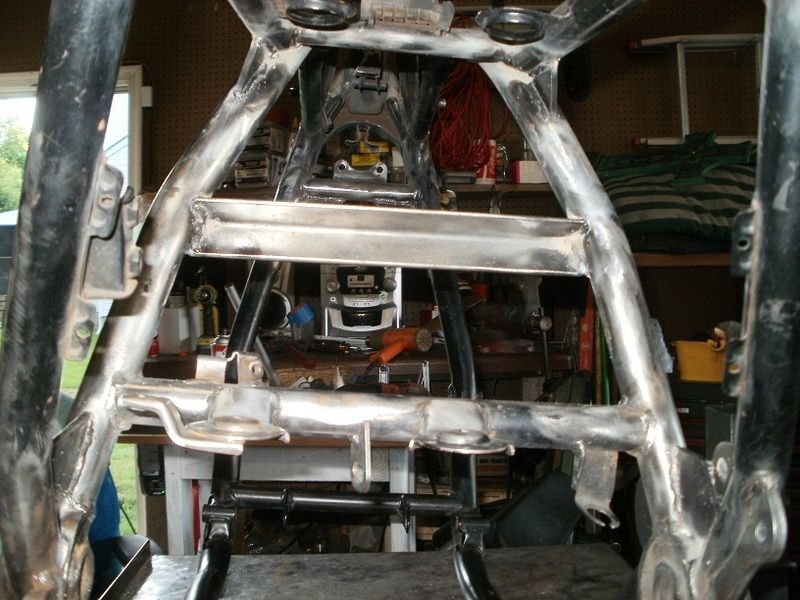
Okay, any comment, complaints, suggestions, etc.?
Disclaimer, I'm not a pro-welder like Brant, just a home schooled hobbyist!
T.C.
PS, I'm not done with the frame, have a few more braces to place down low in the rear, and still deciding if I need/want the ones in FRONT of the swing arm pivot points!T. C. Gresham
81SH "Godzilla" . . .1179cc super-rat.
79SF "The Teacher" . . .basket case!
History shows again and again,
How nature points out the folly of men!Comment
Comment