 Tweet
Tweet
Has anyone ever found forward controls that will work on an 80G?
-
80G XScitant XStreme
"Don't ever give up, don't ever give in, and don't ever read the owner's manual."
-- Red Green
Bikes I have owned --
'68 Honda 90
'74 Yamaha Enduro 125
'75 Husqvarna 250CR
'85 Kawasaki KLR250
'80 Kawasaki KZ750H1 LTD -
Do a search on 'forward controls' and you will see several past discussions about this. Basically the answer is that there were a very limited number of aftermarket kits (Markland brand, I think) made for the XS 11. Vary difficult to find now, but they do come up on eBay once in a while. Several people have played with modifying the kits made for the Honda CB 750. Below is a link to a photo of the left side of a forward-mount equipped XS 11:
It is part of this thread:
Good luck.Jerry Fields
'82 XJ 'Sojourn'
'06 Concours
My Galleries Page.
My Blog Page.
"... life is just a honky-tonk show." Cherry Poppin' Daddy Strut -
Thanks, I did do a search or two on the site, but for some reason I got no relevant hits. Thanks for the link to the pics, they gave me some ideas and some of them looked a good deal like what I have already designed in my head.80G XScitant XStreme
"Don't ever give up, don't ever give in, and don't ever read the owner's manual."
-- Red Green
Bikes I have owned --
'68 Honda 90
'74 Yamaha Enduro 125
'75 Husqvarna 250CR
'85 Kawasaki KLR250
'80 Kawasaki KZ750H1 LTDComment
-
Years ago there was a company that made rearsets for the XS because i had them on my bike.The company was called Raask.If that helps.1980 XS1100 SG
Inline fuel filters
New wires in old coils-outer spark plugs
160 mph speedometer mod
Kerker Exhaust
xschop K & N air filter setup
Dynojet Recalibration kit
1999 Kawasaki ZRX1100
1997 Jeep Cherokee 4.5"lift installedComment
-
TJ,
Funny you should bring this topic up. I'm working on some HOMEMADE controls and footrests with what I think will be a neat feature, but I don't want to spill the beans just yet! I've been working, fabricating on them since last weekend, and I've just about got them done, just need to paint, mount and adjust the linkages, and then I'll post photos, costs, materials, etc.!
It helps to have a welding machine and basic metal working tools, cutter/grinder.")
T.C.T. C. Gresham
81SH "Godzilla" . . .1179cc super-rat.
79SF "The Teacher" . . .basket case!
History shows again and again,
How nature points out the folly of men!Comment
-
I would be interested, since I have a 'partial' installation consisting of floorboards and heel/toe shifter, not true forward controls.
Another thread I could not find was from Indy Rick, which outlined converting a Gold Wing Markland kit to his XS11, including the mods he made to the rear brake linkage. Goes back a long way, maybe it didn't make the transition when the site went to new software several years back.
Left side was almost a straight bolt-up, think he used a kit for the original 1000 cc Gold Wing. Most of the work was in the brake linkage on the bike's right side. Incidently, it appears Yamaha and Honda used the same spline arrangement on the shift shaft, as the Gold Wing / CB 750 shift linkage parts from the '70s and '80s seem to fit right on the Yamaha shift shaft. In fact, the heel/toe shifter I use on my XJ came from a Honda 90, of all things. This might help if you are looking for shift linkage parts.Jerry Fields
'82 XJ 'Sojourn'
'06 Concours
My Galleries Page.
My Blog Page.
"... life is just a honky-tonk show." Cherry Poppin' Daddy StrutComment
-
I build rear sets for my 'F' and love them. It is the most comfortable riding position imaginable (IMHO).
I though it shouldn't be very tough to make a forward set for my Special. I could not find a location that did not get in the way of the side cases or crash bars and still be comfortable.
Where would forward controls go?DZ
Vyger, 'F'
"The Special", 'SF'
'08 FJR1300Comment
-
A tease!
Hey Denny,
I, too, "HAD" the crash guards, but with the strength of the 3/8" thick 1.5" angle iron that I'm using for the mounts, they will replace the crash bars, and stick out beside the engine cases. They will act like crash bars in that situation, but will also be the supports for the floorboards and controls!
Due to my Xsive leg length, I wanted mine to be FORWARD controls, not just slightly positioned floorboards just barely infront of the OEM footpegs!
Here's a shot of my floorboards with the appropriate GREEN cushion pads that will be glued on top once they are mounted to the framing! And yes, they are uneven at the heel, that was done on purpose for a specific functionality!

I just found out that I "HAVE" to go to Busch Gardens here in Va. with my SWMBO tomorrow, so I won't be able to get them actually mounted then. I have just finished painting them, and they are drying in the garage with my dual 1000 watt flood work lights shining on them!
SO....I expect to get them mounted on Sunday, and take it for a test run. Then I'll take a bunch more photos, and post the entire project, I think you'll be a little surprised with what I have done, an out of the box approach!
T.C.T. C. Gresham
81SH "Godzilla" . . .1179cc super-rat.
79SF "The Teacher" . . .basket case!
History shows again and again,
How nature points out the folly of men!Comment
-
out a control (pics)
Spent half an hour looking for pics of the forwad controls I had, no luck....will look agin when I get home tonight.
Did find a pic of the rear sets tho.

mroComment
-
Ah! Long legs! That would make a difference. The best I could come up with were my heals just forward of the side covers (where the crash bars are).
I like the idea of merging the protectors and forward controls together. I never though the case guards were particularly attractive.DZ
Vyger, 'F'
"The Special", 'SF'
'08 FJR1300Comment
-
FORWARD CONTROLS....Redneck Engineered Style!
Hey folks,
I promised you a finished project, and it IS!!! I took it out for a little test ride, and was amazed at how easy it was to shift gears, and the brake worked as well!! Now to the FUN PART!
The "out of the box" thinking I did was in that on most FWD CNTRLS sets you get, you have the heel toe shifter and linkage, but they are positioned just barely in front of the OEM position!
I wanted more S-T-R-E-T-C-H in my legs since I'm 6'6" tall, have a 37" inseam. BUT... I wanted to KEEP my OEM foot rests and CONTROLS! SO....I designed a set that would allow me to have my forward controls, and also retain the OEM controls!!!
Here's how I did it! The parts list:
1) 3/6" thick 2"x2"x4' angle iron: $21.00
2) 1/8" thick x3"wide x 4' long iron plate:$13.00
3) 12" x 12" x 1/2" thick aluminum plate...was left over stock, think it was around $30.00
4) 1/2" round 3' long tube weld steel: $7.00
5) Two 3.5" rectangular hinges :$7.00
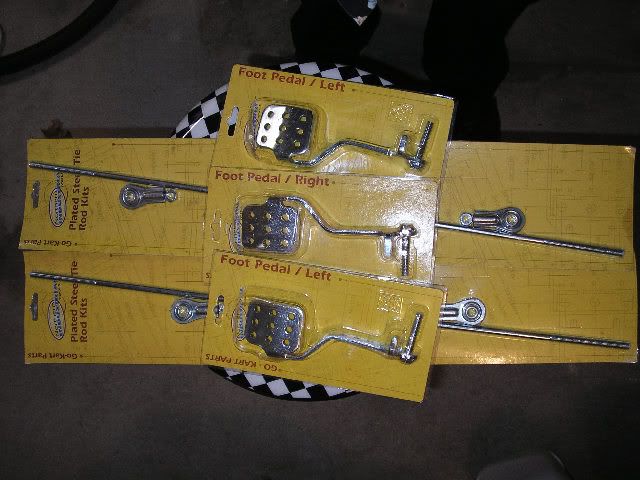
6) 3 go-cart pedals from Northern Tool, 2 lefts, 1 right: $30.00
7) 2 - 24" tie-rods and ends: $20.00
8) 3 - 3/8" x 7" hex head bolts : $2.50
9) 10 - 5/6" x 1.5" hex head bolts/washers/lock nuts:~$3.00
10) box of assorted springs: $3.50
11) pkg nylon washers: $1.00
12) A pkg of that multicolored 2' square foam for kids floors: $?
Roughly about $150.00 bucks worth of materials, I already had welding wire, grinding and cutoff discs, paint, etc.!
Fabrication time was from last weekend, every night this week, and today, estimated 30-40 hours....I'm kinda slow!
I cut 2 - 10" sections of the angle iron for the base that was long enough to cover the 2 smaller engine mount bolts at the timing cover level, and the larger one below the timing cover. I cut 2 smaller ~3" long sections for drop downs from the angle iron, and then 2 other ~10" long sections for the footrests. I cut angles in the drop downs to allow the foot rest sections to be slightly angled upwards and more inwards so my feet and ankles would not be at funny angles!
I took the 3 pedals, flattened them out in the bench press, ground off the welded 5/16" bolt, and drilled out the hole for the 3/8" bolts. I then took 1 left/1right and welded them together at the hinge point for the heel/toe shifter. The other "left" is used for the RIGHT foot brake!
Cut the 1/2" aluminum plate into 2 sections, and then into the desired pattern for the footrests, drilled 3 holes for the hinges!
Drilled 1/2" wide holes in the now welded together base and foot support for the 3/8" bolts that will be the shafts for the pedals. Also cut some 5" long sections from the 1/8" plate for the levers on the ends of the pedal shafts for the tie rods to bolt to. I had to shorten the tie rods about 7-8", cut out from the middle and rewelded together to keep the threaded ends intact!
I had to weld a section of the plate to itself to make it ~5" wide and long, then cut an "L" shape out of it that would be the lever for the OEM shifter. ALL of the holes in the levers are 3" from each other. At that distance from the shifter shaft, you only need about a 2.5" travel distance for up/down shifting, that's about a 45 degree arc. The brake lever travels about 90 degrees to attain full actuation/depression. I didn't realize this until the end, or I would have made the brake lever at the pedal a bit longer to cover more distance with less throw angle so the pedal wouldn't be so far towards the engine case!
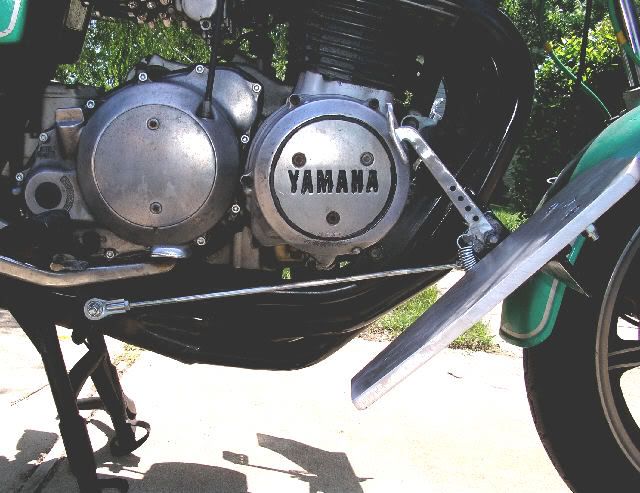
Put it all together and here's what it looks like. This is the wide view of the gear shift side!
Here's a close up of the OEM gear shift lever and "L" bracket secured to the lever!

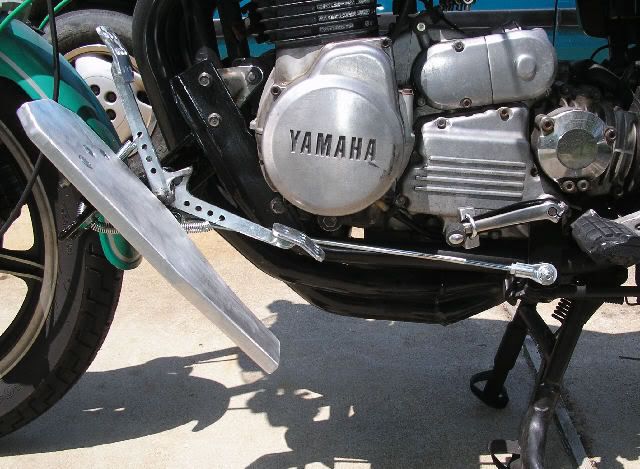
Here's a wide view of the Brake Side:
Here's a close view of the actuator above the right brake lever, it's very small, and doesn't interfere with the OEM brake action!

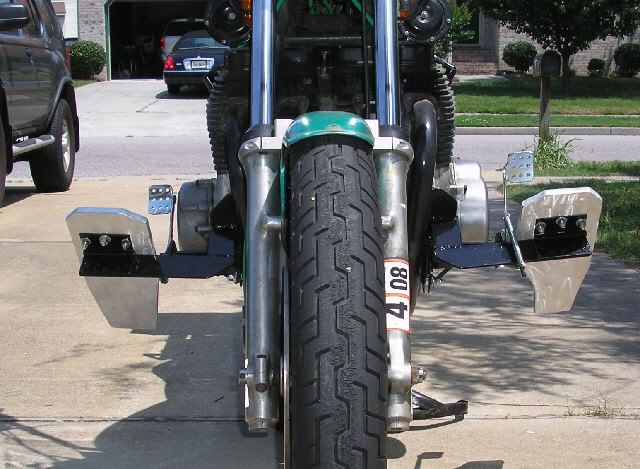
Here's a front view!
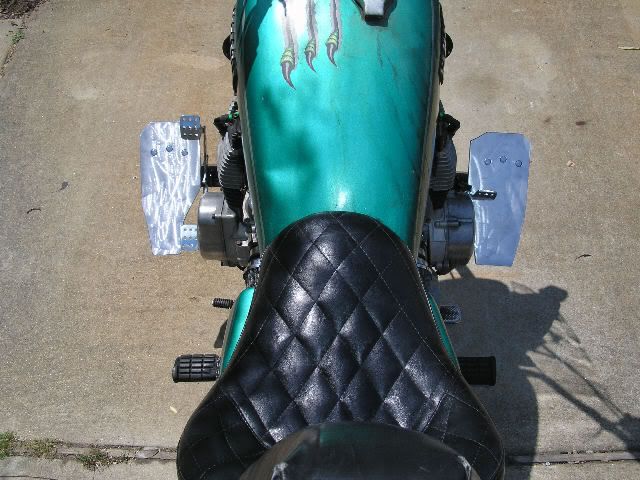
Here's a view from the top...don't mind the UGLY tank, it's going to be replaced soon!!
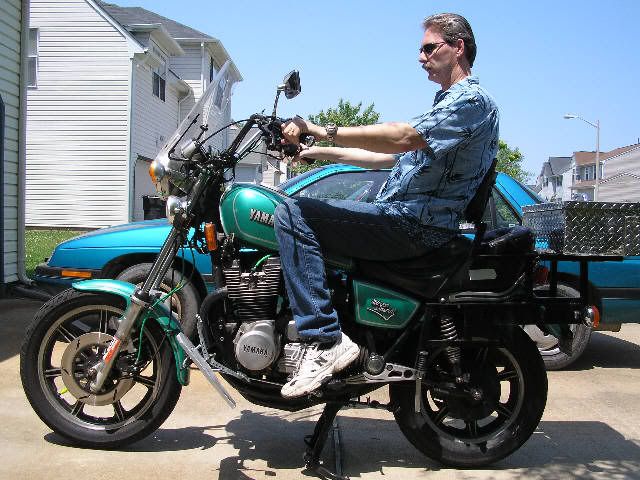
Here's ME sitting in the OEM position, note the cramped position and angle of my lower legs, feet,....but it's my preferred position for running the twisties!!!! My reasoning for keeping the OEM controls!!!
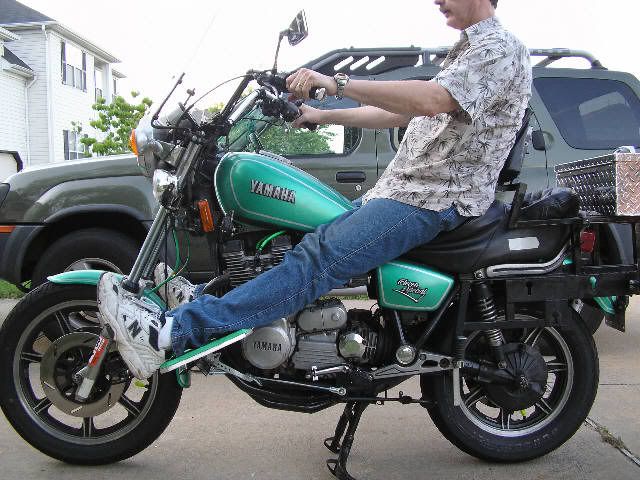
And here's ME with my feet stretched out on the NEW FWD CNTRLS!!!

And finally, here's Me with my legs stretched out even further nice and straight when I really want to stretch, and the nice foam pads that I have since added provide a nice large area of support under my calves.....with the angling of the footrests swiveling upwards in the rear......NOW you know what the hinges were for!

So...as I stated in the beginning, the shifting action is easy, both from the FWD CNTRLS as well as the OEM shifter, very light springs on the Fwd Cntrls, but keeps the stress off of the internal return shifter spring! The brake lever is also very smooth, and easy to press, and I can drop down to the OEM positions whenever the need arises!
Well, I hope at least a few of you are somewhat impressed!? I'm happy!
T. C. Gresham
I'm happy!
T. C. Gresham
81SH "Godzilla" . . .1179cc super-rat.
79SF "The Teacher" . . .basket case!
History shows again and again,
How nature points out the folly of men!Comment
-
briggs and stratton minibike
yeah tc, slick work, you do make that machine look small though.
have you scraped the boards yet?
don't get too comfy, it may be hard to ride while asleep.
Last edited by mason79; 05-20-2007, 07:23 PM."a good man knows his limitations" dirty harry
History
85 Yamaha FJ 1100
79 yamaha xs1100f
03 honda cbr 600 f4
91 yamaha fzr 600
84 yamaha fj 1100
82 yamaha seca 750
87 yamaha fazer
86 yamaha maxim x
82 yamaha vision
78 yamaha rd 400Comment
-
Think you got the most unique and versatile floor boards I've ever seen... as well as dual controlssomewhat impressed!? I'm happy!
mro
btw, dent in the lower left on your tank?Comment
-
Hey Mason,
I didn't get to mention, on my first test run, with just a modest lean angle, I did scrape the heel of the footrest.
BTW, that extra cut out area on the left rest was to allow for clearance of the heel shifter part when the rest hinges upward!
So....off they came, took another 1" off the end, and also a corner off of the lower outer edge!
The nice thing about them being on hinges, is that IF I do scrape, they will just bounce up, but won't lift the rear or front of the bike IF they were solidly attached!
Yeah, I do feel like I'm riding a minibike sometimes!! Maybe I ought to look into what XSChop does, and stretch the frame and all!
Hey MRO, thanks, we'll see how they behave at next weekends NY Rally. I might even let some of the other Xsives in attendance try it out if they want to. Yes....like I said, F-UGLY tank, will be doing an XJ tank conversion later this summer, just not enough time before the rally, and I have to teach myself airbrushing, among other stuff! Should be a fun project when I get to it!
T.C.T. C. Gresham
81SH "Godzilla" . . .1179cc super-rat.
79SF "The Teacher" . . .basket case!
History shows again and again,
How nature points out the folly of men!Comment
-
F-UGLY tank
I dun know,
think it looks pretty good in pics, claws kinda cool too
XSpecially on a special Godzilla XS.........
mro
just thought I'd mention the dent before Prom did
Comment


Comment