Announcement

Collapse
No announcement yet.

Hydraulic Clutch Mod (finally complete)

Collapse
X
 
  • Filter
  • Time
  • Show
Clear All
new posts

  • Hydraulic Clutch Mod (finally complete)

    Today I rushed home to finish up my hydro clutch conversion. Final opinion... AWESOME!!!

    I took a bunch of pics and will do a full write-up tonight. The whole project cost me under $40.

    The only disapointment is that it requires only slightly less pressure to engage than with the cable. But, when starting from a stop, it is just SO SMOOTH. Really, nice.

    Will finish post tonight!
    '81 XS1100 SH

    Melted to the ground during The Valley Fire

    Sep. 12th 2015

    RIP

  • #2
    Looking forward to seeing that!
    80 XS1100SG
    81 XS400SH

    Some men miss opportunity because it is dressed in overalls and looks like work. - Thomas Edison

    A Few Animations I've Made

    Comment


    • #3
      Oh Goody,

      Another tech tip that "I" won't have to type up! Looking forward to seeing the works! Keep this up, and you could be in for a promotion to Moderator!
      T.C.
      T. C. Gresham
      81SH "Godzilla" . . .1179cc super-rat.
      79SF "The Teacher" . . .basket case!
      History shows again and again,
      How nature points out the folly of men!

      Comment


      • #4
        Alright, I'm back and done editing the pictures.

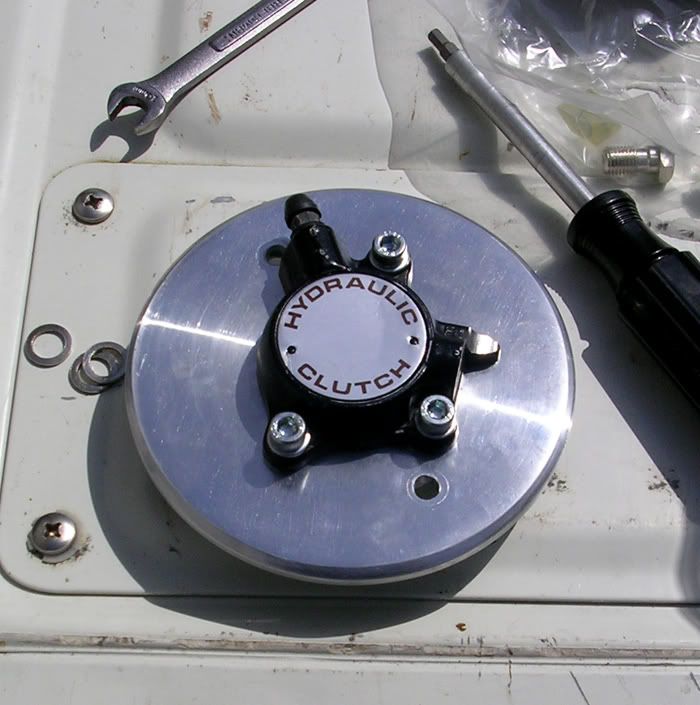
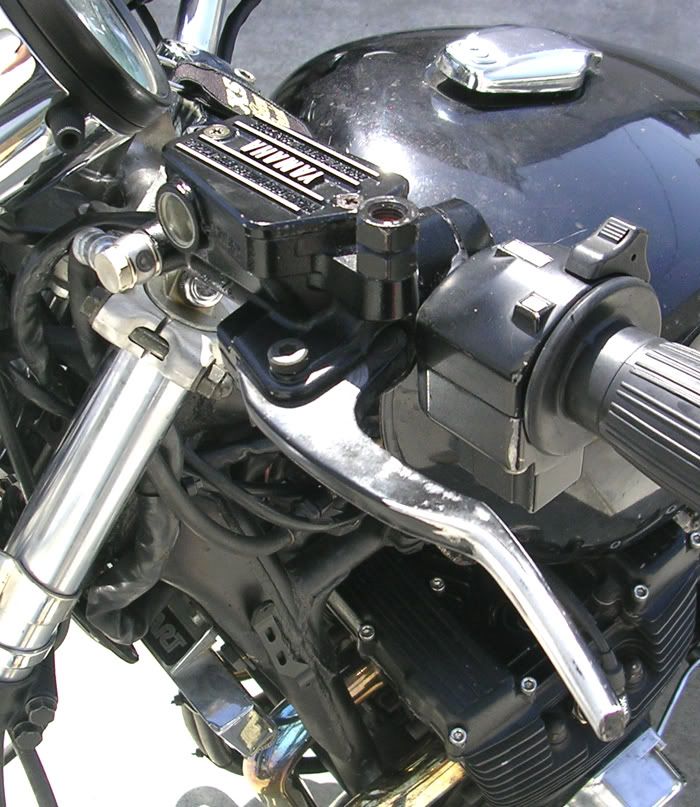
        So, the clutch master cylinder and line are off of an '85-'86 FJ1100-1200. I was going to use the slave too, but it was too large. I think it cost me around $25 off ebay. The slave is off of a ('85, I think?) Honda VF500/VF600 (appx. $15 off ebay). It is a very low profile slave as I was worried that having some thing protruding would be in the way of where my right foot rides. The line by itself is too short as the FJ clutch is on the left side of the motor.


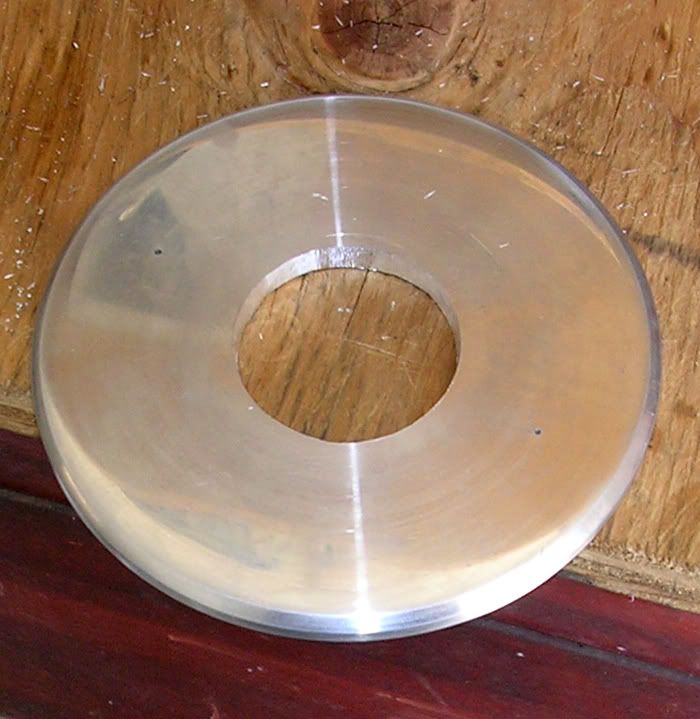
        I started out by tracing the stock clutch adjustment cover on a piece of scrap 5/16" aluminum plate ($0 ). I used a compass to draw out the right size circle and then reduced the spread of the compass to half the diameter and drew a series of small arcs from various locations centered on the outside of the circle. Where all the little arcs intersected was where I marked for the center of the plate. I also marked out the mounting holes, but should have waited to do this until after the next step. Then I cut the circle out of the circle out with a jigsaw.

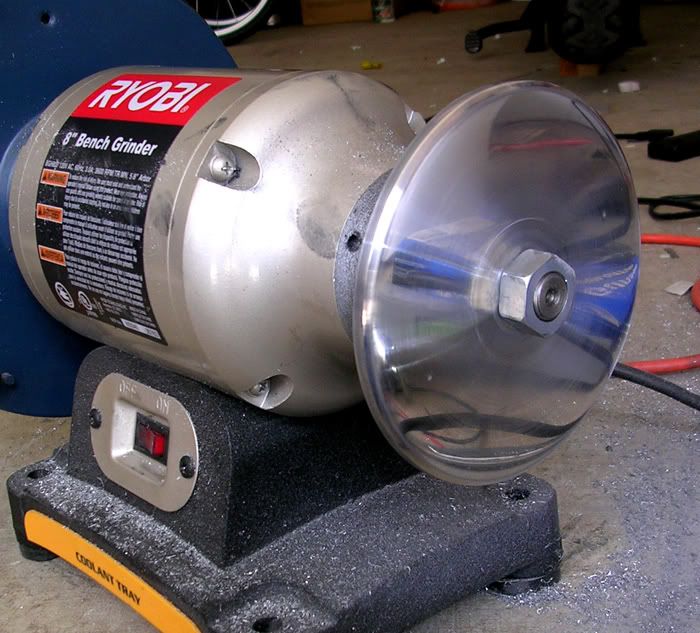
        I drilled a 5/8" hole in the center and mounted the roughly circular plate on my bench grinder to make what I like to call The Hillbilly Lathe .


        I used an old file sprayed down with WD40 and with the grinder spinning, worked down the plate until it was true and the right diameter. Then I put a slight bevel on the outer edge because my plate is thicker than the stock one.

        After it was the right size and shape, I started with 180 grit WD sand paper and with a little spritz of oil on the paper sanded it while it was spinning. I worked it with finer and finer paper, 220, 400, 600, and 1500. If you don't oil the paper, little balls of material will build up and scratch the surface. Some day I will buff and polish, but for now it will do.


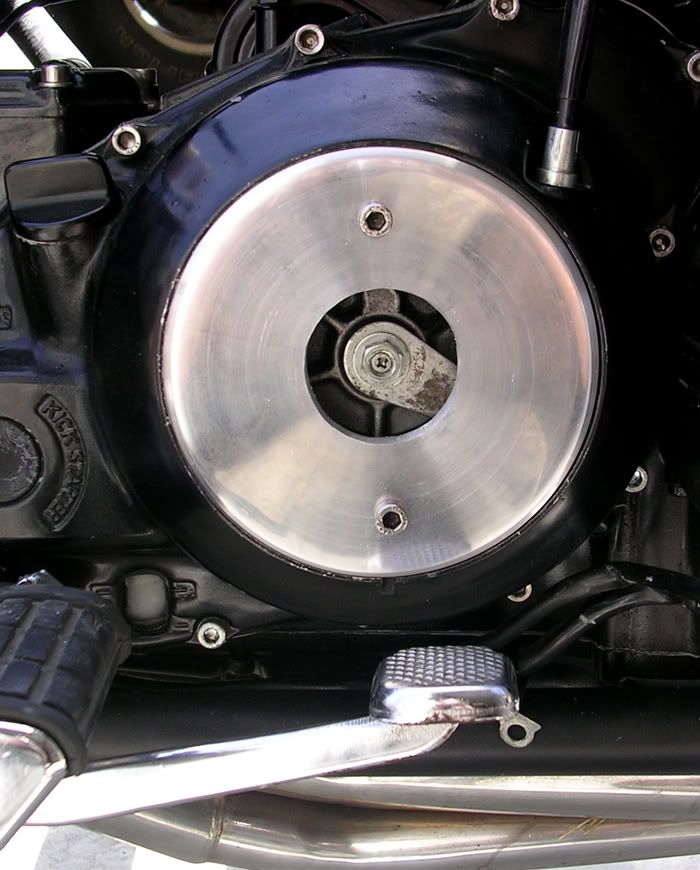
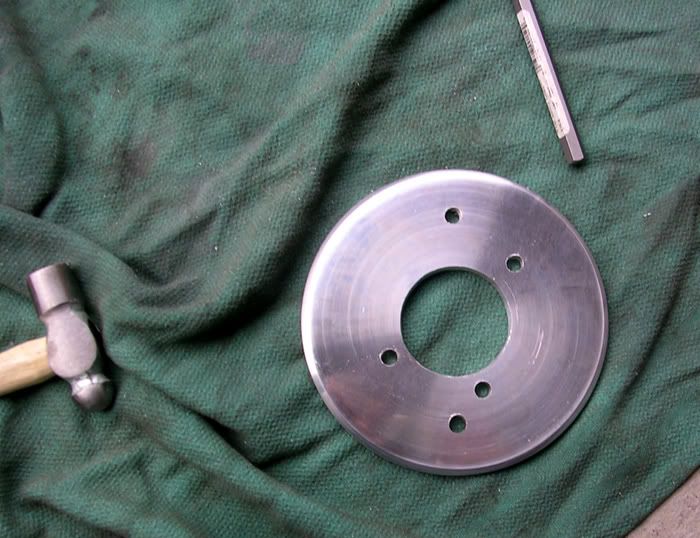
        I got carried away and forgot to take pics of cutting out the center hole whare the slave mounts into. I ended up measuring it from the outside of the circle in, making a dot with a marker while the grinder was off, and then marking it on the plate while it was spinning. I took it off the grinder, drilled holes all the way around to make cutting with a jigsaw easier, and cleaned it up to fit the slave nice and snug with a dremel. This is the point where I should have measured out and marked my mounting holes. I drilled them out and gave it a test mount. I ended up having to do a little filing with a round file to get it just right. But you can't see it, so who cares.


        I then marked and drilled the mounting holes for the slave and mounted it.


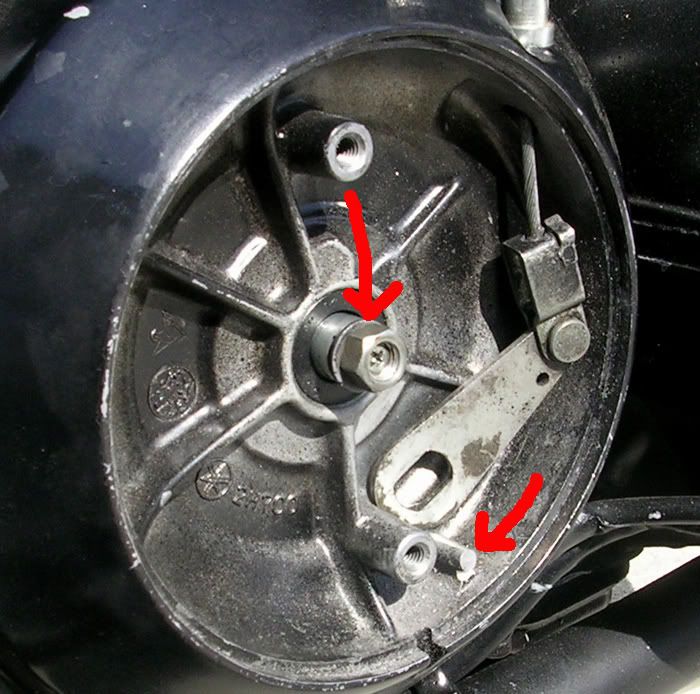
        The slave had a little bushing that held whatever pushrod the FJ uses for the clutch in place against the slave piston. I studied the setup and decided that what is on the XS would work just fine. So, I removed that little bushing thing from the slave piston (I should have taken pics of that too , sorry).

        I adjusted the clutch screw so that there was just a little in and out slack and replaced the thin adjustment locknut with a normal size 7mm nut. This nut fits up in the slave piston great. I also cut off the little nipple that the clutch arm spring is hooked to because it sticks out farther than the plate mounting surface (lower right arrow).


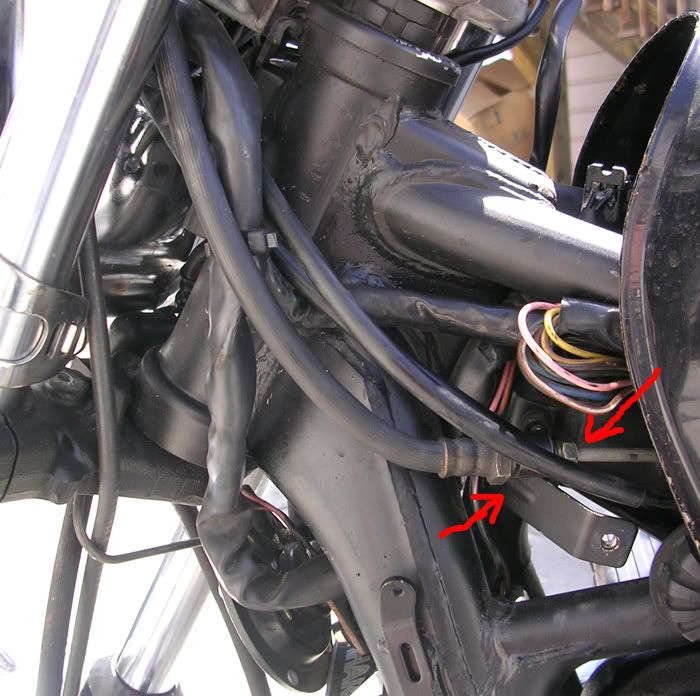
        I took the metal section from the original FJ line to a local auto parts store and got a 40" line for under $5 (way too long as you can see in the first pic below, 32-34 would have been better). It runs from just to the rear and left side of the neck, next to the coils, along the frame, across to the right side, and down between the 3 and 4 intakes. I zip-tied it to the fram and need to get a little bracket to put on the upper-right clutch housing cover bolt.


        After that, I mounted everything hooked it up, and bled it with DOT5.


        I still need to replace the broken clutch lever that came with the master. They apparently don't make aftermarkets for hydros and Yamaha wanted $23 for one. I may end up getting it after seeing that Bikebandit wants $25. Again, I can't tell you how incredibly smooth the action is. You really notice it when starting from a stop.

        The plate is pretty much the only thing that isn't plug and play here. If a lot of folks are interested in this, maybe one of these guys with mills and lathes can fab up a bunch. It would be REALLy easy if you actually had the proper tools, unlike myself.

        Another slave that looked promising was off some mid '80's Goldwings. On larger bikes like these, the slaves might require less force. This new setup requires only a little less force than it did with a brand new and freshly lubed Barrett cable. Riding it today, I don't think my foot ever came close to touching the slave, which was an initial concern of mine.
        '81 XS1100 SH

        Melted to the ground during The Valley Fire

        Sep. 12th 2015

        RIP

        Comment


        • #5
          Is the original plate too light to just use it , is that why you made one outta aluminum? Great job by the way!
          Doug
          Doug Mitchell
          82 XJ1100 sold
          2006 Suzuki C90 SE 1500 CC Cruiser sold
          2007 Stratoliner 1900 sold
          1999 Honda Valkyrie interstate
          47 years riding and still learning, does that make me a slow learner?

          Comment


          • #6
            I think it is too light. Not only that, but it is convex too which would make mounting the slave difficult.
            '81 XS1100 SH

            Melted to the ground during The Valley Fire

            Sep. 12th 2015

            RIP

            Comment


            • #7
              way cool

              Originally posted by 81xsproject
              ......The plate is pretty much the only thing that isn't plug and play here. If a lot of folks are interested in this, maybe one of these guys with mills and lathes can fab up a bunch. It would be REALLy easy if you actually had the proper tools, unlike myself.
              I move to nominate xschop to provide these plates (along with his other billet parts) to the rest of us (me included) that have no fabricating skills or equipment.

              Only one question, will the hydraulic clutch further reduce the wheelie factor? I've yet to raise the front wheel on my LH no matter how hard I try

              Comment


              • #8
                WOW, nice work! Very clean looking!

                That seems too easy not to try. I like the reliability acpect of a hydraulic clutch more than anything. Getting a lighter feel would be gravy.

                Would that flexible braided SS brake line work for the clutch, too? May cost a little more, but would look sooo nice.

                That's got my gears whirring. What about making a bowl-like peice out of aluminum and mounting the slave inside it? Hmmmm....

                Great job!!
                80 XS1100SG
                81 XS400SH

                Some men miss opportunity because it is dressed in overalls and looks like work. - Thomas Edison

                A Few Animations I've Made

                Comment


                • #9
                  Okay, went out on the bay and found a lever for $5, that is better. Plus, the master from a V-Max is nearly identical to the FJ. I might look to get a brake master from an FJ so that they match and I don't have to look at that nasty yellow plastic anymore.
                  '81 XS1100 SH

                  Melted to the ground during The Valley Fire

                  Sep. 12th 2015

                  RIP

                  Comment


                  • #10
                    Nice work, Jessie!. This needs to be in the Mods section. Are you reading this T.C.?

                    Comment


                    • #11
                      Awesome work.
                      1980 XS1100g

                      Comment


                      • #12
                        ThanXS guys. The braded like would be nice to. However, you still have to route it somewhere. The nice thing about the steel line is that it can be routed a little more discretely. Even though you guys have seen the guts in my pics, with carbs on and everything bolted up, you don't see ANY of the metal line. Braided SS would look good at the ends where the stock FJ rubber line is.


                        JW, I think that you would be making an even higher/farther out protruding feature with the dome cover, plus you would have to build some mounts for the slave underneath. But it sure would look cool
                        Last edited by 81xsproject; 04-28-2007, 05:19 PM.
                        '81 XS1100 SH

                        Melted to the ground during The Valley Fire

                        Sep. 12th 2015

                        RIP

                        Comment


                        • #13
                          Mismatch?

                          Hi 81XS,
                          congratulations, that's a sweet job. I suspect the feel is heavier then you hoped to get because the piston area ratio between the Yamaha lever and the Honda actuator ain't quite right. I betcha the piston in the Honda lever is a tad smaller than the piston in the Yamaha unit you have used. A smaller piston in the lever will give a lighter feel and a longer travel. Try if you can find the Honda lever that is meant to go with the actuator and see if the feel you get with it is nearer to what you expected.
                          Fred Hill, S'toon.
                          BTW, myself at the primative "Mr Bodger" end of clutch modification cut the clutch actuating force nearly in half simply by re-routing the cable from it's tortuous path under the tank. My first try had the cable in a single giant swoop from the lever to the engine case. That felt really light but the cable ran right across both gauge faces. I compromised and deked it through the forks so it's one giant swoop with a wiggle in it. It still feels far lighter than it was.
                          F.
                          Fred Hill, S'toon
                          XS11SG with Spirit of America sidecar
                          "The Flying Pumpkin"

                          Comment


                          • #14
                            This thread is one of the best i have ever seen

                            Theres a few Uk XS Owners looking into this mod ,,and a few other Europeans allready done this ,,there were a few areas some wanted more detail on ,,this Thread has solved all of that

                            Anyway ,,i put a link to this Thread on the Uk forum (hope this is ok ??)

                            In europe there is a bike called a Thunderace (1000cc)
                            I am sure this is the bike a European took the master cylinder from to get the perfect ratio's etc ??
                            http://s61.photobucket.com/albums/h5...t=DSCF0031.jpg


                            Did you get the Thunderace in USA ??

                            Anyway if it works with those parts from FJ and VF that is peeeeeeeeeeeeeeeeeeeeeeeerfeeeect !!

                            A big thankyou from allot of peeps i am sure !!!


                            Gaffer
                            Last edited by gaffer77; 04-29-2007, 01:40 AM.
                            Don't put all yer eggs into one basket ,,,case

                            Comment


                            • #15
                              Sorry posted pic and can't see the master cylinder

                              Can't really see the master cyl sorry

                              http://s61.photobucket.com/albums/h5...t=DSCF0029.jpg
                              Last edited by gaffer77; 04-29-2007, 02:04 AM.
                              Don't put all yer eggs into one basket ,,,case

                              Comment

                              Working...
                              X