 Tweet
Tweet
I have learned so much from this forum, and now it's my turn to give something back. After much head scratching and sacrificing spare parts, I finally figured out how to rebuild leaking rear air shocks on an XJ1100, and it's surprisingly easy!
First, remove the boot from around the lower tube, remove the air hoses and fittings, and tip the shock upside down to drain out as much of the old oil as possible. Then, use a large crescent wrench to unscrew the lower mount (RH thread) while holding the lower shock tube from rotating (I used some thick rubber between my vice jaws and the tube). Once you get it broken loose, it will come off quite easily.
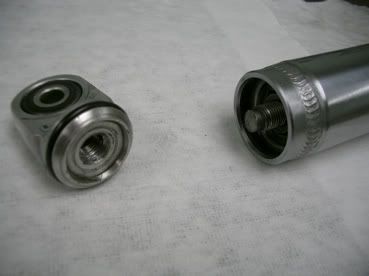
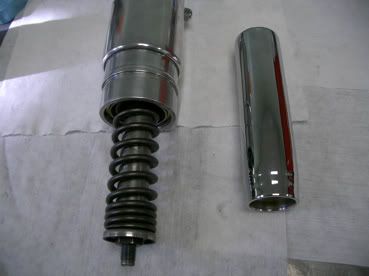
Now you can slide the lower shock tube off the spring.
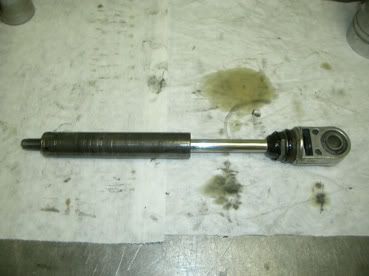
Note the longitudinal scoring on the shock tube at the upper end (RH side in this photo). This is typical of 3 different sets of shocks I have. It seems that the material for this tube is quite soft. Once it get scored like this, replacing the seal by itself will not fix the leak.
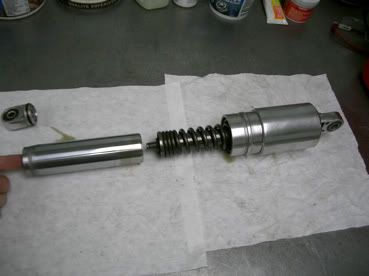
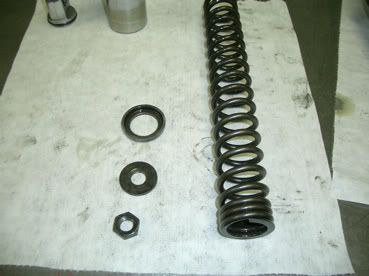
With the lower shock tube out of the way, you will see a nut on the bottom that holds the spring in compression. I just held onto the spring (with some good leather gloves) and zipped this nut off with an impact gun, letting the upper part of the shock skid away from me on the work bench (not a problem because I intended to polish the upper bodies anyway). There's not that much compression left in the spring by the time the nut clears the threads.
With the nut off, you can remove the washer, cupped washer and spring from the damper unit. Once you get that out of the way, simply push the damper unit in towards the upper body until it bottoms out and then give it another push and the damper unit and the upper mounting eye will pop out of the upper body as an assembly.
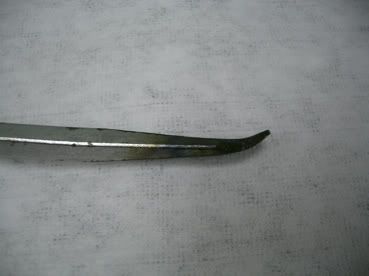
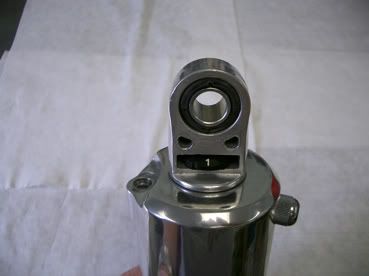
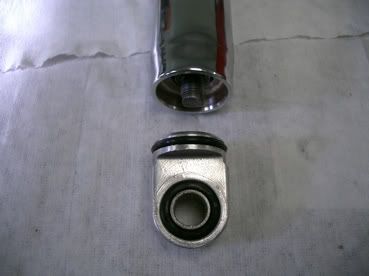
Now all that's left is to remove the seal from the upper body. First you need to remove the snap ring and back-up washer from the body. Then I turned the upper body right-side-up and used an old screwdriver (heated and bent to fit) through the hole in the top to drive out the seal. The original seal has a rigid outer diameter, and it's a pretty tight fit in the housing. I tried other methods on some of my spare shocks, and ended up gouging either the ID of the body, or the OD of the shock tube.


That's it for the dismantle. I don't recommend dismantling the damper unit from the upper mounting eye. I tried this on my first "guinea pig" shock, and never did figure out how to get it back together properly.
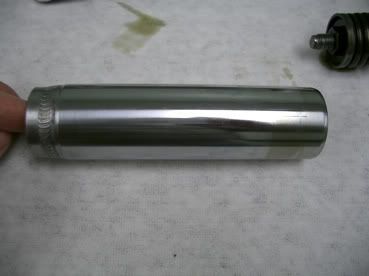
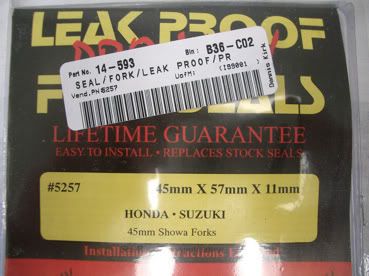
I took the scored lower shock tubes to my local chrome shop and had them chrome plated. I figure the chrome gives a nice smooth seal surface and it's harder than whatever the base material is, so hopefully it will wear better. I also found a cross-reference for "Leak-Proof" seals that allowed me to match a new set of seals by size. I like the "Leak-Proof" type seals because they have a soft sealing surface on both the inner and outer diameters, so if I ever have to replace them again, I can probably pop them out easily without even removing the lower shock tube. The correct size is 45 mm x 57 mm x 11 mm, and the OEM part number for the "Pro-Moly" version is #5257. I bought mine from Dennis Kirk; their internal part number is 14-593.
Assembly is just the reverse of the dismantle. I took a good look at the o-rings on the upper and lower mounting eyes, and since none of them had any flat spots, I re-used them. I cleaned up the corresponding o-ring bores and used a bit of petroleum jelly to help them slide in without catching. First, install the damper unit / upper mounting eye assembly into the upper body. Note that I took the opportunity to clean and polish things up a bit.
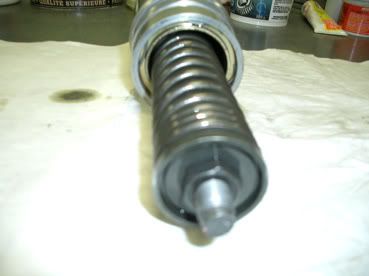
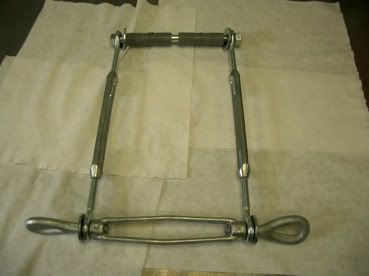
I made a simple spring compressor out of three turn-buckles, a long 1/2" bolt and a couple of plastic hose nipples (for spacers). I bent the center part of one of the turn-buckles to open it up enough to provide clearance for the nut. Install the spring, cupped washer and flat washer over the damper unit and compress the spring so that you can thread the nut down as far as possible by hand. I used some locktite on the threads for a little insurance.
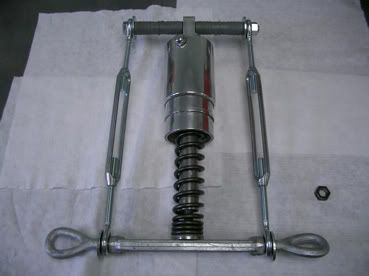
I stuck a wrench over the nut and then squeezed the tip of the male thread in a vise to allow me to tighten the nut snuggly. It's probably not that critical, because the lower shock tube locks the nut in place anyway. (Note the many other XJ1100 parts cluttering up the workbench!!!)
Once I had the spring locked in place, I installed the new seal. I purposely left this until close to the end so that I didn't damage the seal while installing the spring.

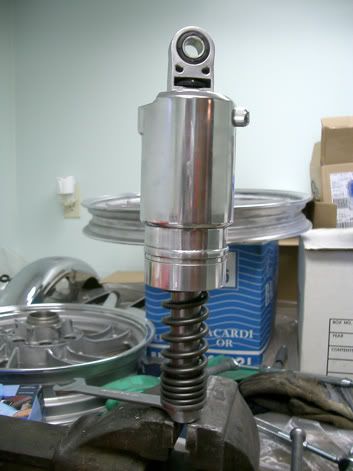
All that's left now is to re-install the lower shock tube (with a little oil to help slide through the seal), and then re-install the lower mounting eye. Once again, I used some locktite on the threads to help keep things together. I used a strap wrench with a rubber band to hold the lower shock tube while tightening the mounting eye. This seemed to work OK and didn't damage the new chrome finish. As a precaution, hold the shock tube as far down as possible while doing this, so that even if you do make a mark on the finish, it will be well outside the normal range of motion of the tube.

Once the shock is assembled, fill it with shock oil to 2.95 inches from the outer (top) surface of the upper body (where the air hose attaches). You can use the depth probe of a vernier caliper for measuring this.
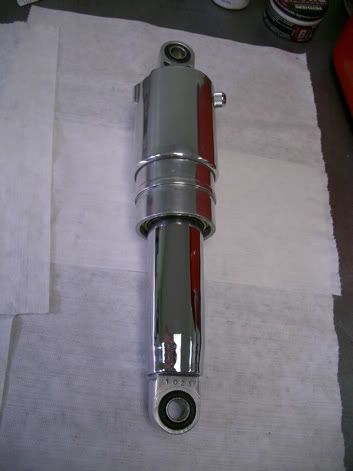
That's all there is to it! I now have a beautiful set of original shocks for my Maxim, that are probably better than new due to the harder chrome wear surface. They look so good, I'm tempted to leave the boots off, but they probably help keep dust out of the seal and prolong the life of the shocks.
Total cost to rebuild both shocks was around $100 US, including the new seals, chrome plating of the lower tubes, miscellaneous hardware for the spring compressor and shock oil.
First, remove the boot from around the lower tube, remove the air hoses and fittings, and tip the shock upside down to drain out as much of the old oil as possible. Then, use a large crescent wrench to unscrew the lower mount (RH thread) while holding the lower shock tube from rotating (I used some thick rubber between my vice jaws and the tube). Once you get it broken loose, it will come off quite easily.
Now you can slide the lower shock tube off the spring.
Note the longitudinal scoring on the shock tube at the upper end (RH side in this photo). This is typical of 3 different sets of shocks I have. It seems that the material for this tube is quite soft. Once it get scored like this, replacing the seal by itself will not fix the leak.
With the lower shock tube out of the way, you will see a nut on the bottom that holds the spring in compression. I just held onto the spring (with some good leather gloves) and zipped this nut off with an impact gun, letting the upper part of the shock skid away from me on the work bench (not a problem because I intended to polish the upper bodies anyway). There's not that much compression left in the spring by the time the nut clears the threads.
With the nut off, you can remove the washer, cupped washer and spring from the damper unit. Once you get that out of the way, simply push the damper unit in towards the upper body until it bottoms out and then give it another push and the damper unit and the upper mounting eye will pop out of the upper body as an assembly.
Now all that's left is to remove the seal from the upper body. First you need to remove the snap ring and back-up washer from the body. Then I turned the upper body right-side-up and used an old screwdriver (heated and bent to fit) through the hole in the top to drive out the seal. The original seal has a rigid outer diameter, and it's a pretty tight fit in the housing. I tried other methods on some of my spare shocks, and ended up gouging either the ID of the body, or the OD of the shock tube.
That's it for the dismantle. I don't recommend dismantling the damper unit from the upper mounting eye. I tried this on my first "guinea pig" shock, and never did figure out how to get it back together properly.
I took the scored lower shock tubes to my local chrome shop and had them chrome plated. I figure the chrome gives a nice smooth seal surface and it's harder than whatever the base material is, so hopefully it will wear better. I also found a cross-reference for "Leak-Proof" seals that allowed me to match a new set of seals by size. I like the "Leak-Proof" type seals because they have a soft sealing surface on both the inner and outer diameters, so if I ever have to replace them again, I can probably pop them out easily without even removing the lower shock tube. The correct size is 45 mm x 57 mm x 11 mm, and the OEM part number for the "Pro-Moly" version is #5257. I bought mine from Dennis Kirk; their internal part number is 14-593.
Assembly is just the reverse of the dismantle. I took a good look at the o-rings on the upper and lower mounting eyes, and since none of them had any flat spots, I re-used them. I cleaned up the corresponding o-ring bores and used a bit of petroleum jelly to help them slide in without catching. First, install the damper unit / upper mounting eye assembly into the upper body. Note that I took the opportunity to clean and polish things up a bit.
I made a simple spring compressor out of three turn-buckles, a long 1/2" bolt and a couple of plastic hose nipples (for spacers). I bent the center part of one of the turn-buckles to open it up enough to provide clearance for the nut. Install the spring, cupped washer and flat washer over the damper unit and compress the spring so that you can thread the nut down as far as possible by hand. I used some locktite on the threads for a little insurance.
I stuck a wrench over the nut and then squeezed the tip of the male thread in a vise to allow me to tighten the nut snuggly. It's probably not that critical, because the lower shock tube locks the nut in place anyway. (Note the many other XJ1100 parts cluttering up the workbench!!!)
Once I had the spring locked in place, I installed the new seal. I purposely left this until close to the end so that I didn't damage the seal while installing the spring.
All that's left now is to re-install the lower shock tube (with a little oil to help slide through the seal), and then re-install the lower mounting eye. Once again, I used some locktite on the threads to help keep things together. I used a strap wrench with a rubber band to hold the lower shock tube while tightening the mounting eye. This seemed to work OK and didn't damage the new chrome finish. As a precaution, hold the shock tube as far down as possible while doing this, so that even if you do make a mark on the finish, it will be well outside the normal range of motion of the tube.
Once the shock is assembled, fill it with shock oil to 2.95 inches from the outer (top) surface of the upper body (where the air hose attaches). You can use the depth probe of a vernier caliper for measuring this.
That's all there is to it! I now have a beautiful set of original shocks for my Maxim, that are probably better than new due to the harder chrome wear surface. They look so good, I'm tempted to leave the boots off, but they probably help keep dust out of the seal and prolong the life of the shocks.
Total cost to rebuild both shocks was around $100 US, including the new seals, chrome plating of the lower tubes, miscellaneous hardware for the spring compressor and shock oil.


Comment