Announcement

Collapse
No announcement yet.

LED Driving Lamps (CREE U2)

Collapse
X
 
  • Filter
  • Time
  • Show
Clear All
new posts

  • LED Driving Lamps (CREE U2)

    XS Friends,
    At the recent Stecoah XSSE '16 Rally several people asked about the LED driving lamps on my XS11's. Although often products from China are less than expected, these lamps were MUCH MORE and HIGHER QUALITY than I expected (having purchased some real JUNK from China in the past). They are an aluminum body available in either Black or Natural.


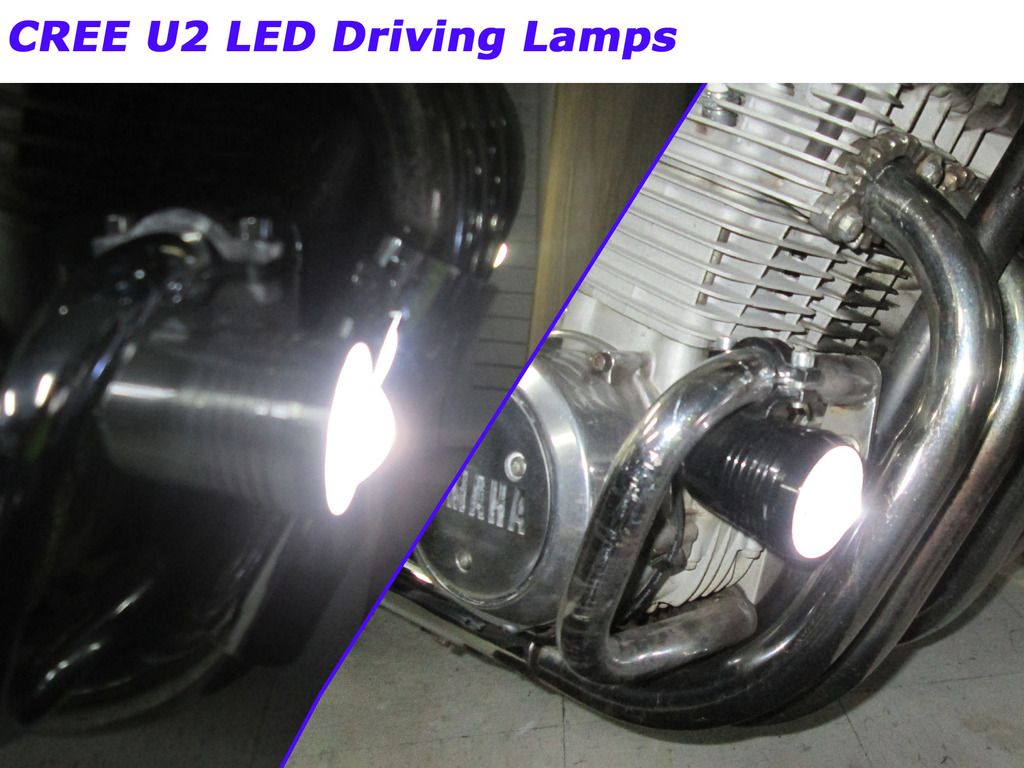
    These lamps are "CREE LED U2" lamps. They are very inexpensive at less than $20 per pair (shipped). I purchased mine from CHINA seller "Autodaby", I've purchased three(3) sets from him. During the rally one of our members found them on Amazone in the U.S. for about $16. Shipping time from China was several weeks.

    Originally, these were purchased and installed only for SEE ME purposes. However, they are absolutely fantastic at lighting the highway and a great driving benefit. They claim to be good for 200 meters and I believe that is very true.
    • I installed mine on the engine guards.
    • The wiring was ran the long way around the back of the motor to avoid potential problems with the hot exhaust.
    • I incorporated the lamp wiring with the existing generator wiring (R) and ignition pick-ups wiring (L) to make for a cleaner install.
    • All wiring was terminated in the headlamp and a switch was added using the instrument cluster mounting bolt behind the tachometer.
    • The wiring provided on each lamp is approximately 12" and must obviously be extended to reach the headlamp.
    • No on/off switch is provided. I purchased weather resistant switches from the local auto parts store.


    INSTALLATION & OPERATIONAL NOTE: The lamps have three modes of operation: Low, High, FLASH. When installed, you MUST align them to the same mode. This is easily accomplished by removing the GROUND from one and making sure they are at the same "position" when connections are finalized. Quickly cycling the switch off/on changes the modes. Merely turning them off or on normally will not change the mode. You must verify the modes and adjust or one will be flashing while the other is on High beam and then vice-versa.

    http://www.ebay.com/itm/2x-30W-Motor...ZW-4T4&vxp=mtr

    I highly recommend these lamps for "SEE ME" and for driving purposes.

    Sincerely,
    Kurt Boehringer
    Peachtree City, Georgia

    1970 - CT70K0 - Mini-Trail
    1978 - SR500 - Thumper
    1979 - CT70H - Mini-Trail
    1979 - XS1100SF - Pensacola
    1980 - XS850SG - Rocky
    1980 - XS1100SG - The Ugly Duck
    1980 - XS1100SG - Mayberry Duck
    1981 - XS1100SH - DEAD Duck Cafe'
    1981 - XJ550 Maxim - Nancy's Mini-Max
    1982 - XJ650 SECA - Hurricane
    1986 - FJ1200 - Georgia Big Red
    1992 - FZR1000 - Genesis
    2016 - FJR1300A - Montgomery

  • #2
    Nice. I have Cree lamps on both of my daily riders. They def help.
    1979 XS1100F
    2H9 Mod, Truck-Lite LED Headlight, TECHNA-FIT S/S Brake Lines, Rear Air Shocks, TKAT Fork Brace, Dyna DC-I Coils, TC Fuse Block, Barnett HD Clutch Springs, Superbike Handlebars, V-Star 650 ACCT, NGK Irridium Plugs, OEM Exhaust. CNC-Cut 2nd Gear Dogs; Ported/Milled Head; Modded Airbox: 8x8 Wix Panel Filter; #137.5 Main Jet, Viper Yellow Paint, Michelin Pilot Activ F/R, Interstate AGM Battery, 14MM MC, Maier Fairing, Cree LED Fog Lights.

    Comment


    • #3
      Thats funny I just ordered these same lights a few days ago.
      Nathan
      KD9ARL

      μολὼν λαβέ

      1978 XS1100E
      K&N Filter
      #45 pilot Jet, #137.5 Main Jet
      OEM Exhaust
      ATK Fork Brace
      LED Dash lights
      Ammeter, Oil Pressure, Oil Temp, and Volt Meters

      Green Monster Coils
      SS Brake Lines
      Vision 550 Auto Tensioner

      In any moment of decision the best thing you can do is the right thing, the next best thing is the wrong thing, and the worst thing you can do is nothing.

      Theodore Roosevelt

      Comment


      • #4
        Mark and I are ordering these...should be here in a month or so...I got a good look at yours in action and indeed they are excellent to be seen and look like seeing with them works well too...cant beat the price but one has to wonder how long thet'll last...still at that price its worth a try...Thanks for leading the way...
        1980 XS650G Special-Two
        1993 Honda ST1100

        Comment


        • #5
          Just ordered a set from your link. I will let you know how they work when they come in. Thanks
          81 XS11

          Comment


          • #6
            Received my order

            I ordered on Sat Feb 18th and they arrived at work today Mar 8th so less than 3 weeks, including going through internal mail to my mail slot.

            Pretty fast all the way from China considering they only added $1.50 for shipping! Total was $19.80 USD

            Nice looking product. Could not get photobucket to give me a link to copy....again....efn photobucket!

            There is nothing in the box to explain the function or wiring, just the light, the clamp and screws.

            So now I need to figure out the rest and despite searching didn't see anything beyond Kurt's description with a weatherproof switch. Any suggestions will be welcome for my electrically challenged mind.

            These look cool. http://www.ebay.com/itm/1X-Black-Mot...xXhZ2N&vxp=mtr

            So you guys just cycle through high, low flashing every time you use the lights?
            Last edited by dbbrian; 03-08-2017, 07:33 PM.
            '78 XS1100E (the newest bike I've ever owned)
            '74 CB350F1 (under restoration)
            '72 RT2 MX360 (gone but not forgotten)

            Comment


            • #7
              Headlight Switch

              Could I re-purpose the un-used headlight switch? (Canadian law - headlight is always on)
              '78 XS1100E (the newest bike I've ever owned)
              '74 CB350F1 (under restoration)
              '72 RT2 MX360 (gone but not forgotten)

              Comment


              • #8
                Wiring Instructions.....

                Originally posted by dbbrian View Post
                Could I re-purpose the un-used headlight switch? (Canadian law - headlight is always on)
                Brian,
                Sure, you can re-purpose that switch. But, it will be a lot more work.

                Here's what I've done for three XS11's.:
                You've got two wires per lamp (1 ground, 1 power).
                • Tie the powers together and get 'em to the fuse box or accessory block below it. Done with those.
                • Now run the grounds to wherever you plan to put the switch.

                I fabricated a small bracket and placed it just below the tachometer between it and the handlebars using the tach/speedo bracket bolt (which had to be replaced with a slightly longer bolt to accommodate the extra bracket).
                • Tie one end terminal of your switch to a GOOD ground. Use a decent piece of wire with a good eyelet and heat shrink the terminal connections well.
                • Tie the TWO grounds from the lamps to the opposite side. Done..... now play with your new lamps!

                You will be breaking the ground NOT the power. Why? IF this switch does get wet it won't blow the breaker or cause some other shorting it will merely turn the lights on by creating a ground condition!

                Remember the note above.... You have to make sure the lamps are on the same setting. They will go from: low, high, flash. To get them to the same mode you have to check them by grounding the leads your putting on the switch. Just touch them to the frame one at a time to determine they are on the same mode. Then tie them together and onto the switch terminal. If you activate the switch on/off very quickly they will change modes. Otherwise they will remain in the same state.

                Simple....

                KURT
                Kurt Boehringer
                Peachtree City, Georgia

                1970 - CT70K0 - Mini-Trail
                1978 - SR500 - Thumper
                1979 - CT70H - Mini-Trail
                1979 - XS1100SF - Pensacola
                1980 - XS850SG - Rocky
                1980 - XS1100SG - The Ugly Duck
                1980 - XS1100SG - Mayberry Duck
                1981 - XS1100SH - DEAD Duck Cafe'
                1981 - XJ550 Maxim - Nancy's Mini-Max
                1982 - XJ650 SECA - Hurricane
                1986 - FJ1200 - Georgia Big Red
                1992 - FZR1000 - Genesis
                2016 - FJR1300A - Montgomery

                Comment


                • #9
                  Originally posted by dbbrian View Post
                  I ordered on Sat Feb 18th and they arrived at work today Mar 8th so less than 3 weeks, including going through internal mail to my mail slot.

                  Pretty fast all the way from China considering they only added $1.50 for shipping! Total was $19.80 USD

                  Nice looking product. Could not get photobucket to give me a link to copy....again....efn photobucket!

                  There is nothing in the box to explain the function or wiring, just the light, the clamp and screws.

                  So now I need to figure out the rest and despite searching didn't see anything beyond Kurt's description with a weatherproof switch. Any suggestions will be welcome for my electrically challenged mind.

                  These look cool. http://www.ebay.com/itm/1X-Black-Mot...xXhZ2N&vxp=mtr

                  So you guys just cycle through high, low flashing every time you use the lights?
                  Yes...Mine are not wired to a ignition switch so they are always on..even with the battery/engine off...Just the way Mark wired them..but it is taking me some time to be accustomed to remembering to turn the lights off wwhen i turn off the engine...a couple times i did forget ...not a big deal since they draw so little current...
                  But the light output is excellent and i love mine...
                  1980 XS650G Special-Two
                  1993 Honda ST1100

                  Comment


                  • #10
                    Originally posted by kboehringer View Post
                    Brian,
                    Sure, you can re-purpose that switch. But, it will be a lot more work.

                    Here's what I've done for three XS11's.:
                    You've got two wires per lamp (1 ground, 1 power).
                    • Tie the powers together and get 'em to the fuse box or accessory block below it. Done with those.
                    • Now run the grounds to wherever you plan to put the switch.

                    I fabricated a small bracket and placed it just below the tachometer between it and the handlebars using the tach/speedo bracket bolt (which had to be replaced with a slightly longer bolt to accommodate the extra bracket).
                    • Tie one end terminal of your switch to a GOOD ground. Use a decent piece of wire with a good eyelet and heat shrink the terminal connections well.
                    • Tie the TWO grounds from the lamps to the opposite side. Done..... now play with your new lamps!

                    You will be breaking the ground NOT the power. Why? IF this switch does get wet it won't blow the breaker or cause some other shorting it will merely turn the lights on by creating a ground condition!

                    Remember the note above.... You have to make sure the lamps are on the same setting. They will go from: low, high, flash. To get them to the same mode you have to check them by grounding the leads your putting on the switch. Just touch them to the frame one at a time to determine they are on the same mode. Then tie them together and onto the switch terminal. If you activate the switch on/off very quickly they will change modes. Otherwise they will remain in the same state.

                    Simple....

                    KURT
                    Nice explanation..Thank you...at some point in the future i will want to rewire these so that the above features you describe are incorporated into mine..and again Thankyou for finding these and passing them along...
                    BTW these are dual LEDs..U2 and U3 @30w..Info is in small print on the
                    box..
                    Last edited by madmax-im; 03-08-2017, 09:20 PM.
                    1980 XS650G Special-Two
                    1993 Honda ST1100

                    Comment


                    • #11
                      Originally posted by dbbrian View Post
                      So you guys just cycle through high, low flashing every time you use the lights?
                      Forgot to answer this question....

                      NO. I have mine on HIGH. When I turn them off then back on for the next ride they are on HIGH still. Only by QUICKLY flicking them off/on will they change state.

                      On a rare occasion when I feel I need more attention (busy intersection or some idiot on the phone texting) I flick 'em off/on until they are in flash mode. Later, I flick 'em off/on until they return to high mode. From that point forward assuming I don't flick 'em quickly they will remain in the high mode.

                      KURT
                      Kurt Boehringer
                      Peachtree City, Georgia

                      1970 - CT70K0 - Mini-Trail
                      1978 - SR500 - Thumper
                      1979 - CT70H - Mini-Trail
                      1979 - XS1100SF - Pensacola
                      1980 - XS850SG - Rocky
                      1980 - XS1100SG - The Ugly Duck
                      1980 - XS1100SG - Mayberry Duck
                      1981 - XS1100SH - DEAD Duck Cafe'
                      1981 - XJ550 Maxim - Nancy's Mini-Max
                      1982 - XJ650 SECA - Hurricane
                      1986 - FJ1200 - Georgia Big Red
                      1992 - FZR1000 - Genesis
                      2016 - FJR1300A - Montgomery

                      Comment

                      Working...
                      X